Casio EX Z85 Owners Manual - Page 31
Tips for Better Auto Shutter Snapshots, Some BEST SHOT sample scenes ID Photo, White board, etc. - problem
 |
UPC - 079767624071
View all Casio EX Z85 manuals
Add to My Manuals
Save this manual to your list of manuals |
Page 31 highlights
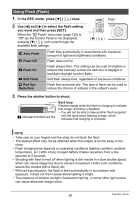
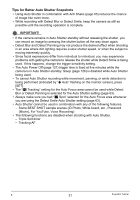
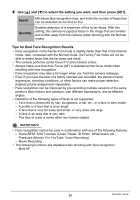
Tips for Better Auto Shutter Snapshots • Using Auto Shutter in combination with Anti Shake (page 65) reduces the chance of image blur even more. • While recording with Detect Blur or Detect Smile, keep the camera as still as possible until the recording operation is complete. IMPORTANT! • If the camera remains in Auto Shutter standby without releasing the shutter, you can record an image by pressing the shutter button all the way down again. • Detect Blur and Detect Panning may not produce the desired effect when shooting in an area where dim lighting requires a slow shutter speed, or when the subject is moving extremely quickly. • Since facial expressions differ from individual to individual, you may experience problems with getting the camera to release the shutter while Detect Smile is being used. If this happens, change the trigger sensitivity setting. • The Auto Power Off (page 127) trigger time is fixed at five minutes while the camera is in Auto Shutter standby. Sleep (page 126) is disabled while Auto Shutter being used. • To cancel Auto Shutter recording while movement, panning, or smile detection is being performed (indicated by "0 Auto" flashing on the monitor screen), press [SET]. • The "O Tracking" setting for the Auto Focus area cannot be used while Detect Blur or Detect Panning is selected for the Auto Shutter setting (page 63). • Always make sure you had "U Spot" selected for the Auto Focus area whenever you are using the Detect Smile Auto Shutter setting (page 63). • Auto Shutter cannot be used in combination with any of the following features. - Some BEST SHOT sample scenes (ID Photo, White board, etc., Prerecord (Movie), For YouTube, Voice Recording) • The following functions are disabled when shooting with Auto Shutter. - Triple Self-timer - Tracking AF B 31 Snapshot Tutorial
-
 1
1 -
2
-
3
-
4
-
5
-
6
-
7
-
8
-
9
-
10
-
11
-
12
-
13
-
14
-
15
-
16
-
17
-
18
-
19
-
20
-
21
-
22
-
23
-
24
-
25
-
 26
26 -
 27
27 -
 28
28 -
 29
29 -
 30
30 -
 31
31 -
 32
32 -
 33
33 -
 34
34 -
 35
35 -
 36
36 -
37
-
38
-
39
-
40
-
41
-
42
-
43
-
44
-
45
-
46
-
47
-
48
-
49
-
50
-
51
-
52
-
53
-
54
-
55
-
56
-
57
-
58
-
59
-
60
-
61
-
62
-
63
-
64
-
65
-
66
-
67
-
68
-
69
-
70
-
71
-
72
-
73
-
74
-
75
-
76
-
77
-
78
-
79
-
80
-
81
-
82
-
83
-
84
-
85
-
86
-
87
-
88
-
89
-
90
-
91
-
92
-
93
-
94
-
95
-
96
-
97
-
98
-
99
-
100
-
101
-
102
-
103
-
104
-
105
-
106
-
107
-
108
-
109
-
110
-
111
-
112
-
113
-
114
-
115
-
116
-
117
-
118
-
119
-
120
-
121
-
122
-
123
-
124
-
125
-
126
-
127
-
128
-
129
-
130
-
131
-
132
-
133
-
134
-
135
-
136
-
137
-
138
-
139
-
140
-
141
-
142
-
143
-
144
-
145
-
146
-
147
-
148
-
149
-
150
-
151
-
152
-
153
-
154
-
155
-
156
-
157
-
158
-
159
-
160
-
161
-
162
-
163
 |
 |