Creative CT4180 Getting Started Guide
Creative CT4180 - Sound Blaster 16 ViBRA Card Manual
 |
View all Creative CT4180 manuals
Add to My Manuals
Save this manual to your list of manuals |
Creative CT4180 manual content summary:
- Creative CT4180 | Getting Started Guide - Page 1
Sound Getting Started Plug and Play ® TM - Creative CT4180 | Getting Started Guide - Page 2
software for backup purposes. Copyright © 1997 by Creative Technology Ltd. All rights reserved. Version 2.0 October 1997 Sound Blaster is a registered trademark of Creative Technology Ltd. Sound Blaster 16 and Wave Blaster are trademarks of Creative Technology Ltd. Microsoft, MS-DOS, Windows, and - Creative CT4180 | Getting Started Guide - Page 3
and, if not installed and used in accordance with the instructions, may cause harmful interference to radio communications. However, there manufacturer's defined operator access area. Check the equipment operating/installation manual and/or with the equipment manufacturer to verify/confirm if your - Creative CT4180 | Getting Started Guide - Page 4
v Using This Guide v Getting More Information v Document Conventions v 1 Installing Audio Card and Related Hardware To install the card and related peripherals 1-1 To test the DRAM upgrade 1-3 2 Installing Software in Windows 95 Setting Up the Audio Drivers 2-1 Installing the Applications - Creative CT4180 | Getting Started Guide - Page 5
B-5 C Troubleshooting Problems Installing Audio Card Software from CD-ROM C-1 Problems with Sound C-2 Problems in DOS C-3 Problems in Windows 3.1x Device Connector Pin Assignments D-11 Wave Blaster Connector Pin Assignments D-11 E Technical Support Inside Europe E-3 Through CompuServe E-3 By - Creative CT4180 | Getting Started Guide - Page 6
Conventions Using This Guide Chapter 1 shows you how to install the audio card into your computer. Chapters 2 and 3 describes how to install the audio software in Windows 95 and Windows 3.1x, respectively. For information on installation, changing settings, and troubleshooting, see the appendices - Creative CT4180 | Getting Started Guide - Page 7
Table ii: Text conventions. Text In Represents bold Text that must be entered exactly as it appears. italic Title of a book. Otherwise, when presented at the DOS command line, it is a placeholder that represents information you must provide. This information usually appears in the parameter - Creative CT4180 | Getting Started Guide - Page 8
and Related Hardware If you want to install this Plug and Play (PnP) audio card in a non-PnP environment such as DOS/Windows 3.1x or Windows 95 MS-DOS Mode, you must first install a PnP configuration manager. For details, refer to the documentation that comes with your PnP configuration manager. To - Creative CT4180 | Getting Started Guide - Page 9
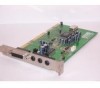
from the metal plate. 16-bit slot 8-bit slot Figure 1-2 8. Connect powered speakers or an external amplifier to the Line Out jack(s) if your audio card does not have an internal amplifier, or if you do not want to use the amplifier. You can also connect non-powered speakers to your - Creative CT4180 | Getting Started Guide - Page 10
software. (The installation of the software is covered in the next two chapters.) 2. Start the AWE Control Panel. That is, click the Start button, point to Programs, point to the menu of your Sound Blaster card User's Guide for detailed information on how to use the AWE Control Panel. Installing - Creative CT4180 | Getting Started Guide - Page 11
to install the audio software in Windows 95 after installing your card. It consists of the following sections: u Setting Up the Audio Drivers u Installing the Applications u Testing the Installation u Uninstalling the Applications Setting Up the Audio Drivers You need device drivers to control the - Creative CT4180 | Getting Started Guide - Page 12
which the Windows default driver option is available. u If a dialog box similar to Figure 2-3 appears, click the second option, and then click the OK button. Figure 2-3: Driver installation dialog box in which the Windows default driver option is NOT available. 2-2 Installing Software in Windows 95 - Creative CT4180 | Getting Started Guide - Page 13
instructions on the screen to complete the installation of the driver. Figure 2-4: Update Device Driver , and If your package comes with a Drivers Disk: • Insert it into your floppy select the folder \WIN95\Language\DRIVERS, where Language is the language of the software that you want to install. - Creative CT4180 | Getting Started Guide - Page 14
CD-ROM supports Windows 95 AutoPlay mode and starts running automatically. If it does not, see Appendix C, "Troubleshooting". 3. Follow the instructions on the use Windows 95 Media Player to test if your audio card is working properly. If you do not have Media Player, follow the instructions below - Creative CT4180 | Getting Started Guide - Page 15
sure that the Media Player check box is selected. If you do not have Volume Control, Sound Recorder or Audio Compression installed, make sure that the relevant check boxes are also selected. 6. Follow the instructions on the screen to complete the installation. Installing Software in Windows 95 2-5 - Creative CT4180 | Getting Started Guide - Page 16
click the Open button. 4. On Media Player, click . You should hear the selected sound being played. If you encounter any problems, see Appendix C, "Troubleshooting". Uninstalling the Applications The Windows 95 Uninstall feature allows you to remove applications cleanly and then reinstall them to - Creative CT4180 | Getting Started Guide - Page 17
icon. 3. In the Add/Remove Programs Properties dialog box, select the Sound Blaster entry for your card (see the Knowing Your Audio Card leaflet for your exact card model) and click the Add/Remove button. 4. Follow the instructions on the screen to uninstall. Installing Software in Windows 95 2-7 - Creative CT4180 | Getting Started Guide - Page 18
software in DOS/Windows 3.1x after installing your card. It consists of the following sections: u Installing the Software u Testing the Installation u Optimizing Memory Usage Installing the Software To install the software press 4. Follow the instructions on the screen to complete the - Creative CT4180 | Getting Started Guide - Page 19
card and displays a menu to let you test the card's sound and music output.) 3. Follow the instructions on card. For more information, see Appendix A, "Understanding the Installation" or Appendix C, "Troubleshooting". Optimizing Memory Usage If you choose to install the low-level DOS device drivers - Creative CT4180 | Getting Started Guide - Page 20
the drivers into memory. If you do not want to load these drivers, select another session without them at system bootup. (Refer to your MS-DOS 6.x documentation for instructions on QEMM or 386MAX, refer to their respective documentation for instructions. Installing Software in DOS/ Windows 3.1x 3-3 - Creative CT4180 | Getting Started Guide - Page 21
-Configurable Settings u Understanding the Environment Variables u Understanding the Installation Program in Windows 3.1x Understanding the Software-Configurable Settings Your audio card supports the Plug and Play (PnP) 1.0a standard. This allows a PnP system to assign necessary resources such - Creative CT4180 | Getting Started Guide - Page 22
If your card encounters a conflict with a peripheral device, you may need to change its resource settings. If you are using Windows 95, run the Device Manager. If you are using Windows 3.1x, run the configuration utility that comes with your PnP configuration manager. For details, see "Resolving - Creative CT4180 | Getting Started Guide - Page 23
Variables Environment variables are used to pass hardware configuration information to software in your system. This section explains the environment variables of your audio card: u SOUND Environment Variable u BLASTER Environment Variable (only DOS applications use this) u MIDI Environment Variable - Creative CT4180 | Getting Started Guide - Page 24
SOUND=path where path is the drive and directory of the audio software (for example, C:\SB16 or C:\VIBRA16). No space is allowed before and after the equal sign. BLASTER Environment Variable The BLASTER Tx Card type. x must be 6. The parameters in bold apply only to Sound Blaster SB32 and the - Creative CT4180 | Getting Started Guide - Page 25
mode. x can be 0, 1, or 2. 0 (default setting) specifies General MIDI mode. 1 specifies General Standard mode. 2 specifies MT-32 mode. The parameters in bold apply only to Sound Blaster SB32 and the AWE line of audio cards. Understanding the Installation A-5 - Creative CT4180 | Getting Started Guide - Page 26
MIDI=SYNTH:1 MAP:E MODE:0 C:\SB16\DIAGNOSE /S /W=C:\WINDOWS C:\SB16\MIXERSET /P /Q C:\SB16\AWEUTIL /S The directory name SB16 may be VIBRA16 in your installation. The parameters in bold apply only to Sound Blaster SB32 and the AWE line of audio cards. The first 3 statements set up the environment - Creative CT4180 | Getting Started Guide - Page 27
To free system memory when you are using Windows applications or playing DOS games, use a text editor to delete or comment out the preceding two statements from the CONFIG.SYS file. If you later need the low-level device drivers for your software application, load them into memory by typing DIAGNOSE - Creative CT4180 | Getting Started Guide - Page 28
of your card's features. Enabling/Disabling Creative 3D Stereo Enhancement Effect The Creative 3D Stereo Enhancement (3DSE) effect allows you to eliminate speaker crosstalk which occurs when two speakers are placed close together. With this effect enabled, mono and stereo sounds produced by your - Creative CT4180 | Getting Started Guide - Page 29
Control Panel. 2. In the Control Panel window, double-click the System icon. 3. In the System Properties dialog box, click the Device Manager tab. 4. Double-click Sound, Video And Game Controllers. 5. Select the Creative Sound Blaster entry for your audio card and click the Properties button. 6. In - Creative CT4180 | Getting Started Guide - Page 30
features on your card can now use them. In DOS/Windows 3.1x, you must install the DOS AWEUTIL utility for the MIDI Emulation feature to function properly. For more information, refer to the AWEUTIL.TXT file in your audio software directory. Protected mode software does not support MIDI Emulation - Creative CT4180 | Getting Started Guide - Page 31
To enable or disable MPU401 emulation in DOS/Windows 3.1x 1. If your audio card is already installed, switch off your computer and all peripheral devices. Remove the the cover from your system and then the audio card. 2. Enable or disable the MFBEN jumper according to the settings shown in Figure - Creative CT4180 | Getting Started Guide - Page 32
and Play Configuration Utility screen, click PnP Cards. 4. In the List Of PnP Cards box, click your Creative Plug and Play card. In the List Of Devices box, click Gameport or IDE as required. 5. Click the Resources button. The Resources window displays the current resources assigned to the interface - Creative CT4180 | Getting Started Guide - Page 33
selected. 7. Click the OK button and restart Windows 95 for the change to take effect. After restarting Windows 95, ignore the information displayed in the Resource . When you re-enable the interface for use by another device, Windows 95 might warn you that there is a conflicting device or that the - Creative CT4180 | Getting Started Guide - Page 34
C Troubleshooting This appendix provides some tips for solving some problems you may encounter with your audio card during installation or normal use. Problems Installing Audio Card Software from CD-ROM Problem Cause Solution In Windows 95, the installation program does not run automatically - Creative CT4180 | Getting Started Guide - Page 35
Auto Insert Notification check box is selected. 6. Click the OK button to you exit from the dialog box. Problems with Sound Problem Causes Solution No output from both the 8-bit and 16-bit digitized sounds when running the test program. u The volume knob on the speakers is not set properly. u The - Creative CT4180 | Getting Started Guide - Page 36
in DOS Problem Cause Solution Problem Cause Solution SOUND or BLASTER environment values are missing or incorrect. When you install your audio software, the commands are automatically added to the AUTOEXEC. bytes.) For details on the SHELL command, refer to your DOS manual. Troubleshooting C-3 - Creative CT4180 | Getting Started Guide - Page 37
, which requires two separate DMA channels. Problems in Windows 3.1x The following are problems you might encounter when in Windows 3.1x: Problem No sound is heard when running your audio card's Windows applications. Cause One or more of the sound drivers might not be included in the SYSTEM - Creative CT4180 | Getting Started Guide - Page 38
parameters in bold apply only to Sound Blaster SB32 and the AWE line of audio cards. If one or more of the statements are missing, run SETUP in the audio software directory. SETUP rewrites SYSTEM.INI to set up the drivers and the Windows applications. Resolving Hardware Conflicts Hardware conflicts - Creative CT4180 | Getting Started Guide - Page 39
the conflicting device. You can also refer to the Troubleshooting section in the Windows 95 Help. To resolve hardware conflicts in DOS/Windows 3.1x 1. Run your Plug and Play configuration utility. 2. Reselect the resource settings of your audio card that are in conflict. For more details, refer to - Creative CT4180 | Getting Started Guide - Page 40
audio card. Refer to "General Specifications" of the Knowing Your Audio Card leaflet to find out what is available on your card. u Redirecting PC Sounds to External Assignments u Telephone Answering Device Connector Pin Assignments u Wave Blaster Connector Pin Assignments Hardware Information D-1 - Creative CT4180 | Getting Started Guide - Page 41
to External Speakers It is possible to redirect the sounds that normally come from your computer's speaker to the speakers connected to the audio card. However, once you do this, you will not be able to hear POST beeps, that is, computer beeps made during power-on self test. Read - Creative CT4180 | Getting Started Guide - Page 42
AUX1 Connector Pin Assignments The AUX1 connector has the following pin assignments as shown in Table D-1. Table D-1: AUX1 connector pin assignments. Pin Signal I/O 1 AUX1 Left Channel In 2 Analog Ground - 3 Analog Ground - 4 AUX1 Right Channel In AUX2 Connector Pin Assignments The AUX2 - Creative CT4180 | Getting Started Guide - Page 43
CD Audio Connector Pin Assignments Your audio card has two types of CD Audio connectors. The CD Audio connector shown in Table D-3. has the following pin assignments as Table D-3: CD Audio connector pin - Creative CT4180 | Getting Started Guide - Page 44
DRAM Upgrade Connector Pin Assignments There are two DRAM Upgrade connectors on your card. Each has a different set of pin assignments as shown in Table D-5 and Table D-6. Table D-5: 24-pin DRAM Upgrade connector pin assignments. Pin Description Pin Description 1 - Creative CT4180 | Getting Started Guide - Page 45
Table D-6: 26-pin DRAM Upgrade connector pin assignments. Pin Description Pin Description 1 RAMDIS 2 VCC 3 SD15 4 SD14 5 SD13 6 SD12 7 SD11 8 SD10 9 SD9 10 SD8 11 Digital Ground 12 Digital Ground 13 SMCAS 14 MODE 15 Digital Ground 16 Digital Ground 17 Digital Ground 18 Digital Ground - Creative CT4180 | Getting Started Guide - Page 46
Gold Finch Connector Pin Assignments The Gold Finch connector has the following pin descriptions as shown in Table D-7. Table D-7: Gold Finch connector pin assignments. Pin Description Pin Description 1 EMUR 2 AGND 3 EMUL 4 AGND 5 KEYED 6 AGND 7 NC 8 NC IDE Connector Pin Assignments The - Creative CT4180 | Getting Started Guide - Page 47
Table D-8: IDE connector pin assignments. Pin Description Pin 21 NC 22 23 DIOWB 24 25 DIORB 26 27 IOCHRDYB 28 29 NC 30 31 IRQ 32 33 DA1 34 35 DA0 36 37 CS0 38 39 NC 40 Description Digital Ground Digital Ground Digital Ground BALE Digital Ground IOCS16B NC DA2 CS1 Digital Ground - Creative CT4180 | Getting Started Guide - Page 48
Modem Connector Pin Assignments The Modem connector has the following pin assignments shown in Table D-10. Table D-10: Modem connector pin assignments. Pin Description I/O 1 Analog Ground - 2 Pin is cut to provide keyed connection. N/A 3 Mono line level input from modem to Line In jack. In - Creative CT4180 | Getting Started Guide - Page 49
SPDIF Connector Pin Assignments The SPDIF connector has the following pin assignments as shown in Table D-12. Table D-12: SPDIF connector pin assignments. Pin Signal 0 Digital Out 1 Digital Ground Speaker/Line Connector Pin Assignments The Speaker/Line connector has the following pin - Creative CT4180 | Getting Started Guide - Page 50
- 4 Microphone output to modem. Out Wave Blaster Connector Pin Assignments The Wave Blaster connector has the following pin descriptions as shown in Table D-15. Table D-15: Wave Blaster connector pin assignments. Pin Description Pin 1 Digital Ground 2 3 - Creative CT4180 | Getting Started Guide - Page 51
Table D-15: Wave Blaster connector pin assignments. Pin Description Pin 17 Analog Ground 18 19 Analog Ground 20 Description +12 V Line In: Right 21 Analog Ground 22 23 Analog Ground 24 25 Analog Ground 26 -12 V Line In: Left ResetB D-12 Hardware Information - Creative CT4180 | Getting Started Guide - Page 52
of the product are functioning to your satisfaction. They will all be required in the unlikely event that your product needs to be returned to Creative. Before contacting 'Creative Technical Services', please ensure that you have read Appendix C, 'Troubleshooting'. Technical Support E-1 - Creative CT4180 | Getting Started Guide - Page 53
advisable that you write down the following numbers of your card and other hardware devices, if installed in your system in Table E-1 and Table E-2. Table E-1: Model and Serial Numbers of your hardware. Hardware Model Number Audio Card* Video Card Fax/Modem CD-ROM Drive MIDI Device Telephony - Creative CT4180 | Getting Started Guide - Page 54
, software updates, and fixes to common problems. u We will also welcome your recommendations and suggestions for new products and for improving our products in future releases. See 'Creative Technical Services' leaflet for details. By Fax For fast and efficient Technical Support solutions - Creative CT4180 | Getting Started Guide - Page 55
u Setting up Dialing and Service Provider Information u Setting up a Dial Up Script 2. Installation instructions for Windows 3x. u Setting up Microsoft Internet Explorer 3. A Creative Video Webphone 3.0 Guide to help you get on line. Installing Software for Windows 95 To install the accompanying - Creative CT4180 | Getting Started Guide - Page 56
you proceed to set up Microsoft Internet Explorer, get the following ready: 2. Windows 95 CD-ROM to install the required drivers when prompted. 3. Information from your Internet Service Provider: u The name of your Internet Service Provider. u Your user or account name. u Your password. u The phone - Creative CT4180 | Getting Started Guide - Page 57
your Internet mail. Select your choice and click Next. 7. Click Next to install files and driver to access the Internet. If prompted, insert the Windows 95 CD-ROM to install the required drivers. 8. Enter the Name of Service Provider and click Next. 9. Enter the phone number to dial up your Internet - Creative CT4180 | Getting Started Guide - Page 58
\Program Files\Accessories\ of your system. This is usually provided by your Internet Service Provider. If you do not have a dial-up script, check with your Internet Service Provider whether you need one and where can you download one to your system. 3. Once the Dial-Up Scripting Tool is installed - Creative CT4180 | Getting Started Guide - Page 59
Service Provider. To do so, double-click The Internet icon on your desktop. Installing Software for Windows 3.x To install the accompanying software for Windows \RA16_30 D:\INTERNET\VIDEOWP\WIN31\ENGLISH\WPSETUP 6. Follow the instructions on the screen to finish installing your application. 7. - Creative CT4180 | Getting Started Guide - Page 60
Windows 3.x disks or CD-ROM and your modem configuration software. 2. Information from your Internet Service Provider: u The name of your Internet Service dialog box. Windows will query all COM ports for the presence of a modem. This may take a few minutes to complete. 3. Windows should detect your - Creative CT4180 | Getting Started Guide - Page 61
then be asked to restart your computer. When your computer restarts, run Windows again to carry out the next part of the setup. 5. Go to choose "Manual" and click Next. 8. Enter the name of your Service Provider and click Next. 9. Enter the phone number to dial up your Internet Service Provider and - Creative CT4180 | Getting Started Guide - Page 62
Labs Phone Blaster or a Creative Labs Modem Blaster, it may select interrupt 10 or 11 as its default setting. If you would prefer not to change this setting, then you can force the Modem Properties dialog to recognize this interrupt by editing the Windows Service Provider's computer, another Window - Creative CT4180 | Getting Started Guide - Page 63
Video Webphone 3.0 Guide Entering your activation key When you start your Creative Video Webphone for the first time, you will . Entering information in the Configure window When you start your Creative Video Webphone for the first time, it will open the Configure window for you to specify your User - Creative CT4180 | Getting Started Guide - Page 64
each time you use the Creative Video Webphone , but you will need to enter your password if you reinstall the Creative Video Webphone for any reason, please call "[email protected]" on your WebPhone or send e-mail to "[email protected]" describing your problem. Support agents will reset - Creative CT4180 | Getting Started Guide - Page 65
In the event you change your e-mail address (e.g., you change your Internet service provider), you will need to change your E-Mail address in the Network Parameters section of the Creative Video Webphone Configure window. A message will be displayed when your e-mail address change has been confirmed - Creative CT4180 | Getting Started Guide - Page 66
your sound card. Modems and your Creative Video Webphone If you have a modem connection (dialup) to your Internet service provider, make sure your modem has error correction and data compression enabled (this is the default for almost every modem we know of). If your 14.4 kb modem does not support - Creative CT4180 | Getting Started Guide - Page 67
the remote party to talk (this is will not be the case if both you and the remote party have full duplex sound cards). If this is not the case and Creative Video Webphone displays LISTEN when you would expect to hear something from the remote party, check your Speaker volume on the - Creative CT4180 | Getting Started Guide - Page 68
is a trademark of the NetSpeak Corporation. Microsoft, MS-DOS, Windows, and the Windows logo are registered trademarks of Microsoft Corporation. Real Audio is a trademark of Progressive Networks. Sound Blaster is a registered trademark of Creative Technology Ltd. All other products are trademarks or - Creative CT4180 | Getting Started Guide - Page 69
to install your Creative PnP card in a PnP system like Windows 95, you only need to "plug" the card into your personal computer and the card will "play" as well as Creative's PnP solution for non-PnP environments. And to find out how to solve some common PnP installation problems, just flip to - Creative CT4180 | Getting Started Guide - Page 70
before all the statements that load other low-level device drivers (such as CTSB16.SYS and SBIDE.SYS) so that your Creative PnP cards will be configured before these device drivers try to use them. If you add this line to CONFIG.SYS manually, please make sure that this line is placed after the - Creative CT4180 | Getting Started Guide - Page 71
. CTCU will run in silent mode and update the parameters needed by your Creative and Windows drivers. It will also update the BLASTER environment variable if it detects a Creative audio card in the system. For more details on how the CTCM and CTCU commands work, please read the sections "Using CTCM - Creative CT4180 | Getting Started Guide - Page 72
card. So you should run Creative PnP Configuration Utility (CTCU) when one of the following situations happens: u Your PnP cards' settings do not work properly. For example, some systems do not support /Windows 3.1x" in page 13. To run CTCU in DOS/Windows 3.1x: 1. Exit to DOS if you are in Windows - Creative CT4180 | Getting Started Guide - Page 73
messages or screens. It will simply update the parameters required by the Creative drivers. If you do not use the /S switch, CTCU will run in full-screen mode (see Figure 1). Informs CTCU to update the PnP hardware information of your Windows drivers in the SYSTEM.INI file. If you do not use this - Creative CT4180 | Getting Started Guide - Page 74
to view the resource settings of the PnP cards in your system and change the settings of Creative PnP cards only. When you select the PnP Cards section from the CTCU menu, the Plug and Play window will appear, listing the PnP cards in the system. Choosing a card here will, in turn, display a list of - Creative CT4180 | Getting Started Guide - Page 75
change this setting, select one from the list. Make sure it will not conflict with the other cards' settings. Then double-click the new setting or click the OK button. The Memory Range window displays the current 32-bit memory resource setting and a list of possible settings. To change this setting - Creative CT4180 | Getting Started Guide - Page 76
CTCU supports the testing of Creative's audio and wavetable devices only. Legacy Cards Section You can use this section to enter, view or change the resource settings of all the legacy (non-PnP) cards in your system. When you select the Legacy Cards section from the CTCU menu, the Legacy window will - Creative CT4180 | Getting Started Guide - Page 77
range (Mem). View Button Clicking this button in the Legacy window opens the View window which lists the resources reserved for a selected legacy card in your system. Add Button Clicking this button in the Legacy window opens the Add window where you can enter the following details for a new or - Creative CT4180 | Getting Started Guide - Page 78
can also change any of the resources as well as the card's name here. To store a card's system settings for future use, select the Card Removed check box in the Change window and click OK. To re-use the same resources after re-installing the card, simply clear the check box to retrieve its original - Creative CT4180 | Getting Started Guide - Page 79
window opens the View window which lists the resources reserved for a selected PCI card in your system. PnP Concepts When you add a hardware card reserve system resources only by manually changing the settings of some dip switches or jumpers on a legacy (non-PnP) card. This can be quite difficult - Creative CT4180 | Getting Started Guide - Page 80
this specification. So, there are some compatibility problems. For more details, please read the section "PnP in DOS/Windows 3.1x" on page 14. PnP System BIOS system manual for more details. PnP Operating System A PnP operating system provides a fully PnP user environment. It can support PnP cards on - Creative CT4180 | Getting Started Guide - Page 81
For more details, please read the next section "PnP in DOS/Windows 3.1x" . PnP in DOS/Windows 3.1x DOS/Windows 3.1x is not a PnP operating system. So, to configure PnP cards, you need to install a PnP configuration driver and a PnP configuration utility. Currently, a generic set of PnP configuration - Creative CT4180 | Getting Started Guide - Page 82
able to configure your PnP card properly. Creative's Approach to PnP To solve problems similar to those mentioned in the previous section, we have developed a DOS-based PnP configuration driver and utility for the DOS/Windows 3.1x environment. They are called Creative PnP Configuration Manager (CTCM - Creative CT4180 | Getting Started Guide - Page 83
problems similar to those mentioned in the section "PnP in DOS/Windows 3.1x" in page 13, CTCM may be able to allocate resources to these cards. 3. You need not reboot your system after using CTCU to change Creative PnP card settings, if you do not have any DOS device drivers (e.g., SBIDE - Creative CT4180 | Getting Started Guide - Page 84
the answers to some common questions that you may have while installing a Creative PnP card in the DOS/Windows 3.1x environment. General Questions Question I have a PnP BIOS as well as a PnP operating system or a PnP configuration driver and utility. Which one should I use to configure my PnP - Creative CT4180 | Getting Started Guide - Page 85
used by ICM. You should use ICU instead to change or disable your card settings if ICM is already loaded into your system. CTCM Questions Question How do I use CTCM to configure both legacy and PnP cards in DOS/Windows 3.1x? Ans w er First, run CTCU to add the information on the hardware - Creative CT4180 | Getting Started Guide - Page 86
. When it does, CTCM will not work properly. To solve this problem, remove the HIGHSCAN option in the EMM386 statement in the CONFIG.SYS Creative Technology Ltd. Copyright © 1997 by Creative Technology Ltd. All rights reserved. Version 2.0 October 1997 Microsoft, MS-DOS, Windows, and the Windows - Creative CT4180 | Getting Started Guide - Page 87
playback because currently, the Sound Blaster hardware and driver do not support this. u While WaveSynth/WG is playing a MIDI file, you cannot enable Creative Mixer's LED display. And vice versa. Some of the constraints explained in this leaflet may not apply to your audio card. For details, refer - Creative CT4180 | Getting Started Guide - Page 88
In addition, for Sound Blaster cards that use one time. u Creative FastSpeech playback is not supported. u Wave Creative Technology Ltd. Copyright © 1997 Creative Technology Ltd. All rights reserved. Sound Blaster is a trademark of Creative Technology Ltd. Microsoft, MS-DOS, Windows 3.x, and Windows - Creative CT4180 | Getting Started Guide - Page 89
of multimedia computing! Fully Sound Blaster compatible, your audio card supports these features: u Compliance with the Plug and Play (PnP) ISA specification version 1.0a u Compression algorithms such as A-law, Mu-law, CTADPCM, and IMA-ADPCM u Full duplex operation u Creative 3D Stereo Enhancement - Creative CT4180 | Getting Started Guide - Page 90
Windows 95 or Windows 3.1x with DOS 5.0 and a Plug and Play (PnP) configuration manager Changing Audio Card Settings This section is organized as follows: u Changing Hardware Resource Settings u Enabling/Disabling Creative 4: BLASTER environment variables. Parameter Axxx Preferred Value A220 - Creative CT4180 | Getting Started Guide - Page 91
the menu of your Sound Blaster card, and then click Creative Mixer. 2. To view the title bar, click anywhere in the Creative Mixer window. On the system in DOS/Windows 3.1x 1. Exit to DOS if you are in Windows 3.1x. 2. At the DOS prompt, change to the directory containing your audio software; for - Creative CT4180 | Getting Started Guide - Page 92
2. On the Menu of the Creative Plug and Play Configuration Utility screen, click PnP Cards. 3. In the List Of PnP Cards box, click the Creative Plug and Play card. In the List Of Devices box, click Gameport. 4. Click the Resources button. The Resources window displays the current resources assigned - Creative CT4180 | Getting Started Guide - Page 93
1x directory (for example, C:\Windows) and press . 8. Restart your system for the change to take effect. Enabling/Disabling the Built-in Amplifier Your audio card comes with a Speaker Out/Line Out jack which connects non-powered speakers by default. To connect powered speakers or an external - Creative CT4180 | Getting Started Guide - Page 94
Sound Blaster music synthesizer chips Stereo Digitized Voice Channel u Full duplex u 16-bit and 8-bit digitizing in stereo and mono modes u Programmable sampling rates, 5 kHz to 44.1 kHz in linear steps Note: Your audio applications may support in 1.5 dB steps u Full software control of fade-in, fade - Creative CT4180 | Getting Started Guide - Page 95
part of Creative Technology Ltd. No part of this manual may be software for backup purposes. Sound Blaster is a registered trademark, and Blaster is a trademark of Creative Technology Ltd. Intel and Pentium are registered trademarks of Intel Corporation. Microsoft, MS-DOS, Windows, and the Windows
-
 1
1 -
 2
2 -
 3
3 -
 4
4 -
 5
5 -
 6
6 -
 7
7 -
8
-
9
-
10
-
11
-
12
-
13
-
14
-
15
-
16
-
17
-
18
-
19
-
20
-
21
-
22
-
23
-
24
-
25
-
26
-
27
-
28
-
29
-
30
-
31
-
32
-
33
-
34
-
35
-
36
-
37
-
38
-
39
-
40
-
41
-
42
-
43
-
44
-
45
-
46
-
47
-
48
-
49
-
50
-
51
-
52
-
53
-
54
-
55
-
56
-
57
-
58
-
59
-
60
-
61
-
62
-
63
-
64
-
65
-
66
-
67
-
68
-
69
-
70
-
71
-
72
-
73
-
74
-
75
-
76
-
77
-
78
-
79
-
80
-
81
-
82
-
83
-
84
-
85
-
86
-
87
-
88
-
89
-
90
-
91
-
92
-
93
-
94
-
95
 |
 |

Sound
®
Getting Started
Plug and Play