Cuisinart CBK-210 User Manual - Page 6
Operating Instructions
 |
View all Cuisinart CBK-210 manuals
Add to My Manuals
Save this manual to your list of manuals |
Page 6 highlights
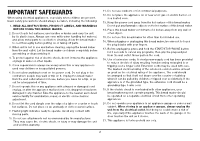
OPERATING INSTRUCTIONS 1. Remove bread pan from baking chamber by grasping the handle (see figure 1a), turning the pan counterclockwise, and lifting up. It may be helpful to first lift the handle of the bread pan by using the pan hook. To properly attach the kneading paddle, insert onto shaft with wide base facing down (see figure 1b). Please refer to the Automatic Mix-In Dispenser section (page 7) for more instructions. 1a. 1b. 2. Properly measure all ingredients and put into the bread pan in the exact order they are listed. Always put the liquids in first, the dry ingredients in next, and the yeast last. Yeast should not touch wet ingredients. Please refer to page 13 for detailed instructions. 3. Insert the bread pan back into the baking chamber, turning clockwise to lock in place. 4. If the Automatic Mix-In Dispenser is being used, pull out the dispenser compartment from the unit, then add mix-ins before placing back in the unit. 5. Close the lid and connect the power cord to a standard electrical outlet. 6. Select your program by pressing the MENU button. For more information on each program, see pages 9-11. 7. Select your crust color (light, medium, or dark) by pressing the CRUST COLOR button. If no crust color is selected, the unit will automatically default to medium crust color. 8. Select your loaf size (1 lb., 1½ lb., or 2 lb.) by pressing the LOAF SIZE button. If no loaf size is selected, the unit will automatically default to a 1½-lb. loaf. 9. If you would like the bread-making process to start immediately, first press the CONFIRM button to confirm your selected settings. The indicator light on the START/STOP/PAUSE button will be flashing, indicating your selection has been confirmed. Next press the START/STOP/PAUSE button to start the program. The indicator light will stay solid to show that the bread maker is on. NOTE: The indicator light must be flashing before you can press the START/STOP/PAUSE button to start the program. If it is not flashing, press the CONFIRM button again. 10. For additional setting options and info on the Automatic Mix-in Dispenser, Custom Memory, Delay Start Timer, and Sound On/Off, see pages 7-8. 11. To pause the process at any time, press the START/STOP/PAUSE button. To resume the process, first press the Confirm button, then press START/STOP/PAUSE. To cancel the process at any time, press and hold the START/STOP/PAUSE button for 3 seconds. 6
-
 1
1 -
 2
2 -
 3
3 -
 4
4 -
 5
5 -
 6
6 -
 7
7 -
 8
8 -
 9
9 -
 10
10 -
 11
11 -
 12
12 -
13
-
14
-
15
-
16
-
17
-
18
-
19
-
20
-
21
-
22
-
23
-
24
-
25
-
26
-
27
-
28
-
29
-
30
-
31
-
32
-
33
-
34
-
35
-
36
-
37
-
38
-
39
-
40
-
41
-
42
-
43
-
44
-
45
-
46
-
47
-
48
-
49
-
50
-
51
-
52
-
53
-
54
-
55
-
56
-
57
-
58
-
59
-
60
-
61
-
62
-
63
-
64
-
65
-
66
-
67
-
68
-
69
-
70
-
71
-
72
-
73
-
74
-
75
-
76
-
77
-
78
-
79
-
80
-
81
-
82
-
83
-
84
-
85
-
86
-
87
-
88
-
89
-
90
-
91
-
92
-
93
-
94
-
95
-
96
-
97
-
98
-
99
-
100
-
101
-
102
-
103
-
104
-
105
-
106
-
107
-
108
-
109
-
110
-
111
-
112
-
113
-
114
 |
 |
