Dell B3460dn Mono Laser Printer User's Guide - Page 107
Printer control panel message, What to do, Clearing jams
 |
View all Dell B3460dn Mono Laser Printer manuals
Add to My Manuals
Save this manual to your list of manuals |
Page 107 highlights
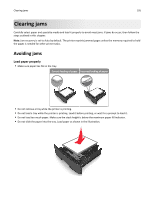
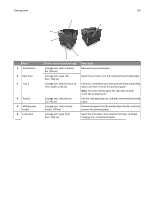
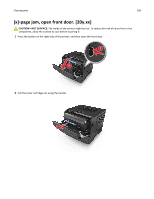
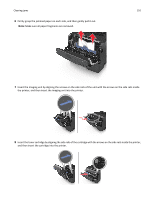
Clearing jams 107 1 2 6 5 Area 1 Standard bin 2 Rear door 3 Tray 1 4 Tray [x] 5 Multipurpose feeder 6 Front door 3 4 Printer control panel message [x]‑page jam, clear standard bin. [20y.xx] [x]‑page jam, open rear door. [20y.xx] [x]‑page jam, remove tray 1 to clear duplex. [23y.xx] [x]‑page jam, remove tray [x]. [24y.xx] [x]‑page jam, clear manual feeder. [250.xx] [x]‑page jam, open front door. [20y.xx] What to do Remove the jammed paper. Open the rear door, and then remove the jammed paper. Pull tray 1 completely out, then push the front duplex flap down, and then remove the jammed paper. Note: You may need to open the rear door to clear some 23y.xx paper jams. Pull the indicated tray out, and then remove the jammed paper. Remove all paper from the multipurpose feeder, and then remove the jammed paper. Open the front door, then remove the toner cartridge, imaging unit, and jammed paper.
-
 1
1 -
2
-
3
-
4
-
5
-
6
-
7
-
8
-
9
-
10
-
11
-
12
-
13
-
14
-
15
-
16
-
17
-
18
-
19
-
20
-
21
-
22
-
23
-
24
-
25
-
26
-
27
-
28
-
29
-
30
-
31
-
32
-
33
-
34
-
35
-
36
-
37
-
38
-
39
-
40
-
41
-
42
-
43
-
44
-
45
-
46
-
47
-
48
-
49
-
50
-
51
-
52
-
53
-
54
-
55
-
56
-
57
-
58
-
59
-
60
-
61
-
62
-
63
-
64
-
65
-
66
-
67
-
68
-
69
-
70
-
71
-
72
-
73
-
74
-
75
-
76
-
77
-
78
-
79
-
80
-
81
-
82
-
83
-
84
-
85
-
86
-
87
-
88
-
89
-
90
-
91
-
92
-
93
-
94
-
95
-
96
-
97
-
98
-
99
-
100
-
101
-
 102
102 -
 103
103 -
 104
104 -
 105
105 -
 106
106 -
 107
107 -
 108
108 -
 109
109 -
 110
110 -
 111
111 -
 112
112 -
113
-
114
-
115
-
116
-
117
-
118
-
119
-
120
-
121
-
122
-
123
-
124
-
125
-
126
-
127
-
128
-
129
-
130
-
131
-
132
-
133
-
134
-
135
-
136
-
137
-
138
-
139
-
140
-
141
-
142
-
143
-
144
-
145
-
146
-
147
-
148
-
149
-
150
-
151
-
152
-
153
-
154
-
155
-
156
-
157
-
158
-
159
-
160
-
161
-
162
-
163
-
164
-
165
-
166
-
167
 |
 |
