Dell B3460dn Mono Laser Printer User's Guide - Page 132
Paper jam message remains after jam is cleared, Jammed s are not reprinted, Step 3, Settings - review
 |
View all Dell B3460dn Mono Laser Printer manuals
Add to My Manuals
Save this manual to your list of manuals |
Page 132 highlights
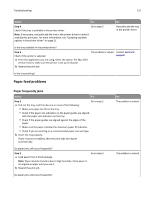
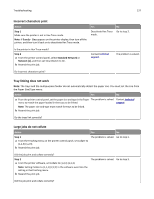
Troubleshooting 132 Action Yes Step 3 Contact technical a Review the tips on avoiding jams. For more information, see "Avoiding support. jams" on page 105. b Follow the recommendations, and then resend the print job. Do paper jams still occur frequently? No The problem is solved. Paper jam message remains after jam is cleared Action Open front door and remove all trays. a Clear any jammed pages. Note: Make sure all paper fragments are removed. b Press to clear the message and continue printing. Does the paper jam message remain? Yes Contact technical support. No The problem is solved. Jammed pages are not reprinted Action a Turn on jam recovery. 1 From the printer control panel, navigate to: Yes No The problem is solved. Contact technical support. Settings > > General Settings > > Print Recovery > > Jam Recovery 2 Press the left or right arrow button to scroll to On or Auto, and then press . b Resend the pages that did not print. Were the jammed pages reprinted?
-
 1
1 -
2
-
3
-
4
-
5
-
6
-
7
-
8
-
9
-
10
-
11
-
12
-
13
-
14
-
15
-
16
-
17
-
18
-
19
-
20
-
21
-
22
-
23
-
24
-
25
-
26
-
27
-
28
-
29
-
30
-
31
-
32
-
33
-
34
-
35
-
36
-
37
-
38
-
39
-
40
-
41
-
42
-
43
-
44
-
45
-
46
-
47
-
48
-
49
-
50
-
51
-
52
-
53
-
54
-
55
-
56
-
57
-
58
-
59
-
60
-
61
-
62
-
63
-
64
-
65
-
66
-
67
-
68
-
69
-
70
-
71
-
72
-
73
-
74
-
75
-
76
-
77
-
78
-
79
-
80
-
81
-
82
-
83
-
84
-
85
-
86
-
87
-
88
-
89
-
90
-
91
-
92
-
93
-
94
-
95
-
96
-
97
-
98
-
99
-
100
-
101
-
102
-
103
-
104
-
105
-
106
-
107
-
108
-
109
-
110
-
111
-
112
-
113
-
114
-
115
-
116
-
117
-
118
-
119
-
120
-
121
-
122
-
123
-
124
-
125
-
126
-
 127
127 -
 128
128 -
 129
129 -
 130
130 -
 131
131 -
 132
132 -
 133
133 -
 134
134 -
 135
135 -
 136
136 -
 137
137 -
138
-
139
-
140
-
141
-
142
-
143
-
144
-
145
-
146
-
147
-
148
-
149
-
150
-
151
-
152
-
153
-
154
-
155
-
156
-
157
-
158
-
159
-
160
-
161
-
162
-
163
-
164
-
165
-
166
-
167
 |
 |