Dell Dimension 8200 Dell Dimension 8200 Systems Solutions Guide - Page 73
Removing Cards - network driver
 |
View all Dell Dimension 8200 manuals
Add to My Manuals
Save this manual to your list of manuals |
Page 73 highlights
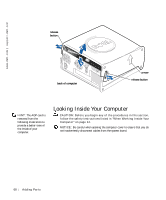
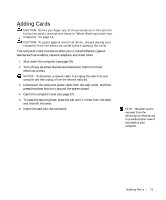
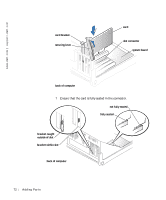
8 Lower the plastic securing lever. 9 Connect any cables that should be attached to the card. See the documentation that came with the card for information about the card cable connections. 10 Close the computer cover (see page 90). 11 Connect your computer and devices to their electrical outlets, and turn them on. NOTICE: To connect a network cable, first plug the cable in to the network wall jack and then plug it in to the computer. 12 Install any drivers required for the card as described in the documentation that came with the card. Removing Cards CAUTION: Before you begin any of the procedures in this section, follow the safety instructions listed in "When Working Inside Your Computer" on page 12. 1 Shut down the computer (see page 20). 2 Turn off any attached devices and disconnect them from their electrical outlets. NOTICE: To disconnect a network cable, first unplug the cable from your computer and then unplug it from the network wall jack. 3 Disconnect the computer power cable from the wall outlet, and then press the power button to ground the system board. 4 Open the computer cover (see page 67). 5 If necessary, disconnect any cables connected to the card. 6 To raise the securing lever, press the tab until it is free from the latch and then lift the lever. Addi ng Part s 73
-
 1
1 -
2
-
3
-
4
-
5
-
6
-
7
-
8
-
9
-
10
-
11
-
12
-
13
-
14
-
15
-
16
-
17
-
18
-
19
-
20
-
21
-
22
-
23
-
24
-
25
-
26
-
27
-
28
-
29
-
30
-
31
-
32
-
33
-
34
-
35
-
36
-
37
-
38
-
39
-
40
-
41
-
42
-
43
-
44
-
45
-
46
-
47
-
48
-
49
-
50
-
51
-
52
-
53
-
54
-
55
-
56
-
57
-
58
-
59
-
60
-
61
-
62
-
63
-
64
-
65
-
66
-
67
-
 68
68 -
 69
69 -
 70
70 -
 71
71 -
 72
72 -
 73
73 -
 74
74 -
 75
75 -
 76
76 -
 77
77 -
 78
78 -
79
-
80
-
81
-
82
-
83
-
84
-
85
-
86
-
87
-
88
-
89
-
90
-
91
-
92
-
93
-
94
-
95
-
96
-
97
-
98
-
99
-
100
-
101
-
102
-
103
-
104
-
105
-
106
-
107
-
108
-
109
-
110
-
111
-
112
-
113
-
114
-
115
-
116
-
117
-
118
-
119
-
120
-
121
-
122
-
123
-
124
-
125
-
126
-
127
-
128
-
129
-
130
-
131
-
132
-
133
-
134
-
135
-
136
-
137
-
138
-
139
-
140
-
141
-
142
-
143
-
144
-
145
-
146
-
147
-
148
-
149
-
150
 |
 |
