Dell Dimension 8200 Dell Dimension 8200 Systems Solutions Guide - Page 78
Disconnect the computer power cable from the wall outlet, and then - memory upgrade
 |
View all Dell Dimension 8200 manuals
Add to My Manuals
Save this manual to your list of manuals |
Page 78 highlights
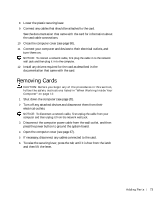
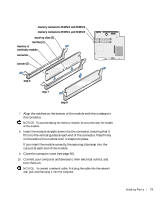
www.dell.com | support.dell.com HINT: Memory purchased from Dell is covered under your computer warranty. To install memory modules: 1 Shut down the computer (see page 20). 2 Turn off any attached devices and disconnect them from their electrical outlets. NOTICE: To disconnect a network cable, first unplug the cable from your computer and then unplug it from the network wall jack. 3 Disconnect the computer power cable from the wall outlet, and then press the power button to ground the system board. 4 Open the computer cover (see page 67). NOTICE: If you upgrade the memory, the memory modules must be upgraded in matched pairs of identical MB capacity in both memory connectors RIMM1 and RIMM2 or memory connectors RIMM3 and RIMM4 (see page 70). NOTICE: Be sure to install memory modules in the first two memory connectors (RIMM1 and RIMM2) nearest the processor before installing memory modules in the outer two memory connectors (RIMM3 and RIMM4) (see page 70). NOTICE: All memory connectors must be populated with either a memory module or a continuity module. The computer will not operate if a memory connector is unpopulated. 5 Remove a memory or a continuity module. NOTICE: If you remove your original memory modules from the computer during a memory upgrade, keep them separate from any new modules that you may have, even if the new modules were purchased from Dell. Your original memory modules must be installed as a pair in either connectors RIMM1 and RIMM 2 or RIMM 3 and RIMM4. Do not pair one original memory module with one new memory module in connectors RIMM1 and RIMM2 or RIMM3 and RIMM4. Otherwise, your computer may not start properly. a Press out the securing clip at each end of the memory module connector. b Grasp the module and pull up. If the module is difficult to remove, gently ease the module back and forth to remove it from the connector. 6 To insert a module, press out the securing clip at each end of the memory module connector. 78 Adding Parts
-
 1
1 -
2
-
3
-
4
-
5
-
6
-
7
-
8
-
9
-
10
-
11
-
12
-
13
-
14
-
15
-
16
-
17
-
18
-
19
-
20
-
21
-
22
-
23
-
24
-
25
-
26
-
27
-
28
-
29
-
30
-
31
-
32
-
33
-
34
-
35
-
36
-
37
-
38
-
39
-
40
-
41
-
42
-
43
-
44
-
45
-
46
-
47
-
48
-
49
-
50
-
51
-
52
-
53
-
54
-
55
-
56
-
57
-
58
-
59
-
60
-
61
-
62
-
63
-
64
-
65
-
66
-
67
-
68
-
69
-
70
-
71
-
72
-
 73
73 -
 74
74 -
 75
75 -
 76
76 -
 77
77 -
 78
78 -
 79
79 -
 80
80 -
 81
81 -
 82
82 -
 83
83 -
84
-
85
-
86
-
87
-
88
-
89
-
90
-
91
-
92
-
93
-
94
-
95
-
96
-
97
-
98
-
99
-
100
-
101
-
102
-
103
-
104
-
105
-
106
-
107
-
108
-
109
-
110
-
111
-
112
-
113
-
114
-
115
-
116
-
117
-
118
-
119
-
120
-
121
-
122
-
123
-
124
-
125
-
126
-
127
-
128
-
129
-
130
-
131
-
132
-
133
-
134
-
135
-
136
-
137
-
138
-
139
-
140
-
141
-
142
-
143
-
144
-
145
-
146
-
147
-
148
-
149
-
150
 |
 |