Dell PowerEdge 840 Hardware Owner's Manual (PDF) - Page 120
Disabling a Forgotten Password, removed. However, before you assign a new system and/or setup password
 |
View all Dell PowerEdge 840 manuals
Add to My Manuals
Save this manual to your list of manuals |
Page 120 highlights
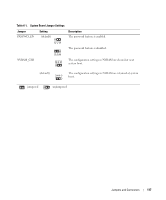
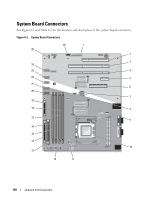
Disabling a Forgotten Password The system's software security features include a system password and a setup password, which are discussed in detail in "Using the System Setup Program" on page 29. The password jumper enables these password features or disables them and clears any password(s) currently in use. CAUTION: Only trained service technicians are authorized to remove the system cover and access any of the components inside the system. Before performing any procedure, see your Product Information Guide for complete information about safety precautions, working inside the computer, and protecting against electrostatic discharge. 1 Turn off the system and attached peripherals, and disconnect the system from the electrical outlet. 2 Open the system. See "Opening the System" on page 43. 3 Remove the memory cooling shroud by lifting the release latch and sliding the shroud toward the front of the system. See Figure 3-14. 4 Remove the password jumper plug. See Figure 6-1 to locate the password jumper on the system board. 5 Replace the memory cooling shroud. 6 Close the system. See "Closing the System" on page 47. 7 Reconnect the system to the electrical outlet, and turn on the system. The existing passwords are not disabled (erased) until the system boots with the password jumper plug removed. However, before you assign a new system and/or setup password, you must install the jumper plug. NOTE: If you assign a new system and/or setup password with the jumper plug still removed, the system disables the new password(s) the next time it boots. 8 Turn off the system, including any attached peripherals, and disconnect the system from the electrical outlet. 9 Open the system. 10 Remove the memory cooling shroud. 11 Reinstall the password jumper plug in its original position to enable the password protection feature. 12 Reinstall the memory cooling shroud. 13 Close the system, reconnect the system to the electrical outlet, and turn on the system. 14 Assign a new system and/or setup password. To assign a new password using the System Setup program, see "Using the System Setup Program" on page 29. 120 Jumpers and Connectors
-
 1
1 -
2
-
3
-
4
-
5
-
6
-
7
-
8
-
9
-
10
-
11
-
12
-
13
-
14
-
15
-
16
-
17
-
18
-
19
-
20
-
21
-
22
-
23
-
24
-
25
-
26
-
27
-
28
-
29
-
30
-
31
-
32
-
33
-
34
-
35
-
36
-
37
-
38
-
39
-
40
-
41
-
42
-
43
-
44
-
45
-
46
-
47
-
48
-
49
-
50
-
51
-
52
-
53
-
54
-
55
-
56
-
57
-
58
-
59
-
60
-
61
-
62
-
63
-
64
-
65
-
66
-
67
-
68
-
69
-
70
-
71
-
72
-
73
-
74
-
75
-
76
-
77
-
78
-
79
-
80
-
81
-
82
-
83
-
84
-
85
-
86
-
87
-
88
-
89
-
90
-
91
-
92
-
93
-
94
-
95
-
96
-
97
-
98
-
99
-
100
-
101
-
102
-
103
-
104
-
105
-
106
-
107
-
108
-
109
-
110
-
111
-
112
-
113
-
114
-
 115
115 -
 116
116 -
 117
117 -
 118
118 -
 119
119 -
 120
120 -
 121
121 -
 122
122 -
 123
123 -
 124
124 -
 125
125 -
126
-
127
-
128
-
129
-
130
-
131
-
132
-
133
-
134
-
135
-
136
-
137
-
138
-
139
-
140
-
141
-
142
-
143
-
144
-
145
-
146
-
147
-
148
-
149
-
150
-
151
-
152
-
153
-
154
-
155
-
156
-
157
-
158
 |
 |
