Dell XPS 600 Renegade Owner's Manual - Page 109
Removing a CD/DVD Drive, remove it from the drive bay.
 |
View all Dell XPS 600 Renegade manuals
Add to My Manuals
Save this manual to your list of manuals |
Page 109 highlights
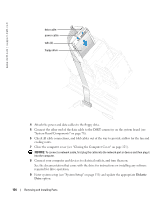
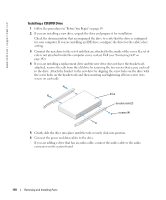
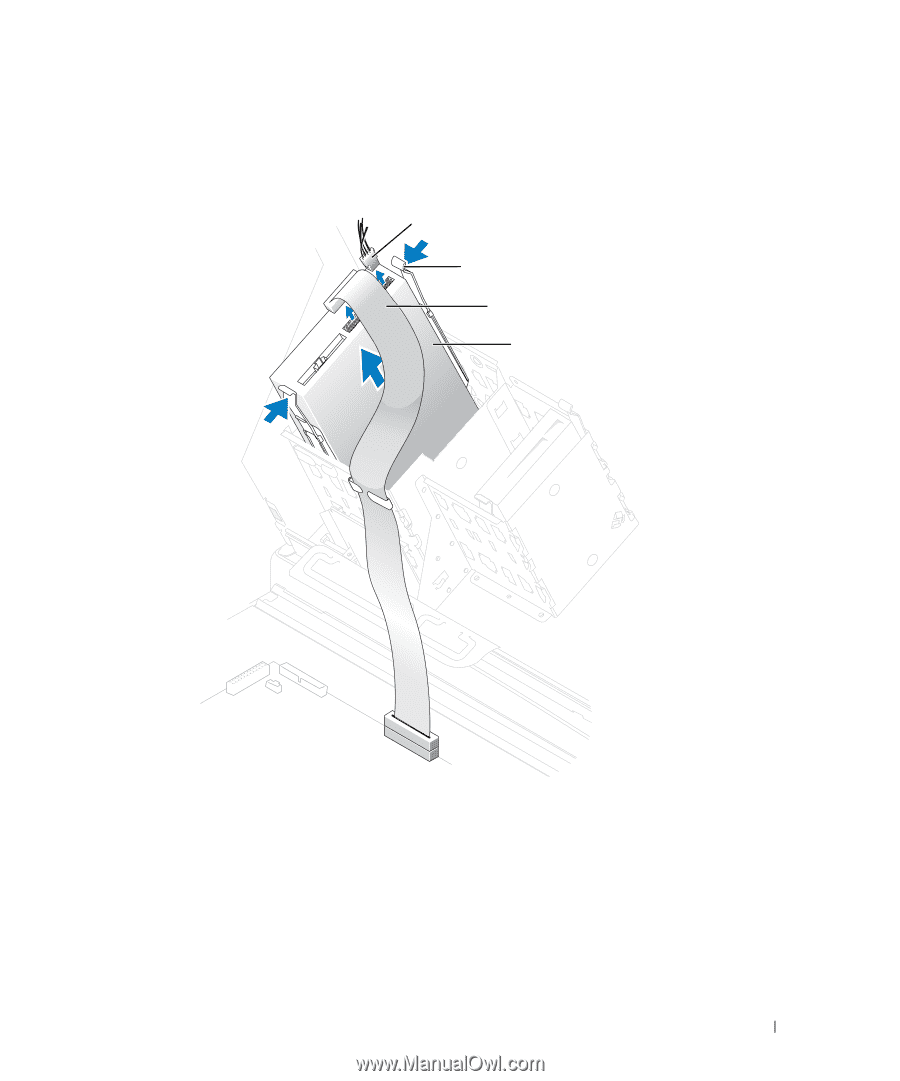
Removing a CD/DVD Drive 1 Follow the procedures in "Before You Begin" on page 69. 2 Disconnect the power and data cables from the back of the drive. power cable tabs (2) data cable CD/DVD drive 3 Press inward on the two tabs on the sides of the drive, and then slide the drive upward and remove it from the drive bay. Removing and Installing Parts 109
-
 1
1 -
2
-
3
-
4
-
5
-
6
-
7
-
8
-
9
-
10
-
11
-
12
-
13
-
14
-
15
-
16
-
17
-
18
-
19
-
20
-
21
-
22
-
23
-
24
-
25
-
26
-
27
-
28
-
29
-
30
-
31
-
32
-
33
-
34
-
35
-
36
-
37
-
38
-
39
-
40
-
41
-
42
-
43
-
44
-
45
-
46
-
47
-
48
-
49
-
50
-
51
-
52
-
53
-
54
-
55
-
56
-
57
-
58
-
59
-
60
-
61
-
62
-
63
-
64
-
65
-
66
-
67
-
68
-
69
-
70
-
71
-
72
-
73
-
74
-
75
-
76
-
77
-
78
-
79
-
80
-
81
-
82
-
83
-
84
-
85
-
86
-
87
-
88
-
89
-
90
-
91
-
92
-
93
-
94
-
95
-
96
-
97
-
98
-
99
-
100
-
101
-
102
-
103
-
 104
104 -
 105
105 -
 106
106 -
 107
107 -
 108
108 -
 109
109 -
 110
110 -
 111
111 -
 112
112 -
 113
113 -
 114
114 -
115
-
116
-
117
-
118
-
119
-
120
-
121
-
122
-
123
-
124
-
125
-
126
-
127
-
128
-
129
-
130
-
131
-
132
-
133
-
134
-
135
-
136
-
137
-
138
-
139
-
140
-
141
-
142
-
143
-
144
-
145
-
146
-
147
-
148
-
149
-
150
-
151
-
152
-
153
-
154
-
155
-
156
-
157
-
158
-
159
-
160
-
161
-
162
-
163
-
164
-
165
-
166
 |
 |
Removing and Installing Parts
109
Removing a CD/DVD Drive
1
Follow the procedures in "Before You Begin" on page69.
2
Disconnect the power and data cables from the back of the drive.
3
Press inward on the two tabs on the sides of the drive, and then slide the drive upward and
remove it from the drive bay.
power cable
data cable
tabs (2)
CD/DVD drive