Dell XPS 600 Renegade Owner's Manual - Page 112
Processor Airflow Shroud, Removing the Processor Airflow Shroud
 |
View all Dell XPS 600 Renegade manuals
Add to My Manuals
Save this manual to your list of manuals |
Page 112 highlights
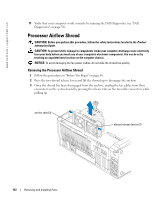
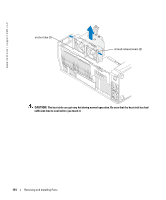
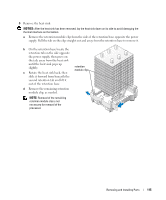
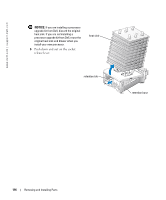
www.dell.com | support.dell.com 11 Verify that your computer works correctly by running the Dell Diagnostics (see "Dell Diagnostics" on page 58). Processor Airflow Shroud CAUTION: Before you perform this procedure, follow the safety instructions located in the Product Information Guide. CAUTION: To prevent static damage to components inside your computer, discharge static electricity from your body before you touch any of your computer's electronic components. You can do so by touching an unpainted metal surface on the computer chassis. NOTICE: To avoid damaging the fan power cables, do not slide the shroud too quickly. Removing the Processor Airflow Shroud 1 Follow the procedures in "Before You Begin" on page 69. 2 Press the two shroud release levers and lift the shroud up to disengage the anchors. 3 Once the shroud has been disengaged from the anchors, unplug the fan cables from their connectors on the system board by pressing the release tabs on the fan cable connectors while pulling up. anchor tabs (3) shroud release levers (2) 112 Removing and Installing Parts
-
 1
1 -
2
-
3
-
4
-
5
-
6
-
7
-
8
-
9
-
10
-
11
-
12
-
13
-
14
-
15
-
16
-
17
-
18
-
19
-
20
-
21
-
22
-
23
-
24
-
25
-
26
-
27
-
28
-
29
-
30
-
31
-
32
-
33
-
34
-
35
-
36
-
37
-
38
-
39
-
40
-
41
-
42
-
43
-
44
-
45
-
46
-
47
-
48
-
49
-
50
-
51
-
52
-
53
-
54
-
55
-
56
-
57
-
58
-
59
-
60
-
61
-
62
-
63
-
64
-
65
-
66
-
67
-
68
-
69
-
70
-
71
-
72
-
73
-
74
-
75
-
76
-
77
-
78
-
79
-
80
-
81
-
82
-
83
-
84
-
85
-
86
-
87
-
88
-
89
-
90
-
91
-
92
-
93
-
94
-
95
-
96
-
97
-
98
-
99
-
100
-
101
-
102
-
103
-
104
-
105
-
106
-
 107
107 -
 108
108 -
 109
109 -
 110
110 -
 111
111 -
 112
112 -
 113
113 -
 114
114 -
 115
115 -
 116
116 -
 117
117 -
118
-
119
-
120
-
121
-
122
-
123
-
124
-
125
-
126
-
127
-
128
-
129
-
130
-
131
-
132
-
133
-
134
-
135
-
136
-
137
-
138
-
139
-
140
-
141
-
142
-
143
-
144
-
145
-
146
-
147
-
148
-
149
-
150
-
151
-
152
-
153
-
154
-
155
-
156
-
157
-
158
-
159
-
160
-
161
-
162
-
163
-
164
-
165
-
166
 |
 |
