Dell XPS 600 Renegade Owner's Manual - Page 113
Installing the Processor Airflow Shroud, Processor, Removing the Processor
 |
View all Dell XPS 600 Renegade manuals
Add to My Manuals
Save this manual to your list of manuals |
Page 113 highlights
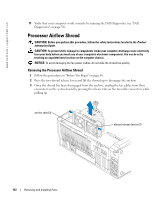
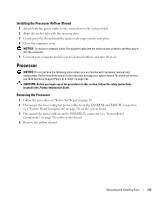
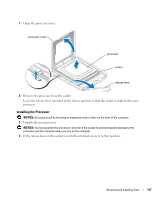
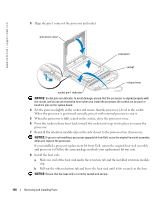
Installing the Processor Airflow Shroud 1 Attach both fan power cables to the connectors on the system board. 2 Align the anchor tabs with the securing slots. 3 Gently press the shroud until the anchor tabs snap securely into place. 4 Close the computer cover. NOTICE: To connect a network cable, first plug the cable into the network port or device and then plug it into the computer. 5 Connect your computer and devices to electrical outlets, and turn them on. Processor NOTICE: Do not perform the following steps unless you are familiar with hardware removal and replacement. Performing these steps incorrectly could damage your system board. For technical service, see "Dell Technical Support Policy (U.S. Only)" on page 140. CAUTION: Before you begin any of the procedures in this section, follow the safety instructions located in the Product Information Guide. Removing the Processor 1 Follow the procedures in "Before You Begin" on page 69. 2 Disconnect the two cooling fan power cables from the FANREAR and FANCPU connectors (see "System Board Components" on page 78) on the system board. 3 Disconnect the power cable from the POWER12V connector (see "System Board Components" on page 78) on the system board. 4 Remove the airflow shroud. Removing and Installing Parts 113
-
 1
1 -
2
-
3
-
4
-
5
-
6
-
7
-
8
-
9
-
10
-
11
-
12
-
13
-
14
-
15
-
16
-
17
-
18
-
19
-
20
-
21
-
22
-
23
-
24
-
25
-
26
-
27
-
28
-
29
-
30
-
31
-
32
-
33
-
34
-
35
-
36
-
37
-
38
-
39
-
40
-
41
-
42
-
43
-
44
-
45
-
46
-
47
-
48
-
49
-
50
-
51
-
52
-
53
-
54
-
55
-
56
-
57
-
58
-
59
-
60
-
61
-
62
-
63
-
64
-
65
-
66
-
67
-
68
-
69
-
70
-
71
-
72
-
73
-
74
-
75
-
76
-
77
-
78
-
79
-
80
-
81
-
82
-
83
-
84
-
85
-
86
-
87
-
88
-
89
-
90
-
91
-
92
-
93
-
94
-
95
-
96
-
97
-
98
-
99
-
100
-
101
-
102
-
103
-
104
-
105
-
106
-
107
-
 108
108 -
 109
109 -
 110
110 -
 111
111 -
 112
112 -
 113
113 -
 114
114 -
 115
115 -
 116
116 -
 117
117 -
 118
118 -
119
-
120
-
121
-
122
-
123
-
124
-
125
-
126
-
127
-
128
-
129
-
130
-
131
-
132
-
133
-
134
-
135
-
136
-
137
-
138
-
139
-
140
-
141
-
142
-
143
-
144
-
145
-
146
-
147
-
148
-
149
-
150
-
151
-
152
-
153
-
154
-
155
-
156
-
157
-
158
-
159
-
160
-
161
-
162
-
163
-
164
-
165
-
166
 |
 |