Dell XPS M1210 Owner's Manual - Page 68
Enabling the Display Settings for a TV in Microsoft® Windows® XP, Sound Modes, Stereo Sound Mode - display problem
 |
View all Dell XPS M1210 manuals
Add to My Manuals
Save this manual to your list of manuals |
Page 68 highlights
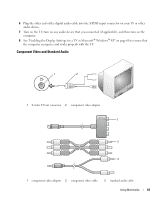
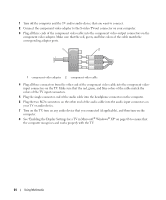
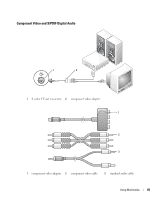
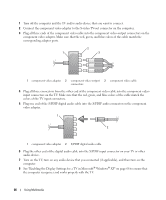
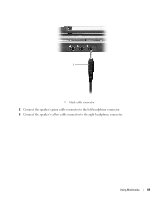
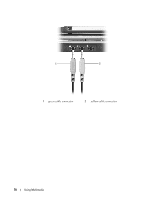
7 Click the arrows beside the Audio listening mode setting to scroll through the options, and select the CL Headphone option. 8 Click the arrows beside the Dynamic range compression option to select the most suitable option. 9 Click the Back button once, and then click the Back button again to return to the main menu screen. Enabling the Display Settings for a TV in Microsoft® Windows® XP Video Controller NOTE: To ensure that the display options appear correctly, connect the TV to the computer before you enable the display settings. 1 Click the Start button, point to Settings, and then click Control Panel. 2 Double-click Display and click the Settings tab. 3 Click Advanced. 4 Click the tab for your video card. NOTE: To determine the type of video card installed in your computer, see the Windows Help and Support Center. To access the Help and Support Center, click Start→ Help and Support. Under Pick a Task, click Use Tools to view your computer information and diagnose problems. Then, under My Computer Information, select Hardware. 5 In the display devices section, select the appropriate option for using either a single display or multiple displays, ensuring that the display settings are correct for your selection. Sound Modes Your computer is designed to run on two different sound modes-stereo and 5.1 surround sound. Stereo Sound Mode Your computer ships with stereo sound mode as the default. For this mode, the computer is equipped with two different headphone connectors and a microphone/line-in connector at the front of the computer. You can simultaneously use two sets of headphones or other sound output devices and a microphone or other sound input device. 5.1 Surround Sound Mode To switch to 5.1 surround sound mode, you need to connect a speaker's three differently colored cable connectors-green, yellow, and black-to the headphone and microphone connectors at the front of the computer. NOTE: You must connect the speaker's black cable connector first or the 5.1 surround sound mode does not work. 1 Connect the speaker's black cable connector to the microphone/line-in connector at the front of the computer. A pop-up menu appears, giving the status of which connectors are plugged in to each jack. 68 Using Multimedia
-
 1
1 -
2
-
3
-
4
-
5
-
6
-
7
-
8
-
9
-
10
-
11
-
12
-
13
-
14
-
15
-
16
-
17
-
18
-
19
-
20
-
21
-
22
-
23
-
24
-
25
-
26
-
27
-
28
-
29
-
30
-
31
-
32
-
33
-
34
-
35
-
36
-
37
-
38
-
39
-
40
-
41
-
42
-
43
-
44
-
45
-
46
-
47
-
48
-
49
-
50
-
51
-
52
-
53
-
54
-
55
-
56
-
57
-
58
-
59
-
60
-
61
-
62
-
 63
63 -
 64
64 -
 65
65 -
 66
66 -
 67
67 -
 68
68 -
 69
69 -
 70
70 -
 71
71 -
 72
72 -
 73
73 -
74
-
75
-
76
-
77
-
78
-
79
-
80
-
81
-
82
-
83
-
84
-
85
-
86
-
87
-
88
-
89
-
90
-
91
-
92
-
93
-
94
-
95
-
96
-
97
-
98
-
99
-
100
-
101
-
102
-
103
-
104
-
105
-
106
-
107
-
108
-
109
-
110
-
111
-
112
-
113
-
114
-
115
-
116
-
117
-
118
-
119
-
120
-
121
-
122
-
123
-
124
-
125
-
126
-
127
-
128
-
129
-
130
-
131
-
132
-
133
-
134
-
135
-
136
-
137
-
138
-
139
-
140
-
141
-
142
-
143
-
144
-
145
-
146
-
147
-
148
-
149
-
150
-
151
-
152
-
153
-
154
-
155
-
156
-
157
-
158
-
159
-
160
-
161
-
162
-
163
-
164
-
165
-
166
-
167
-
168
-
169
-
170
-
171
-
172
-
173
-
174
-
175
-
176
-
177
-
178
-
179
-
180
-
181
-
182
-
183
-
184
-
185
-
186
-
187
-
188
-
189
-
190
-
191
-
192
 |
 |
