Dell XPS M1210 Owner's Manual - Page 72
Removing an ExpressCard or Blank
 |
View all Dell XPS M1210 manuals
Add to My Manuals
Save this manual to your list of manuals |
Page 72 highlights
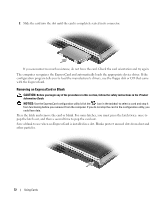
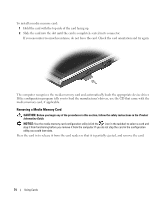
2 Slide the card into the slot until the card is completely seated in its connector. If you encounter too much resistance, do not force the card. Check the card orientation and try again. The computer recognizes the ExpressCard and automatically loads the appropriate device driver. If the configuration program tells you to load the manufacturer's drivers, use the floppy disk or CD that came with the ExpressCard. Removing an ExpressCard or Blank CAUTION: Before you begin any of the procedures in this section, follow the safety instructions in the Product Information Guide. NOTICE: Use the ExpressCard configuration utility (click the icon in the taskbar) to select a card and stop it from functioning before you remove it from the computer. If you do not stop the card in the configuration utility, you could lose data. Press the latch and remove the card or blank. For some latches, you must press the latch twice: once to pop the latch out, and then a second time to pop the card out. Save a blank to use when no ExpressCard is installed in a slot. Blanks protect unused slots from dust and other particles. 72 Using Cards
-
 1
1 -
2
-
3
-
4
-
5
-
6
-
7
-
8
-
9
-
10
-
11
-
12
-
13
-
14
-
15
-
16
-
17
-
18
-
19
-
20
-
21
-
22
-
23
-
24
-
25
-
26
-
27
-
28
-
29
-
30
-
31
-
32
-
33
-
34
-
35
-
36
-
37
-
38
-
39
-
40
-
41
-
42
-
43
-
44
-
45
-
46
-
47
-
48
-
49
-
50
-
51
-
52
-
53
-
54
-
55
-
56
-
57
-
58
-
59
-
60
-
61
-
62
-
63
-
64
-
65
-
66
-
 67
67 -
 68
68 -
 69
69 -
 70
70 -
 71
71 -
 72
72 -
 73
73 -
 74
74 -
 75
75 -
 76
76 -
 77
77 -
78
-
79
-
80
-
81
-
82
-
83
-
84
-
85
-
86
-
87
-
88
-
89
-
90
-
91
-
92
-
93
-
94
-
95
-
96
-
97
-
98
-
99
-
100
-
101
-
102
-
103
-
104
-
105
-
106
-
107
-
108
-
109
-
110
-
111
-
112
-
113
-
114
-
115
-
116
-
117
-
118
-
119
-
120
-
121
-
122
-
123
-
124
-
125
-
126
-
127
-
128
-
129
-
130
-
131
-
132
-
133
-
134
-
135
-
136
-
137
-
138
-
139
-
140
-
141
-
142
-
143
-
144
-
145
-
146
-
147
-
148
-
149
-
150
-
151
-
152
-
153
-
154
-
155
-
156
-
157
-
158
-
159
-
160
-
161
-
162
-
163
-
164
-
165
-
166
-
167
-
168
-
169
-
170
-
171
-
172
-
173
-
174
-
175
-
176
-
177
-
178
-
179
-
180
-
181
-
182
-
183
-
184
-
185
-
186
-
187
-
188
-
189
-
190
-
191
-
192
 |
 |
