Garmin GPSMAP 5215 Owner's Manual - Page 72
Calibrating the Touchscreen, Capturing Screenshots, Configure, System, Beeper/Display
 |
View all Garmin GPSMAP 5215 manuals
Add to My Manuals
Save this manual to your list of manuals |
Page 72 highlights
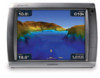
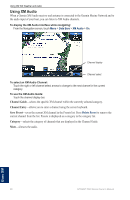
Appendix Calibrating the Touchscreen Your chartplotter's touchscreen does not normally require calibration. However, if the buttons do not seem to be responding properly, use the following process to calibrate the screen. 1. While the chartplotter is turned off, press the Power key. 2. When the Warning screen appears (with the I Agree button), touch anywhere on the black portion of the screen for approximately 15 seconds until the Calibration screen is displayed. 3. Follow the instructions on the screen until "Calibration is complete" is displayed. 4. Touch OK. Capturing Screenshots Note: To capture screenshots, you need the optional Garmin RF Wireless Remote Control. You can capture a screenshot of any screen displayed on your chartplotter as a bitmap (.BMP) file and then transfer it to your computer. To capture screenshots: 1. Insert an SD card into the SD card slot on the front of the chartplotter. 2. Touch Configure > System > Beeper/Display. 3. Touch Screenshot Capture to turn screenshot captures On. 4. When you are on a screen you want to capture, press the HOME button on the Garmin RF Wireless Remote Control for at least six seconds. 5. Touch OK when the Screenshot Taken window is displayed. To copy the screenshots to your computer: 1. Remove the SD card from the chartplotter and insert it into an SD card reader that is attached to a computer. 2. From Windows Explorer, open the Garmin\scrn folder on the SD card. 3. Copy the appropriate .BMP file on the card and paste it to any location on the computer. 68 GPSMAP 5000 Series Owner's Manual
-
 1
1 -
2
-
3
-
4
-
5
-
6
-
7
-
8
-
9
-
10
-
11
-
12
-
13
-
14
-
15
-
16
-
17
-
18
-
19
-
20
-
21
-
22
-
23
-
24
-
25
-
26
-
27
-
28
-
29
-
30
-
31
-
32
-
33
-
34
-
35
-
36
-
37
-
38
-
39
-
40
-
41
-
42
-
43
-
44
-
45
-
46
-
47
-
48
-
49
-
50
-
51
-
52
-
53
-
54
-
55
-
56
-
57
-
58
-
59
-
60
-
61
-
62
-
63
-
64
-
65
-
66
-
 67
67 -
 68
68 -
 69
69 -
 70
70 -
 71
71 -
 72
72 -
 73
73 -
 74
74 -
 75
75 -
 76
76 -
 77
77 -
78
-
79
-
80
-
81
-
82
-
83
-
84
 |
 |