HP 6125G HP 6125G & 6125G/XG Blade Switches ACL and QoS Configuration - Page 60
Configuring priority marking, Configuration procedure
 |
View all HP 6125G manuals
Add to My Manuals
Save this manual to your list of manuals |
Page 60 highlights
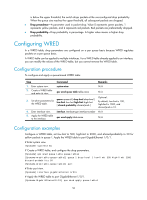
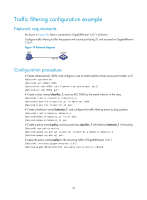
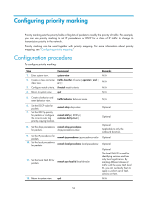
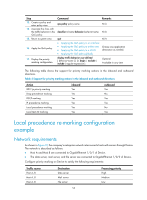
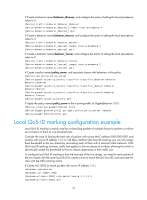
Configuring priority marking Priority marking sets the priority fields or flag bits of packets to modify the priority of traffic. For example, you can use priority marking to set IP precedence or DSCP for a class of IP traffic to change its transmission priority in the network. Priority marking can be used together with priority mapping. For more information about priority mapping, see "Configuring priority mapping." Configuration procedure To configure priority marking: Step Command 1. Enter system view. system-view 2. Create a class and enter traffic classifier tcl-name [ operator { and | class view. or } ] 3. Configure match criteria. if-match match-criteria 4. Return to system view. quit Remarks N/A N/A N/A N/A 5. Create a behavior and enter behavior view. traffic behavior behavior-name 6. Set the DSCP value for packets. remark dscp dscp-value 7. Set the 802.1p priority for packets or configure remark dot1p { 8021p | the inner-to-outer tag customer-dot1p-trust } priority copying function. 8. Set the drop precedence remark drop-precedence for packets. drop-precedence-value 9. Set the IP precedence for packets. 10. Set the local precedence for packets. remark ip-precedence ip-precedence-value remark local-precedence local-precedence 11. Set the local QoS ID for packets. remark qos-local-id local-id-value 12. Return to system view. quit N/A Optional. Optional. Optional. Applicable to only the outbound direction. Optional. Optional. Optional. The local QoS ID is used for identifying services and has only local significance. By marking different classes of traffic with the same QoS local ID, you can re-classify them to apply a uniform set of QoS actions on them. N/A 54
-
 1
1 -
2
-
3
-
4
-
5
-
6
-
7
-
8
-
9
-
10
-
11
-
12
-
13
-
14
-
15
-
16
-
17
-
18
-
19
-
20
-
21
-
22
-
23
-
24
-
25
-
26
-
27
-
28
-
29
-
30
-
31
-
32
-
33
-
34
-
35
-
36
-
37
-
38
-
39
-
40
-
41
-
42
-
43
-
44
-
45
-
46
-
47
-
48
-
49
-
50
-
51
-
52
-
53
-
54
-
 55
55 -
 56
56 -
 57
57 -
 58
58 -
 59
59 -
 60
60 -
 61
61 -
 62
62 -
 63
63 -
 64
64 -
 65
65 -
66
-
67
-
68
-
69
-
70
-
71
-
72
-
73
-
74
-
75
-
76
-
77
-
78
-
79
-
80
-
81
-
82
-
83
-
84
 |
 |
