HP Designjet 2000/3000cp HP DesignJet 2500/2000CP Printer - User's Guide - Page 260
Checking the Ink Cartridges, For Imaging Ink Systems the part numbers are C1806A to C1809A, and for UV
 |
View all HP Designjet 2000/3000cp manuals
Add to My Manuals
Save this manual to your list of manuals |
Page 260 highlights
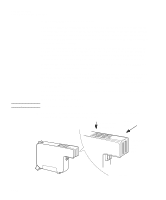
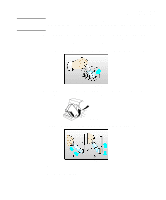
Troubleshooting Solving Ink System Problems Checking the Ink Cartridges Check ink cartridges nnon Abort ---> C4704034 If prompted, open the left door to access the ink cartridges. The message "Check ink cartridges / Abort" is displayed. The flashing squares indicate which printheads require checking. If you are unable to fix the errors now, press ↓ to cancel (abort) the procedure. n Check if any of the valves are loose in their holders. If so, this was probably the cause of the problem. Reinsert the valve, and pull on the valve handle gently to make sure it is seated properly. If you have recurring problems with a loose valve, it is probably occurring while the printheads are refilling. You will need to replace the ink system affected. n If a loose valve was not the problem, remove the ink cartridges that show an error. Check if they are empty by shaking them gently. If it feels as though nothing is moving inside, the ink cartridge is empty and you will need to purchase a new ink system. n Check that the triangular tab on the ink cartridge valve is not bent or broken. If you are getting an Ink Cartridge Removed message, this may be the cause. If any are bent or broken, you will need to replace your ink system. n Check that the tubes coming from the ink cartridges are not bent or damaged. If they are, replace the ink system. n Check that the part number on the ink cartridges matches the type of ink system you are using. (The printhead, cleaner and ink cartridge must all be of the same type.) For Imaging Ink Systems the part numbers are C1806A to C1809A, and for UV Pigmented Ink Systems they are C1892A to C1895A. n Replace the ink cartridge valves in their correct color-coded locations. The triangular tabs on the valves must be pointing up for the printer to recognize them properly. Close the left door. Persistent InkSystem Problems If this does not fix the problem: n If the problem is still present, but not severe enough to prevent printing, the printer's front panel will indicate that the printer's image print quality cannot be assured, but you will be allowed to continue printing if you so desire. n If the problem is serious enough to prevent printing from occurring, please call HP to help resolve the problem. Please have the messages your printer displayed available for the service representative to help speed the diagnosis process. 11-40
-
 1
1 -
2
-
3
-
4
-
5
-
6
-
7
-
8
-
9
-
10
-
11
-
12
-
13
-
14
-
15
-
16
-
17
-
18
-
19
-
20
-
21
-
22
-
23
-
24
-
25
-
26
-
27
-
28
-
29
-
30
-
31
-
32
-
33
-
34
-
35
-
36
-
37
-
38
-
39
-
40
-
41
-
42
-
43
-
44
-
45
-
46
-
47
-
48
-
49
-
50
-
51
-
52
-
53
-
54
-
55
-
56
-
57
-
58
-
59
-
60
-
61
-
62
-
63
-
64
-
65
-
66
-
67
-
68
-
69
-
70
-
71
-
72
-
73
-
74
-
75
-
76
-
77
-
78
-
79
-
80
-
81
-
82
-
83
-
84
-
85
-
86
-
87
-
88
-
89
-
90
-
91
-
92
-
93
-
94
-
95
-
96
-
97
-
98
-
99
-
100
-
101
-
102
-
103
-
104
-
105
-
106
-
107
-
108
-
109
-
110
-
111
-
112
-
113
-
114
-
115
-
116
-
117
-
118
-
119
-
120
-
121
-
122
-
123
-
124
-
125
-
126
-
127
-
128
-
129
-
130
-
131
-
132
-
133
-
134
-
135
-
136
-
137
-
138
-
139
-
140
-
141
-
142
-
143
-
144
-
145
-
146
-
147
-
148
-
149
-
150
-
151
-
152
-
153
-
154
-
155
-
156
-
157
-
158
-
159
-
160
-
161
-
162
-
163
-
164
-
165
-
166
-
167
-
168
-
169
-
170
-
171
-
172
-
173
-
174
-
175
-
176
-
177
-
178
-
179
-
180
-
181
-
182
-
183
-
184
-
185
-
186
-
187
-
188
-
189
-
190
-
191
-
192
-
193
-
194
-
195
-
196
-
197
-
198
-
199
-
200
-
201
-
202
-
203
-
204
-
205
-
206
-
207
-
208
-
209
-
210
-
211
-
212
-
213
-
214
-
215
-
216
-
217
-
218
-
219
-
220
-
221
-
222
-
223
-
224
-
225
-
226
-
227
-
228
-
229
-
230
-
231
-
232
-
233
-
234
-
235
-
236
-
237
-
238
-
239
-
240
-
241
-
242
-
243
-
244
-
245
-
246
-
247
-
248
-
249
-
250
-
251
-
252
-
253
-
254
-
 255
255 -
 256
256 -
 257
257 -
 258
258 -
 259
259 -
 260
260 -
 261
261 -
 262
262 -
 263
263 -
 264
264 -
 265
265 -
266
-
267
-
268
-
269
-
270
-
271
-
272
-
273
-
274
-
275
-
276
-
277
-
278
-
279
-
280
-
281
-
282
-
283
-
284
-
285
-
286
-
287
-
288
-
289
-
290
-
291
-
292
-
293
-
294
-
295
-
296
-
297
-
298
-
299
-
300
-
301
-
302
-
303
-
304
-
305
-
306
-
307
-
308
-
309
-
310
-
311
-
312
-
313
-
314
-
315
-
316
-
317
-
318
-
319
-
320
-
321
-
322
-
323
-
324
-
325
-
326
-
327
-
328
-
329
-
330
-
331
-
332
-
333
-
334
-
335
-
336
-
337
-
338
-
339
-
340
 |
 |