HP Designjet 2000/3000cp HP DesignJet 2500/2000CP Printer - User's Guide - Page 261
If You Have Problems Reseating a Printhead
 |
View all HP Designjet 2000/3000cp manuals
Add to My Manuals
Save this manual to your list of manuals |
Page 261 highlights
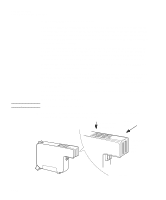
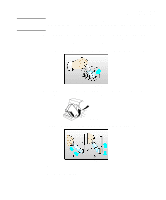
Troubleshooting Solving Ink System Problems If You Have Problems Reseating a Printhead Replace printhead nnon C4704034 Check printhead nnon Abort -> C4704034 When printheads are installed, in extreme circumstances it is possible that the printer will not recognize them. This will be visible on the front panel with the message "Replace printhead" or "Check printhead / Abort" where one or more of the squares are flashing. Each square represents a printhead, with the flashing ones representing printheads where the printer has detected a problem. When you reseat or replace a printhead, the flashing filled square changes, for one or two seconds, to an hour-glass. At this point, the printer is testing the printhead. Don't remove or insert another printhead while this test is being done. n If the test is successful, the hour-glass reverts to its normal non-flashing filled state. n If the test fails, the hour-glass will change back to a flashing filled square. To correct this, make the following checks: 1 Remove all four printheads completely from the printer. On the front panel the displayed message will change to show four flashing lights. 2 Look at the electrical contacts on the printhead and carriage. If they are dirty, they should be cleaned (see page 11-42, Cleaning Electrical Contacts on page). 3 Reinstall each printhead, one at a time; if the flashing squares stop flashing, then the printheads have passed the test. DO NOT INSERT THE NEXT PRINTHEAD UNTIL THE PRINTER HAS ACCEPTED THE CURRENT ONE. If the lights continue flashing and the printheads have been inserted correctly, try reseating them a few more times, by removing the printhead from its stall and then replacing it until it snaps correctly into position. NOTE: Do not leave printheads partly inserted in the carriage; they may be making electrical contact and be the cause of the reseating problem, as you try to reseat other printheads. If the printer still refuses to accept your printheads, try replacing the indicated ink system (see 11-38, Checking Ink Systems) or call HP for assistance. 11-41
-
 1
1 -
2
-
3
-
4
-
5
-
6
-
7
-
8
-
9
-
10
-
11
-
12
-
13
-
14
-
15
-
16
-
17
-
18
-
19
-
20
-
21
-
22
-
23
-
24
-
25
-
26
-
27
-
28
-
29
-
30
-
31
-
32
-
33
-
34
-
35
-
36
-
37
-
38
-
39
-
40
-
41
-
42
-
43
-
44
-
45
-
46
-
47
-
48
-
49
-
50
-
51
-
52
-
53
-
54
-
55
-
56
-
57
-
58
-
59
-
60
-
61
-
62
-
63
-
64
-
65
-
66
-
67
-
68
-
69
-
70
-
71
-
72
-
73
-
74
-
75
-
76
-
77
-
78
-
79
-
80
-
81
-
82
-
83
-
84
-
85
-
86
-
87
-
88
-
89
-
90
-
91
-
92
-
93
-
94
-
95
-
96
-
97
-
98
-
99
-
100
-
101
-
102
-
103
-
104
-
105
-
106
-
107
-
108
-
109
-
110
-
111
-
112
-
113
-
114
-
115
-
116
-
117
-
118
-
119
-
120
-
121
-
122
-
123
-
124
-
125
-
126
-
127
-
128
-
129
-
130
-
131
-
132
-
133
-
134
-
135
-
136
-
137
-
138
-
139
-
140
-
141
-
142
-
143
-
144
-
145
-
146
-
147
-
148
-
149
-
150
-
151
-
152
-
153
-
154
-
155
-
156
-
157
-
158
-
159
-
160
-
161
-
162
-
163
-
164
-
165
-
166
-
167
-
168
-
169
-
170
-
171
-
172
-
173
-
174
-
175
-
176
-
177
-
178
-
179
-
180
-
181
-
182
-
183
-
184
-
185
-
186
-
187
-
188
-
189
-
190
-
191
-
192
-
193
-
194
-
195
-
196
-
197
-
198
-
199
-
200
-
201
-
202
-
203
-
204
-
205
-
206
-
207
-
208
-
209
-
210
-
211
-
212
-
213
-
214
-
215
-
216
-
217
-
218
-
219
-
220
-
221
-
222
-
223
-
224
-
225
-
226
-
227
-
228
-
229
-
230
-
231
-
232
-
233
-
234
-
235
-
236
-
237
-
238
-
239
-
240
-
241
-
242
-
243
-
244
-
245
-
246
-
247
-
248
-
249
-
250
-
251
-
252
-
253
-
254
-
255
-
 256
256 -
 257
257 -
 258
258 -
 259
259 -
 260
260 -
 261
261 -
 262
262 -
 263
263 -
 264
264 -
 265
265 -
 266
266 -
267
-
268
-
269
-
270
-
271
-
272
-
273
-
274
-
275
-
276
-
277
-
278
-
279
-
280
-
281
-
282
-
283
-
284
-
285
-
286
-
287
-
288
-
289
-
290
-
291
-
292
-
293
-
294
-
295
-
296
-
297
-
298
-
299
-
300
-
301
-
302
-
303
-
304
-
305
-
306
-
307
-
308
-
309
-
310
-
311
-
312
-
313
-
314
-
315
-
316
-
317
-
318
-
319
-
320
-
321
-
322
-
323
-
324
-
325
-
326
-
327
-
328
-
329
-
330
-
331
-
332
-
333
-
334
-
335
-
336
-
337
-
338
-
339
-
340
 |
 |