HP Designjet 510 HP Designjet 510 Printer series - User's Guide: English - Page 189
To insert a LAN card or an Accessory, and bottom of the card.
 |
View all HP Designjet 510 manuals
Add to My Manuals
Save this manual to your list of manuals |
Page 189 highlights
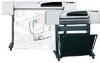
HP Jetdirect network card installation 3. Remove the cover completely. Inside the compartment there are two slots for a LAN card or an Accessory card. If you use an HP-GL/2 card, the LAN card should be in the right-hand slot (nearer the back of the printer), the accessory card on the left. 4. To insert a LAN card (or an Accessory card), remove the metal cover from the appropriate slot by unscrewing its two screws. 5. When you have inserted the card, screw it into place, using its two screws (at the top and bottom of the card). Previous ... Continued ...
-
 1
1 -
2
-
3
-
4
-
5
-
6
-
7
-
8
-
9
-
10
-
11
-
12
-
13
-
14
-
15
-
16
-
17
-
18
-
19
-
20
-
21
-
22
-
23
-
24
-
25
-
26
-
27
-
28
-
29
-
30
-
31
-
32
-
33
-
34
-
35
-
36
-
37
-
38
-
39
-
40
-
41
-
42
-
43
-
44
-
45
-
46
-
47
-
48
-
49
-
50
-
51
-
52
-
53
-
54
-
55
-
56
-
57
-
58
-
59
-
60
-
61
-
62
-
63
-
64
-
65
-
66
-
67
-
68
-
69
-
70
-
71
-
72
-
73
-
74
-
75
-
76
-
77
-
78
-
79
-
80
-
81
-
82
-
83
-
84
-
85
-
86
-
87
-
88
-
89
-
90
-
91
-
92
-
93
-
94
-
95
-
96
-
97
-
98
-
99
-
100
-
101
-
102
-
103
-
104
-
105
-
106
-
107
-
108
-
109
-
110
-
111
-
112
-
113
-
114
-
115
-
116
-
117
-
118
-
119
-
120
-
121
-
122
-
123
-
124
-
125
-
126
-
127
-
128
-
129
-
130
-
131
-
132
-
133
-
134
-
135
-
136
-
137
-
138
-
139
-
140
-
141
-
142
-
143
-
144
-
145
-
146
-
147
-
148
-
149
-
150
-
151
-
152
-
153
-
154
-
155
-
156
-
157
-
158
-
159
-
160
-
161
-
162
-
163
-
164
-
165
-
166
-
167
-
168
-
169
-
170
-
171
-
172
-
173
-
174
-
175
-
176
-
177
-
178
-
179
-
180
-
181
-
182
-
183
-
 184
184 -
 185
185 -
 186
186 -
 187
187 -
 188
188 -
 189
189 -
 190
190 -
 191
191 -
 192
192 -
 193
193 -
 194
194 -
195
-
196
-
197
-
198
-
199
-
200
-
201
-
202
-
203
-
204
-
205
-
206
-
207
-
208
-
209
-
210
-
211
-
212
-
213
-
214
-
215
-
216
-
217
-
218
-
219
 |
 |

3.
Remove the cover completely. Inside the
compartment there are two slots for a LAN
card or an Accessory card.
If you use an HP-GL/2 card, the LAN card
should be in the right-hand slot (nearer the
back of the printer), the accessory card on
the left.
4.
To insert a LAN card (or an Accessory
card), remove the metal cover from the
appropriate slot by unscrewing its two
screws.
5.
When you have inserted the card, screw it
into place, using its two screws (at the top
and bottom of the card).
Previous …
Continued …
HP Jetdirect network card installation