HP Designjet T770 HP Designjet T770 & T1200 Printer series - Users Guide - Page 133
Insert a printhead, Insert the printhead slowly and vertically
 |
View all HP Designjet T770 manuals
Add to My Manuals
Save this manual to your list of manuals |
Page 133 highlights
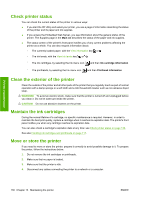
Ink and printheads Insert a printhead 1. Remove the orange protective caps by pulling them down. 2. The printhead is designed to prevent you from accidentally inserting it into the wrong slot. Check that the colored label on the printhead matches the colored label of the carriage slot into which the printhead is to be inserted. 3. Insert the new printhead into its correct slot in the carriage. CAUTION: Insert the printhead slowly and vertically, straight down. It may be damaged if you insert it too fast, or at an angle, or if you rotate it as you insert it. ENWW Insert a printhead 125
-
 1
1 -
2
-
3
-
4
-
5
-
6
-
7
-
8
-
9
-
10
-
11
-
12
-
13
-
14
-
15
-
16
-
17
-
18
-
19
-
20
-
21
-
22
-
23
-
24
-
25
-
26
-
27
-
28
-
29
-
30
-
31
-
32
-
33
-
34
-
35
-
36
-
37
-
38
-
39
-
40
-
41
-
42
-
43
-
44
-
45
-
46
-
47
-
48
-
49
-
50
-
51
-
52
-
53
-
54
-
55
-
56
-
57
-
58
-
59
-
60
-
61
-
62
-
63
-
64
-
65
-
66
-
67
-
68
-
69
-
70
-
71
-
72
-
73
-
74
-
75
-
76
-
77
-
78
-
79
-
80
-
81
-
82
-
83
-
84
-
85
-
86
-
87
-
88
-
89
-
90
-
91
-
92
-
93
-
94
-
95
-
96
-
97
-
98
-
99
-
100
-
101
-
102
-
103
-
104
-
105
-
106
-
107
-
108
-
109
-
110
-
111
-
112
-
113
-
114
-
115
-
116
-
117
-
118
-
119
-
120
-
121
-
122
-
123
-
124
-
125
-
126
-
127
-
 128
128 -
 129
129 -
 130
130 -
 131
131 -
 132
132 -
 133
133 -
 134
134 -
 135
135 -
 136
136 -
 137
137 -
 138
138 -
139
-
140
-
141
-
142
-
143
-
144
-
145
-
146
-
147
-
148
-
149
-
150
-
151
-
152
-
153
-
154
-
155
-
156
-
157
-
158
-
159
-
160
-
161
-
162
-
163
-
164
-
165
-
166
-
167
-
168
-
169
-
170
-
171
-
172
-
173
-
174
-
175
-
176
-
177
-
178
-
179
-
180
-
181
-
182
-
183
-
184
-
185
-
186
-
187
-
188
-
189
-
190
-
191
-
192
-
193
-
194
-
195
-
196
-
197
-
198
-
199
-
200
-
201
-
202
-
203
-
204
-
205
-
206
-
207
-
208
-
209
-
210
-
211
-
212
-
213
-
214
-
215
-
216
-
217
-
218
-
219
-
220
-
221
-
222
 |
 |

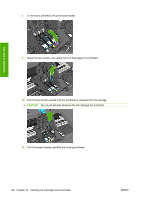
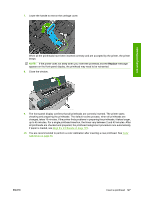
Insert a printhead
1.
Remove the orange protective caps by pulling them down.
2.
The printhead is designed to prevent you from accidentally inserting it into the wrong slot. Check
that the colored label on the printhead matches the colored label of the carriage slot into which the
printhead is to be inserted.
3.
Insert the new printhead into its correct slot in the carriage.
CAUTION:
Insert the printhead slowly and vertically, straight down. It may be damaged if you
insert it too fast, or at an angle, or if you rotate it as you insert it.
ENWW
Insert a printhead
125
Ink and printheads