HP Designjet T770 HP Designjet T770 & T1200 Printer series - Users Guide - Page 21
Printer sharing considerations, Uninstall the printer software (Windows) - troubleshooting
 |
View all HP Designjet T770 manuals
Add to My Manuals
Save this manual to your list of manuals |
Page 21 highlights
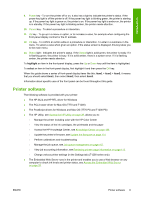
Software installation NOTE: The use of non-certified USB cables can lead to connectivity problems. Only cables certified by the USB Implementor's Forum (http://www.usb.org/) should be used with this printer. 1. Do not connect the computer to the printer yet. You must first install the printer driver software on the computer, as follows. 2. Insert the HP Start-Up Kit CD into your CD drive. If the CD does not start automatically, run the autorun.exe program in the root folder of the CD. 3. Press the Custom Install button. 4. In some cases, you may see a message warning you that the installer would need to communicate through the firewall in order to search the network for printers. As you have no need to do this, you can check the box Continue installation without searching the network. 5. If you see a list of networked printers, select Help me find my printer (including network, USB or parallel connected printers). 6. Select USB Cable. NOTE: You can connect your printer and complete the installation later if you prefer. To do so, check the box marked I want to connect my printer after completing the setup wizard. 7. When prompted to do so, connect your computer to the printer with a certified USB cable. Ensure that the printer is turned on. 8. The printer drivers and the HP Utility are installed. TIP: If you would like to share the printer with other people connected to your network, press the Printer Properties button in the Ready to Install window, set Printer Name to the name under which the printer will be shared, then set Shared to Yes. Printer sharing considerations ● The HP Utility must be installed on a computer before it can be used from that computer. ● Any other users sharing your directly connected printer will be able to send print jobs, but will not be able to receive information from the printer-which affects printer alerts, printer status reports, paper management, printer administration and troubleshooting. ● Any other users sharing your directly connected printer will be unable to use the printer's own print preview facility, although the application's print preview will still be available. See Preview a print on page 60. TIP: The best way to share the printer over a network is to connect the printer not to any computer, but to the network. See Connect to a network (Windows)on page 12. Uninstall the printer software (Windows) 1. Insert the HP Start-Up Kit CD into your CD drive. If the CD does not start automatically, run the autorun.exe program in the root folder of the CD. 2. Press the Modify Installation button, and follow the instructions on your screen to uninstall the printer software. ENWW Uninstall the printer software (Windows) 13
-
 1
1 -
2
-
3
-
4
-
5
-
6
-
7
-
8
-
9
-
10
-
11
-
12
-
13
-
14
-
15
-
 16
16 -
 17
17 -
 18
18 -
 19
19 -
 20
20 -
 21
21 -
 22
22 -
 23
23 -
 24
24 -
 25
25 -
 26
26 -
27
-
28
-
29
-
30
-
31
-
32
-
33
-
34
-
35
-
36
-
37
-
38
-
39
-
40
-
41
-
42
-
43
-
44
-
45
-
46
-
47
-
48
-
49
-
50
-
51
-
52
-
53
-
54
-
55
-
56
-
57
-
58
-
59
-
60
-
61
-
62
-
63
-
64
-
65
-
66
-
67
-
68
-
69
-
70
-
71
-
72
-
73
-
74
-
75
-
76
-
77
-
78
-
79
-
80
-
81
-
82
-
83
-
84
-
85
-
86
-
87
-
88
-
89
-
90
-
91
-
92
-
93
-
94
-
95
-
96
-
97
-
98
-
99
-
100
-
101
-
102
-
103
-
104
-
105
-
106
-
107
-
108
-
109
-
110
-
111
-
112
-
113
-
114
-
115
-
116
-
117
-
118
-
119
-
120
-
121
-
122
-
123
-
124
-
125
-
126
-
127
-
128
-
129
-
130
-
131
-
132
-
133
-
134
-
135
-
136
-
137
-
138
-
139
-
140
-
141
-
142
-
143
-
144
-
145
-
146
-
147
-
148
-
149
-
150
-
151
-
152
-
153
-
154
-
155
-
156
-
157
-
158
-
159
-
160
-
161
-
162
-
163
-
164
-
165
-
166
-
167
-
168
-
169
-
170
-
171
-
172
-
173
-
174
-
175
-
176
-
177
-
178
-
179
-
180
-
181
-
182
-
183
-
184
-
185
-
186
-
187
-
188
-
189
-
190
-
191
-
192
-
193
-
194
-
195
-
196
-
197
-
198
-
199
-
200
-
201
-
202
-
203
-
204
-
205
-
206
-
207
-
208
-
209
-
210
-
211
-
212
-
213
-
214
-
215
-
216
-
217
-
218
-
219
-
220
-
221
-
222
 |
 |