HP Designjet T770 HP Designjet T770 & T1200 Printer series - Users Guide - Page 15
Communication ports, The wall spacers
 |
View all HP Designjet T770 manuals
Add to My Manuals
Save this manual to your list of manuals |
Page 15 highlights
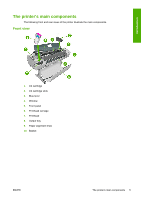
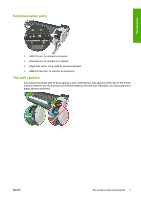
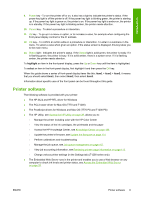
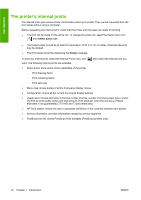
Introduction Communication ports 1. USB 2.0 port, to connect a computer 2. Ethernet port, to connect to a network 3. Diagnostic LEDs, to be used by service engineers 4. USB 2.0 host port, to connect an accessory The wall spacers If you place the printer with its back against a wall, lower the two wall spacers at the rear of the printer to ensure that the rear of the printer is a minimum distance from the wall. Otherwise, you may experience paper advance problems. ENWW The printer's main components 7
-
 1
1 -
2
-
3
-
4
-
5
-
6
-
7
-
8
-
9
-
 10
10 -
 11
11 -
 12
12 -
 13
13 -
 14
14 -
 15
15 -
 16
16 -
 17
17 -
 18
18 -
 19
19 -
 20
20 -
21
-
22
-
23
-
24
-
25
-
26
-
27
-
28
-
29
-
30
-
31
-
32
-
33
-
34
-
35
-
36
-
37
-
38
-
39
-
40
-
41
-
42
-
43
-
44
-
45
-
46
-
47
-
48
-
49
-
50
-
51
-
52
-
53
-
54
-
55
-
56
-
57
-
58
-
59
-
60
-
61
-
62
-
63
-
64
-
65
-
66
-
67
-
68
-
69
-
70
-
71
-
72
-
73
-
74
-
75
-
76
-
77
-
78
-
79
-
80
-
81
-
82
-
83
-
84
-
85
-
86
-
87
-
88
-
89
-
90
-
91
-
92
-
93
-
94
-
95
-
96
-
97
-
98
-
99
-
100
-
101
-
102
-
103
-
104
-
105
-
106
-
107
-
108
-
109
-
110
-
111
-
112
-
113
-
114
-
115
-
116
-
117
-
118
-
119
-
120
-
121
-
122
-
123
-
124
-
125
-
126
-
127
-
128
-
129
-
130
-
131
-
132
-
133
-
134
-
135
-
136
-
137
-
138
-
139
-
140
-
141
-
142
-
143
-
144
-
145
-
146
-
147
-
148
-
149
-
150
-
151
-
152
-
153
-
154
-
155
-
156
-
157
-
158
-
159
-
160
-
161
-
162
-
163
-
164
-
165
-
166
-
167
-
168
-
169
-
170
-
171
-
172
-
173
-
174
-
175
-
176
-
177
-
178
-
179
-
180
-
181
-
182
-
183
-
184
-
185
-
186
-
187
-
188
-
189
-
190
-
191
-
192
-
193
-
194
-
195
-
196
-
197
-
198
-
199
-
200
-
201
-
202
-
203
-
204
-
205
-
206
-
207
-
208
-
209
-
210
-
211
-
212
-
213
-
214
-
215
-
216
-
217
-
218
-
219
-
220
-
221
-
222
 |
 |
Communication ports
1.
USB 2.0 port, to connect a computer
2.
Ethernet port, to connect to a network
3.
Diagnostic LEDs, to be used by service engineers
4.
USB 2.0 host port, to connect an accessory
The wall spacers
If you place the printer with its back against a wall, lower the two wall spacers at the rear of the printer
to ensure that the rear of the printer is a minimum distance from the wall. Otherwise, you may experience
paper advance problems.
ENWW
The printer's main components
7
Introduction