HP Designjet T770 HP Designjet T770 & T1200 Printer series - Users Guide - Page 51
Unload a single sheet
 |
View all HP Designjet T770 manuals
Add to My Manuals
Save this manual to your list of manuals |
Page 51 highlights
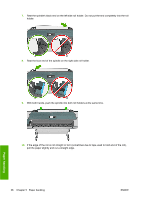
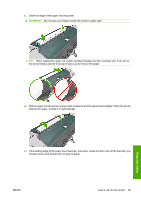
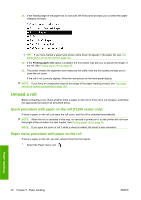
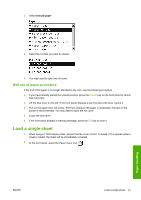
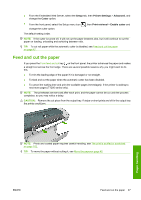
7. When prompted by the front panel, insert the sheet into the cut-sheet slot on the right side of the printer. Load your sheet aligned with the load line and insert until the paper will not continue; with thicker sheets, you feel resistance. WARNING! Do not push your fingers inside the printer's paper path. 8. Press the OK key on the front panel to feed the paper into the printer. Guide the sheet into the printer; this is especially important with thicker papers. 9. The printer checks the alignment and measures the sheet. NOTE: Depending on the length of the sheet, it feeds out the front of the printer. 10. If the length of the sheet is more than 600 mm (23 in), the front panel prompts you to check that the rear of the sheet is hanging backwards over the roll cover (and not forwards over the printer window). 11. If the sheet is not correctly aligned, you may be asked to correct the alignment. Please follow the instructions on the front-panel display. NOTE: If you have an unexpected problem at any stage of the paper loading process, see The paper cannot be loaded successfullyon page 144. Unload a single sheet To unload a single sheet after printing, you can simply pull the sheet free from the front of the printer. To unload a sheet without printing on it, use the following procedure. 1. At the front panel, select the Paper menu icon . ENWW Unload a single sheet 43 Paper handling
-
 1
1 -
2
-
3
-
4
-
5
-
6
-
7
-
8
-
9
-
10
-
11
-
12
-
13
-
14
-
15
-
16
-
17
-
18
-
19
-
20
-
21
-
22
-
23
-
24
-
25
-
26
-
27
-
28
-
29
-
30
-
31
-
32
-
33
-
34
-
35
-
36
-
37
-
38
-
39
-
40
-
41
-
42
-
43
-
44
-
45
-
 46
46 -
 47
47 -
 48
48 -
 49
49 -
 50
50 -
 51
51 -
 52
52 -
 53
53 -
 54
54 -
 55
55 -
 56
56 -
57
-
58
-
59
-
60
-
61
-
62
-
63
-
64
-
65
-
66
-
67
-
68
-
69
-
70
-
71
-
72
-
73
-
74
-
75
-
76
-
77
-
78
-
79
-
80
-
81
-
82
-
83
-
84
-
85
-
86
-
87
-
88
-
89
-
90
-
91
-
92
-
93
-
94
-
95
-
96
-
97
-
98
-
99
-
100
-
101
-
102
-
103
-
104
-
105
-
106
-
107
-
108
-
109
-
110
-
111
-
112
-
113
-
114
-
115
-
116
-
117
-
118
-
119
-
120
-
121
-
122
-
123
-
124
-
125
-
126
-
127
-
128
-
129
-
130
-
131
-
132
-
133
-
134
-
135
-
136
-
137
-
138
-
139
-
140
-
141
-
142
-
143
-
144
-
145
-
146
-
147
-
148
-
149
-
150
-
151
-
152
-
153
-
154
-
155
-
156
-
157
-
158
-
159
-
160
-
161
-
162
-
163
-
164
-
165
-
166
-
167
-
168
-
169
-
170
-
171
-
172
-
173
-
174
-
175
-
176
-
177
-
178
-
179
-
180
-
181
-
182
-
183
-
184
-
185
-
186
-
187
-
188
-
189
-
190
-
191
-
192
-
193
-
194
-
195
-
196
-
197
-
198
-
199
-
200
-
201
-
202
-
203
-
204
-
205
-
206
-
207
-
208
-
209
-
210
-
211
-
212
-
213
-
214
-
215
-
216
-
217
-
218
-
219
-
220
-
221
-
222
 |
 |
