HP LaserJet 1100 Service Manual - Page 132
Cleaning procedures
 |
View all HP LaserJet 1100 manuals
Add to My Manuals
Save this manual to your list of manuals |
Page 132 highlights
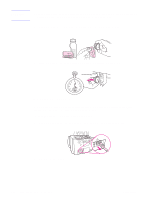
Cleaning procedures Cleaning the toner cartridge area With a dry, lint-free cloth, wipe any residue from the paper path area and the toner cartridge cavity. NOTE: NOTE: Cleaning the toner cartridge area is not necessary on a regular basis. Before cleaning, look for excessive toner in the compartment. Cleaning the printer paper path This process uses copier-grade paper to remove dust and toner from the paper path. Do not use bond or rough paper. Use this process if you are experiencing toner specks or dots on printouts. This process will produce a page with toner debris, which should be discarded. 1 Ensure the printer is loaded with paper. 2 Ensure the printer is in the Ready state. 3 Press and hold the GO key for 20 seconds (if released before 20 seconds the printer will perform a reset). Paper will feed through the printer. After holding the GO key for 20 seconds, each of the three printer lights will blink until the cleaning process is complete. Cleaning the pickup roller To clean the pickup roller rather than replace it, follow the instructions below: 1 Remove the pickup roller as described in "Changing the pickup roller." 2 Dab a lint-free cloth in isopropyl alcohol, and then scrub the roller. C4224-90962 Cleaning procedures 137
-
 1
1 -
2
-
3
-
4
-
5
-
6
-
7
-
8
-
9
-
10
-
11
-
12
-
13
-
14
-
15
-
16
-
17
-
18
-
19
-
20
-
21
-
22
-
23
-
24
-
25
-
26
-
27
-
28
-
29
-
30
-
31
-
32
-
33
-
34
-
35
-
36
-
37
-
38
-
39
-
40
-
41
-
42
-
43
-
44
-
45
-
46
-
47
-
48
-
49
-
50
-
51
-
52
-
53
-
54
-
55
-
56
-
57
-
58
-
59
-
60
-
61
-
62
-
63
-
64
-
65
-
66
-
67
-
68
-
69
-
70
-
71
-
72
-
73
-
74
-
75
-
76
-
77
-
78
-
79
-
80
-
81
-
82
-
83
-
84
-
85
-
86
-
87
-
88
-
89
-
90
-
91
-
92
-
93
-
94
-
95
-
96
-
97
-
98
-
99
-
100
-
101
-
102
-
103
-
104
-
105
-
106
-
107
-
108
-
109
-
110
-
111
-
112
-
113
-
114
-
115
-
116
-
117
-
118
-
119
-
120
-
121
-
122
-
123
-
124
-
125
-
126
-
 127
127 -
 128
128 -
 129
129 -
 130
130 -
 131
131 -
 132
132 -
 133
133 -
 134
134 -
 135
135 -
 136
136 -
 137
137 -
138
-
139
-
140
-
141
-
142
-
143
-
144
-
145
-
146
-
147
-
148
-
149
-
150
-
151
-
152
-
153
-
154
-
155
-
156
-
157
-
158
-
159
-
160
-
161
-
162
-
163
-
164
-
165
-
166
-
167
-
168
-
169
-
170
-
171
-
172
-
173
-
174
-
175
-
176
-
177
-
178
-
179
-
180
-
181
-
182
-
183
-
184
-
185
-
186
-
187
-
188
-
189
-
190
-
191
 |
 |
