HP LaserJet 1100 Service Manual - Page 64
Contact image sensor removal continued
 |
View all HP LaserJet 1100 manuals
Add to My Manuals
Save this manual to your list of manuals |
Page 64 highlights
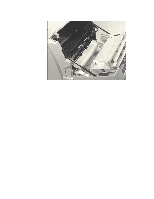
Contact image sensor removal (continued) NOTE: Figure 4-5 Removing the Contact Image Sensor (continued) 2 Gently pry open the snap connectors on each end of the Contact Image Sensor with a small flat-blade screwdriver. 3 Rotate the unit up, grasp the CIS on each end, pry the end pin out of the plastic frame, and slowly lift it out. Be careful with the CIS when you lift it out; it has two springs and a small cable connected to it. 68 Removal and Replacement C4224-90962
-
 1
1 -
2
-
3
-
4
-
5
-
6
-
7
-
8
-
9
-
10
-
11
-
12
-
13
-
14
-
15
-
16
-
17
-
18
-
19
-
20
-
21
-
22
-
23
-
24
-
25
-
26
-
27
-
28
-
29
-
30
-
31
-
32
-
33
-
34
-
35
-
36
-
37
-
38
-
39
-
40
-
41
-
42
-
43
-
44
-
45
-
46
-
47
-
48
-
49
-
50
-
51
-
52
-
53
-
54
-
55
-
56
-
57
-
58
-
 59
59 -
 60
60 -
 61
61 -
 62
62 -
 63
63 -
 64
64 -
 65
65 -
 66
66 -
 67
67 -
 68
68 -
 69
69 -
70
-
71
-
72
-
73
-
74
-
75
-
76
-
77
-
78
-
79
-
80
-
81
-
82
-
83
-
84
-
85
-
86
-
87
-
88
-
89
-
90
-
91
-
92
-
93
-
94
-
95
-
96
-
97
-
98
-
99
-
100
-
101
-
102
-
103
-
104
-
105
-
106
-
107
-
108
-
109
-
110
-
111
-
112
-
113
-
114
-
115
-
116
-
117
-
118
-
119
-
120
-
121
-
122
-
123
-
124
-
125
-
126
-
127
-
128
-
129
-
130
-
131
-
132
-
133
-
134
-
135
-
136
-
137
-
138
-
139
-
140
-
141
-
142
-
143
-
144
-
145
-
146
-
147
-
148
-
149
-
150
-
151
-
152
-
153
-
154
-
155
-
156
-
157
-
158
-
159
-
160
-
161
-
162
-
163
-
164
-
165
-
166
-
167
-
168
-
169
-
170
-
171
-
172
-
173
-
174
-
175
-
176
-
177
-
178
-
179
-
180
-
181
-
182
-
183
-
184
-
185
-
186
-
187
-
188
-
189
-
190
-
191
 |
 |

68
Removal and Replacement
C4224-90962
Contact image sensor removal (continued)
Figure 4-5
Removing the Contact Image Sensor (continued)
2
Gently pry open the snap connectors on each end of the Contact Image Sensor with a
small flat-blade screwdriver.
3
Rotate the unit up, grasp the CIS on each end, pry the end pin out of the plastic frame,
and slowly lift it out.
NOTE:
Be careful with the CIS when you lift it out; it has two springs and a small cable connected to it.