HP LaserJet 1100 Service Manual - Page 138
Drum rotation functional check, Heating element check
 |
View all HP LaserJet 1100 manuals
Add to My Manuals
Save this manual to your list of manuals |
Page 138 highlights
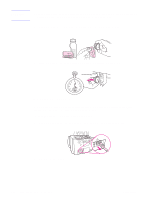
NOTE: Drum rotation functional check The photosensitive drum, located in the toner cartridge, must rotate for the print process to work. The photosensitive drum receives its drive from the main drive assembly. To verify that the drum is rotating: 1 Open the printer door. 2 Remove the toner cartridge. 3 Mark the drive gear on the cartridge with a felt-tipped marker. Note the position of the mark. 4 Install the toner cartridge and close the printer door. The start-up sequence should rotate the drum enough to move the mark. 5 Open the printer and inspect the gear that was marked in step 3. Verify that the mark moved. If the mark did not move, inspect the main drive assembly to make sure that it is meshing with the toner cartridge gears. If the drive gears appear functional and the drum does not move, replace the toner cartridge. This test is especially important if refilled toner cartridges have been used. Heating element check Paper passes between the heating element and a soft pressure roller to fuse toner to the paper. To verify that the heating element is functioning correctly: 1 Unplug the HP LaserJet 1100 Printer for at least ten minutes. 2 Verify that the thermistor connector (Figure 5-3) is seated into both the printer chassis and the ECU (for printer disassembly instructions, see Chapter 4, "Removal and replacement"). C4224-90962 Functional checks 143
-
 1
1 -
2
-
3
-
4
-
5
-
6
-
7
-
8
-
9
-
10
-
11
-
12
-
13
-
14
-
15
-
16
-
17
-
18
-
19
-
20
-
21
-
22
-
23
-
24
-
25
-
26
-
27
-
28
-
29
-
30
-
31
-
32
-
33
-
34
-
35
-
36
-
37
-
38
-
39
-
40
-
41
-
42
-
43
-
44
-
45
-
46
-
47
-
48
-
49
-
50
-
51
-
52
-
53
-
54
-
55
-
56
-
57
-
58
-
59
-
60
-
61
-
62
-
63
-
64
-
65
-
66
-
67
-
68
-
69
-
70
-
71
-
72
-
73
-
74
-
75
-
76
-
77
-
78
-
79
-
80
-
81
-
82
-
83
-
84
-
85
-
86
-
87
-
88
-
89
-
90
-
91
-
92
-
93
-
94
-
95
-
96
-
97
-
98
-
99
-
100
-
101
-
102
-
103
-
104
-
105
-
106
-
107
-
108
-
109
-
110
-
111
-
112
-
113
-
114
-
115
-
116
-
117
-
118
-
119
-
120
-
121
-
122
-
123
-
124
-
125
-
126
-
127
-
128
-
129
-
130
-
131
-
132
-
 133
133 -
 134
134 -
 135
135 -
 136
136 -
 137
137 -
 138
138 -
 139
139 -
 140
140 -
 141
141 -
 142
142 -
 143
143 -
144
-
145
-
146
-
147
-
148
-
149
-
150
-
151
-
152
-
153
-
154
-
155
-
156
-
157
-
158
-
159
-
160
-
161
-
162
-
163
-
164
-
165
-
166
-
167
-
168
-
169
-
170
-
171
-
172
-
173
-
174
-
175
-
176
-
177
-
178
-
179
-
180
-
181
-
182
-
183
-
184
-
185
-
186
-
187
-
188
-
189
-
190
-
191
 |
 |
