HP Photosmart M305 HP Photosmart M305/M307 digital camera with HP Instant Shar - Page 43
Using the Capture Menu
 |
View all HP Photosmart M305 manuals
Add to My Manuals
Save this manual to your list of manuals |
Page 43 highlights
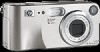
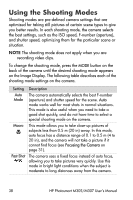
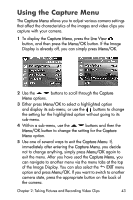
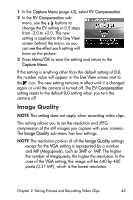
Using the Capture Menu The Capture Menu allows you to adjust various camera settings that affect the characteristics of the images and video clips you capture with your camera. 1 To display the Capture Menu, press the Live View button, and then press the Menu/OK button. If the Image Display is already off, you can simply press Menu/OK. 2 Use the buttons to scroll through the Capture Menu options. 3 Either press Menu/OK to select a highlighted option and display its sub-menu, or use the buttons to change the setting for the highlighted option without going to its sub-menu. 4 Within a sub-menu, use the buttons and then the Menu/OK button to change the setting for the Capture Menu option. 5 Use one of several ways to exit the Capture Menu. If, immediately after entering the Capture Menu, you decide not to change anything, simply press Menu/OK again to exit the menu. After you have used the Capture Menu, you can navigate to another menu via the menu tabs at the top of the Image Display. You can also select the EXIT menu option and press Menu/OK. If you want to switch to another camera state, press the appropriate button on the back of the camera. Chapter 2: Taking Pictures and Recording Video Clips 43
-
 1
1 -
2
-
3
-
4
-
5
-
6
-
7
-
8
-
9
-
10
-
11
-
12
-
13
-
14
-
15
-
16
-
17
-
18
-
19
-
20
-
21
-
22
-
23
-
24
-
25
-
26
-
27
-
28
-
29
-
30
-
31
-
32
-
33
-
34
-
35
-
36
-
37
-
 38
38 -
 39
39 -
 40
40 -
 41
41 -
 42
42 -
 43
43 -
 44
44 -
 45
45 -
 46
46 -
 47
47 -
 48
48 -
49
-
50
-
51
-
52
-
53
-
54
-
55
-
56
-
57
-
58
-
59
-
60
-
61
-
62
-
63
-
64
-
65
-
66
-
67
-
68
-
69
-
70
-
71
-
72
-
73
-
74
-
75
-
76
-
77
-
78
-
79
-
80
-
81
-
82
-
83
-
84
-
85
-
86
-
87
-
88
-
89
-
90
-
91
-
92
-
93
-
94
-
95
-
96
-
97
-
98
-
99
-
100
-
101
-
102
-
103
-
104
-
105
-
106
-
107
-
108
-
109
-
110
-
111
-
112
-
113
-
114
-
115
-
116
-
117
-
118
-
119
-
120
-
121
-
122
-
123
-
124
-
125
-
126
-
127
-
128
-
129
-
130
-
131
-
132
-
133
-
134
-
135
-
136
-
137
-
138
-
139
-
140
-
141
-
142
-
143
-
144
-
145
-
146
-
147
-
148
-
149
-
150
-
151
-
152
-
153
-
154
 |
 |