HP Photosmart M305 HP Photosmart M305/M307 digital camera with HP Instant Shar - Page 69
Selecting Images for HP Instant Share Destinations
 |
View all HP Photosmart M305 manuals
Add to My Manuals
Save this manual to your list of manuals |
Page 69 highlights
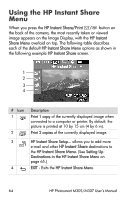
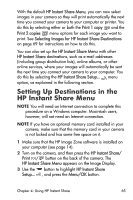
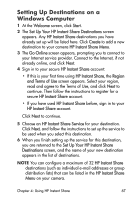
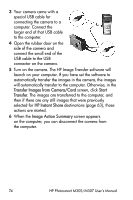
NOTE You can configure a maximum of 32 HP Instant Share destinations (such as individual e-mail addresses or group distribution lists) that can be listed in the HP Instant Share Menu on your camera. 4 Click Add to add another destination (repeating steps 2 & 3), or select a destination and do one of the following: • Click Edit to modify the destination. • Click Remove to delete the destination. 5 When you have finished adding destinations, click Update Camera. The new destinations are then saved to the camera's HP Instant Share Menu. When the computer confirms they have been saved to your camera, disconnect the camera from the computer. Selecting Images for HP Instant Share Destinations NOTE You can select any number of HP Instant Share destinations for each still image. However, you cannot select HP Instant Share destinations for video clips, because video clips are not currently supported by HP Instant Share. 1 Turn on the camera, and then press the HP Instant Share/ Print / button. 2 Use the buttons to highlight the first destination in the HP Instant Share Menu that you want to select, such as an e-mail destination. 3 Use the buttons to scroll to a still image for which you want to select this HP Instant Share destination. Chapter 4: Using HP Instant Share 69
-
 1
1 -
2
-
3
-
4
-
5
-
6
-
7
-
8
-
9
-
10
-
11
-
12
-
13
-
14
-
15
-
16
-
17
-
18
-
19
-
20
-
21
-
22
-
23
-
24
-
25
-
26
-
27
-
28
-
29
-
30
-
31
-
32
-
33
-
34
-
35
-
36
-
37
-
38
-
39
-
40
-
41
-
42
-
43
-
44
-
45
-
46
-
47
-
48
-
49
-
50
-
51
-
52
-
53
-
54
-
55
-
56
-
57
-
58
-
59
-
60
-
61
-
62
-
63
-
 64
64 -
 65
65 -
 66
66 -
 67
67 -
 68
68 -
 69
69 -
 70
70 -
 71
71 -
 72
72 -
 73
73 -
 74
74 -
75
-
76
-
77
-
78
-
79
-
80
-
81
-
82
-
83
-
84
-
85
-
86
-
87
-
88
-
89
-
90
-
91
-
92
-
93
-
94
-
95
-
96
-
97
-
98
-
99
-
100
-
101
-
102
-
103
-
104
-
105
-
106
-
107
-
108
-
109
-
110
-
111
-
112
-
113
-
114
-
115
-
116
-
117
-
118
-
119
-
120
-
121
-
122
-
123
-
124
-
125
-
126
-
127
-
128
-
129
-
130
-
131
-
132
-
133
-
134
-
135
-
136
-
137
-
138
-
139
-
140
-
141
-
142
-
143
-
144
-
145
-
146
-
147
-
148
-
149
-
150
-
151
-
152
-
153
-
154
 |
 |
