HP Photosmart M305 HP Photosmart M305/M307 digital camera with HP Instant Shar - Page 57
Magnifying Images, Menu/OK, Thumbnail, Playback, HP Instant Share, Magnify, Zoom lever, Zoom
 |
View all HP Photosmart M305 manuals
Add to My Manuals
Save this manual to your list of manuals |
Page 57 highlights
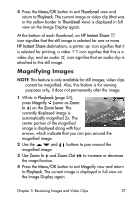
4 Press the Menu/OK button to exit Thumbnail view and return to Playback. The current image or video clip (that was in the yellow border in Thumbnail view) is displayed in full view on the Image Display again. At the bottom of each thumbnail, an HP Instant Share icon signifies that the still image is selected for one or more HP Instant Share destinations, a printer icon signifies that it is selected for printing, a video icon signifies that this is a video clip, and an audio icon signifies that an audio clip is attached to this still image. Magnifying Images NOTE This feature is only available for still images; video clips cannot be magnified. Also, this feature is for viewing purposes only; it does not permanently alter the image. 1 While in Playback (page 53), press Magnify (same as Zoom In ) on the Zoom lever. The currently displayed image is automatically magnified 2x. The center portion of the magnified image is displayed along with four arrows, which indicate that you can pan around the magnified image. 2 Use the and magnified image. buttons to pan around the 3 Use Zoom In and Zoom Out the magnification. to increase or decrease 4 Press the Menu/OK button to exit Magnify view and return to Playback. The current image is displayed in full view on the Image Display again. Chapter 3: Reviewing Images and Video Clips 57
-
 1
1 -
2
-
3
-
4
-
5
-
6
-
7
-
8
-
9
-
10
-
11
-
12
-
13
-
14
-
15
-
16
-
17
-
18
-
19
-
20
-
21
-
22
-
23
-
24
-
25
-
26
-
27
-
28
-
29
-
30
-
31
-
32
-
33
-
34
-
35
-
36
-
37
-
38
-
39
-
40
-
41
-
42
-
43
-
44
-
45
-
46
-
47
-
48
-
49
-
50
-
51
-
 52
52 -
 53
53 -
 54
54 -
 55
55 -
 56
56 -
 57
57 -
 58
58 -
 59
59 -
 60
60 -
 61
61 -
 62
62 -
63
-
64
-
65
-
66
-
67
-
68
-
69
-
70
-
71
-
72
-
73
-
74
-
75
-
76
-
77
-
78
-
79
-
80
-
81
-
82
-
83
-
84
-
85
-
86
-
87
-
88
-
89
-
90
-
91
-
92
-
93
-
94
-
95
-
96
-
97
-
98
-
99
-
100
-
101
-
102
-
103
-
104
-
105
-
106
-
107
-
108
-
109
-
110
-
111
-
112
-
113
-
114
-
115
-
116
-
117
-
118
-
119
-
120
-
121
-
122
-
123
-
124
-
125
-
126
-
127
-
128
-
129
-
130
-
131
-
132
-
133
-
134
-
135
-
136
-
137
-
138
-
139
-
140
-
141
-
142
-
143
-
144
-
145
-
146
-
147
-
148
-
149
-
150
-
151
-
152
-
153
-
154
 |
 |