HP Photosmart M305 HP Photosmart M305/M307 digital camera with HP Instant Shar - Page 70
Menu/OK, HP Instant Share, Transferring Images to a Computer, destinations for your images, select
 |
View all HP Photosmart M305 manuals
Add to My Manuals
Save this manual to your list of manuals |
Page 70 highlights
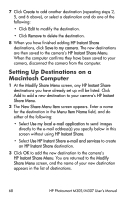
4 Press the Menu/OK button to select the destination, and a appears over that destination in the HP Instant Share Menu. To deselect the destination, press the Menu/OK button again. 5 Select any other HP Instant Share destinations that you want for this image by using the buttons to highlight each destination in the HP Instant Share Menu, and pressing the Menu/OK button to select the destination. 6 Scroll to other images by using the buttons, and select HP Instant Share destinations for each of the other images in the same manner. You can also use the buttons to scroll to other images to simply review their destinations. 7 When you are finished selecting all of the HP Instant Share destinations for your images, select the EXIT menu option and press Menu/OK. 8 Connect the camera to your computer and transfer the images as explained in Transferring Images to a Computer on page 73. After the images are transferred to your computer, they will be automatically sent to their respective HP Instant Share destinations. Macintosh users will need to add addressing information for their HP Instant Share destinations before the images and messages can be sent. 70 HP Photosmart M305/M307 User's Manual
-
 1
1 -
2
-
3
-
4
-
5
-
6
-
7
-
8
-
9
-
10
-
11
-
12
-
13
-
14
-
15
-
16
-
17
-
18
-
19
-
20
-
21
-
22
-
23
-
24
-
25
-
26
-
27
-
28
-
29
-
30
-
31
-
32
-
33
-
34
-
35
-
36
-
37
-
38
-
39
-
40
-
41
-
42
-
43
-
44
-
45
-
46
-
47
-
48
-
49
-
50
-
51
-
52
-
53
-
54
-
55
-
56
-
57
-
58
-
59
-
60
-
61
-
62
-
63
-
64
-
 65
65 -
 66
66 -
 67
67 -
 68
68 -
 69
69 -
 70
70 -
 71
71 -
 72
72 -
 73
73 -
 74
74 -
 75
75 -
76
-
77
-
78
-
79
-
80
-
81
-
82
-
83
-
84
-
85
-
86
-
87
-
88
-
89
-
90
-
91
-
92
-
93
-
94
-
95
-
96
-
97
-
98
-
99
-
100
-
101
-
102
-
103
-
104
-
105
-
106
-
107
-
108
-
109
-
110
-
111
-
112
-
113
-
114
-
115
-
116
-
117
-
118
-
119
-
120
-
121
-
122
-
123
-
124
-
125
-
126
-
127
-
128
-
129
-
130
-
131
-
132
-
133
-
134
-
135
-
136
-
137
-
138
-
139
-
140
-
141
-
142
-
143
-
144
-
145
-
146
-
147
-
148
-
149
-
150
-
151
-
152
-
153
-
154
 |
 |