HP Photosmart M305 HP Photosmart M305/M307 digital camera with HP Instant Shar - Page 67
Setting Up Destinations on a Windows Computer, Set Up Your HP Instant Share Destinations
 |
View all HP Photosmart M305 manuals
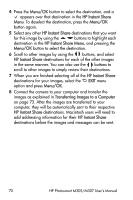
Add to My Manuals
Save this manual to your list of manuals |
Page 67 highlights
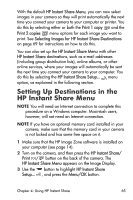
Setting Up Destinations on a Windows Computer 1 At the Welcome screen, click Start. 2 The Set Up Your HP Instant Share Destinations screen appears. Any HP Instant Share destinations you have already set up will be listed here. Click Create to add a new destination to your camera HP Instant Share Menu. 3 The Go Online screen appears, prompting you to connect to your Internet service provider. Connect to the Internet, if not already online, and click Next. 4 Sign in to your secure HP Instant Share account: • If this is your first time using HP Instant Share, the Region and Terms of Use screen appears. Select your region, read and agree to the Terms of Use, and click Next to continue. Then follow the instructions to register for a secure HP Instant Share account. • If you have used HP Instant Share before, sign in to your HP Instant Share account. Click Next to continue. 5 Choose an HP Instant Share Service for your destination. Click Next, and follow the instructions to set up the service to be used when you select this destination. 6 When you finish setting up the service for this destination, you are returned to the Set Up Your HP Instant Share Destinations screen, and the name of your new destination appears in the list of destinations. NOTE You can configure a maximum of 32 HP Instant Share destinations (such as individual e-mail addresses or group distribution lists) that can be listed in the HP Instant Share Menu on your camera. Chapter 4: Using HP Instant Share 67
-
 1
1 -
2
-
3
-
4
-
5
-
6
-
7
-
8
-
9
-
10
-
11
-
12
-
13
-
14
-
15
-
16
-
17
-
18
-
19
-
20
-
21
-
22
-
23
-
24
-
25
-
26
-
27
-
28
-
29
-
30
-
31
-
32
-
33
-
34
-
35
-
36
-
37
-
38
-
39
-
40
-
41
-
42
-
43
-
44
-
45
-
46
-
47
-
48
-
49
-
50
-
51
-
52
-
53
-
54
-
55
-
56
-
57
-
58
-
59
-
60
-
61
-
 62
62 -
 63
63 -
 64
64 -
 65
65 -
 66
66 -
 67
67 -
 68
68 -
 69
69 -
 70
70 -
 71
71 -
 72
72 -
73
-
74
-
75
-
76
-
77
-
78
-
79
-
80
-
81
-
82
-
83
-
84
-
85
-
86
-
87
-
88
-
89
-
90
-
91
-
92
-
93
-
94
-
95
-
96
-
97
-
98
-
99
-
100
-
101
-
102
-
103
-
104
-
105
-
106
-
107
-
108
-
109
-
110
-
111
-
112
-
113
-
114
-
115
-
116
-
117
-
118
-
119
-
120
-
121
-
122
-
123
-
124
-
125
-
126
-
127
-
128
-
129
-
130
-
131
-
132
-
133
-
134
-
135
-
136
-
137
-
138
-
139
-
140
-
141
-
142
-
143
-
144
-
145
-
146
-
147
-
148
-
149
-
150
-
151
-
152
-
153
-
154
 |
 |