HP Surestore Tape Library Model 2/28 HP DLT Tape Library 28/48-Slot - User& - Page 55
Set Ids, Lib Bus0 Id, Update Ids Now, Wait For Update, Ids Saved, Scsi Ids, Conflict, Aborted
 |
View all HP Surestore Tape Library Model 2/28 manuals
Add to My Manuals
Save this manual to your list of manuals |
Page 55 highlights
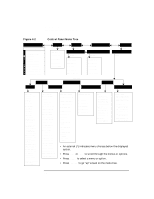
NOTE Library Operation Specifying SCSI Addresses 5. SET IDs* displays. Press ENTER. LIB BUS0 ID # or DRV# BUS# ID # displays. (LIB BUS0 ID # stands for the current SCSI ID of the robotics controller. DRV# BUS# ID # is the current SCSI ID setting for the drive number and its associated bus #.) 6. Press NEXT until the setting to change displays, then press ENTER. 7. The current SCSI address setting flashes. Press NEXT or PREV until the desired address displays, then press ENTER. 8. Press NEXT until UPDATE IDs NOW displays, then press ENTER. 9. WAIT FOR UPDATE displays briefly, then IDs SAVED displays. • If the new settings do not conflict with other SCSI IDs on the bus, SCSI IDs* displays. • If the new settings conflict with other IDs on the SCSI bus, CONFLICT ABORTED displays briefly, then SET IDs* displays. Any changes entered are lost, and previous steps must be repeated to set a new address. • If any buses are daisy chained together, make sure the SCSI IDs are different for each device on the bus. • If a serial communications error is detected while trying to set the SCSI IDs, DRV CONNECT ERR displays, followed by IDs NOT CHANGED. Any changes entered are lost. The SCSI IDs* menu displays. 10. Press CANCEL three times to return to the drive status ("ready" state). 11. New settings can be saved to flash ROM. Turn the library off, then turn it back on. This allows the settings to be recovered if the library is powered off for more than ten days. After you change an address, it may be necessary to reboot the host. This allows the new SCSI IDs to be recognized. Library Operation 4-11
-
 1
1 -
2
-
3
-
4
-
5
-
6
-
7
-
8
-
9
-
10
-
11
-
12
-
13
-
14
-
15
-
16
-
17
-
18
-
19
-
20
-
21
-
22
-
23
-
24
-
25
-
26
-
27
-
28
-
29
-
30
-
31
-
32
-
33
-
34
-
35
-
36
-
37
-
38
-
39
-
40
-
41
-
42
-
43
-
44
-
45
-
46
-
47
-
48
-
49
-
 50
50 -
 51
51 -
 52
52 -
 53
53 -
 54
54 -
 55
55 -
 56
56 -
 57
57 -
 58
58 -
 59
59 -
 60
60 -
61
-
62
-
63
-
64
-
65
-
66
-
67
-
68
-
69
-
70
-
71
-
72
-
73
-
74
-
75
-
76
-
77
-
78
-
79
-
80
-
81
-
82
-
83
-
84
-
85
-
86
-
87
-
88
-
89
-
90
-
91
-
92
-
93
-
94
-
95
-
96
-
97
-
98
-
99
-
100
-
101
-
102
-
103
-
104
-
105
-
106
-
107
-
108
-
109
-
110
 |
 |
