Icom IC-M804 Instruction Manual - Page 17
OTHER FUNCTIONS AND OPERATIONS, Backlight function, Instant Replay function
 |
View all Icom IC-M804 manuals
Add to My Manuals
Save this manual to your list of manuals |
Page 17 highlights
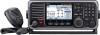
5 OTHER FUNCTIONS AND OPERATIONS ■ Backlight function The function display and keys can be backlit for better visibility under low light conditions. You can set the LCD backlight mode to Day mode or Night mode. The Day mode is for the daytime operation, and the screen items are in color. The Night mode is for nighttime operation, and the screen items are displayed in black and red. 1. Push [◄] or [►] until Backlight is displayed in the Software Key area. 2. Push Backlight to open the Backlight Settings window. ■ Instant Replay function The transceiver has an Instant Replay function that can record the last 120 seconds of the received audio. You can playback the audio that you could not hear. Starts recording automatically when the signal is received. 4 5 3. Push [▲] or [▼] to select "Day Mode," "Night Mode," or "Auto." If you push no key for about 5 seconds in the Backlight Settings window, the transceiver automatically returns to the Main screen. Day mode • is displayed when recording the received audio. • Stops recording 3 seconds after the signal disappears or when the channel is changed. • is displayed when recording is stopped. • The recorded audio is erased when the transceiver is turned OFF. D Playback the recorded voice You can set the play start point in the "Play Time" setting before playing. (p. 60) 1. Push [◄] or [►] until RX Play is displayed in the Software Key area. 2. Push RX Play to play the recorded audio. • The recorded audio automatically starts playing. • The play window is displayed as shown below. Night mode Auto The Day mode or the Night mode is automatically selected. 4. Adjust the backlight brightness level. Rotate + Push The backlight brightness level is adjustable in 7 levels and "OFF." "OFF" is selectable only in the Day mode. TIP: • To stop playing the recorded audio, push [CH/ GRP]. Push [CH/GRP] again to restart play. • Rotate [CH/GRP] to adjust the play start point. Set between -2'00 to 0'00. • Rotate [VOL] to adjust the volume level. Set to between 0 (Off) and 20. • is displayed when playing the recorded audio. • is displayed when playing the recorded audio is stopped. • When the play window is displayed, recording the newly received audio is stopped. 12
-
 1
1 -
2
-
3
-
4
-
5
-
6
-
7
-
8
-
9
-
10
-
11
-
 12
12 -
 13
13 -
 14
14 -
 15
15 -
 16
16 -
 17
17 -
 18
18 -
 19
19 -
 20
20 -
 21
21 -
 22
22 -
23
-
24
-
25
-
26
-
27
-
28
-
29
-
30
-
31
-
32
-
33
-
34
-
35
-
36
-
37
-
38
-
39
-
40
-
41
-
42
-
43
-
44
-
45
-
46
-
47
-
48
-
49
-
50
-
51
-
52
-
53
-
54
-
55
-
56
-
57
-
58
-
59
-
60
-
61
-
62
-
63
-
64
-
65
-
66
-
67
-
68
-
69
-
70
-
71
-
72
-
73
-
74
-
75
-
76
-
77
-
78
-
79
-
80
-
81
-
82
-
83
-
84
-
85
-
86
-
87
-
88
 |
 |
