Kyocera KM-3035 DF-75 Operation Guide - Page 42
optional Hole-Punch Unit
 |
View all Kyocera KM-3035 manuals
Add to My Manuals
Save this manual to your list of manuals |
Page 42 highlights
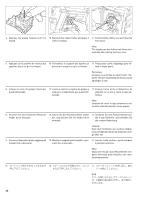
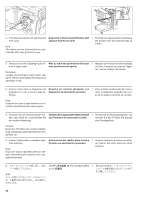
9. Push back the stitcher unit and close the front cover. Note: The staples are free fed several times automatically after closing the front cover. Disposing of Punch waste (Finisher with optional Hole-Punch Unit) 1. Push the lock release button and release the finisher from the machine body as shown. 9. Repoussez l'unité d'agrafage puis fermez le capot avant. Remarque: Lorsque vous fermez le capot avant, l'appareil effectue automatiquement plusieurs agrafages à vide. Mise au rebut des perforations (finisseur avec perforatrice en option) 1. Appuyez sur le bouton de déverrouillage et retirez le finisseur du corps de l'appareil, comme l'indique l'illustration. 9. Empuje hacia atrás el dispositivo de grapado en su sitio y cierre la tapa delantera. Desecho de recortes (Acabador con dispositivo de perforación opcional) 1. Pulse el botón de liberación del cierre y retire el dispositivo acabador del cuerpo de la máquina tal como se muestra. Nota: Después de cerrar la tapa delantera se alimentan automáticamente varias grapas. 9. Schieben Sie den Rückstichhefter wieder in das Gerät ein, und schließen Sie die vordere Abdeckung. Entfernen der ausgestanzten Papierschnipsel (bei Finishern mit optionalem Locher) 1. Drücken Sie die Entriegelungstaste, und nehmen Sie den Finisher wie gezeigt vom Grundgerät ab. Hinweis: Nach dem Schließen der vorderen Abdekkung schiebt das Gerät die Klammern einige Male vor. 9. Inserire l'unità cucitrice e chiudere il pannello anteriore. Nota: Dopo aver chiuso il pannello anteriore, vengono alimentati punti metallici vari volte, automaticamente. Eliminazione dei residui della foratura (finisher con punzonatrice opzionale) 1. Premere il pulsante di rilascio ed estrarre il finisher dal corpo macchina, come da figura. 9 1 ࢀߟ: Λߦ͍·͢ɻ 40
-
 1
1 -
2
-
3
-
4
-
5
-
6
-
7
-
8
-
9
-
10
-
11
-
12
-
13
-
14
-
15
-
16
-
17
-
18
-
19
-
20
-
21
-
22
-
23
-
24
-
25
-
26
-
27
-
28
-
29
-
30
-
31
-
32
-
33
-
34
-
35
-
36
-
 37
37 -
 38
38 -
 39
39 -
 40
40 -
 41
41 -
 42
42 -
 43
43 -
 44
44 -
 45
45 -
 46
46 -
 47
47 -
48
-
49
-
50
-
51
-
52
-
53
-
54
-
55
-
56
-
57
-
58
-
59
-
60
 |
 |
