Kyocera TASKalfa 181 181/221 Print Driver User Guide - Page 20
Operation Panel Message, Displaying the Operation Panel Message, Show Quick Print Tab
 |
View all Kyocera TASKalfa 181 manuals
Add to My Manuals
Save this manual to your list of manuals |
Page 20 highlights
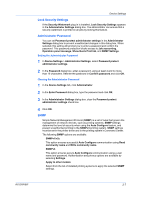
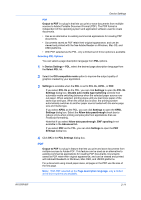
Device Settings Display account ID list 4 Select Account ID List to create and manage account ID lists. 5 Click OK in all dialog boxes. 6 Print the document from the application. 7 For some options, when the Print Options dialog box appears, type or select an account ID, and click OK. Operation Panel Message You can specify settings to display the job name, user name, or department for the current job on the printing system's operation panel during printing. The printing system default names appear unless you set your own user-defined names. You can set job name in the Job tab, and set the user name and department in the User Settings dialog box. Displaying the Operation Panel Message You can select job information to display on the operation panel. 1 In the Device Settings tab, click Administrator. The Administrator Settings dialog box opens. 2 Select the Operation panel message check box. 3 Select from the following options to display on the operation panel during printing: Display job name Display user name Display department Show Quick Print Tab This option lets you control the display of the Quick Print tab. You can define basic print options into group profiles that can be accessed quickly and easily. • With a cleared Show Quick Print tab check box, the tab does not appear in the Printing Preferences dialog box. • With a selected Show Quick Print tab check box, the tab appears in the Printing Preferences dialog box. When you select the Show Quick Print tab check box, you can also access the other two check boxes, Hide other tabs, and Set Quick Print tab as default. • Selecting Hide other tabs displays only the Quick Print tab to the user. • Selecting Set Quick Print tab as default opens to this tab when you access Printing Preferences. 2-6 User Guide
-
 1
1 -
2
-
3
-
4
-
5
-
6
-
7
-
8
-
9
-
10
-
11
-
12
-
13
-
14
-
 15
15 -
 16
16 -
 17
17 -
 18
18 -
 19
19 -
 20
20 -
 21
21 -
 22
22 -
 23
23 -
 24
24 -
 25
25 -
26
-
27
-
28
-
29
-
30
-
31
-
32
-
33
-
34
-
35
-
36
-
37
-
38
-
39
-
40
-
41
-
42
-
43
-
44
-
45
-
46
-
47
-
48
-
49
-
50
-
51
-
52
-
53
-
54
-
55
-
56
-
57
-
58
-
59
-
60
-
61
-
62
-
63
-
64
-
65
-
66
-
67
-
68
-
69
-
70
-
71
-
72
-
73
-
74
-
75
-
76
-
77
-
78
-
79
-
80
-
81
-
82
-
83
-
84
-
85
-
86
-
87
-
88
-
89
-
90
-
91
-
92
-
93
 |
 |
