LG DML200 User Manual - Page 36
Deleting Images/Pix & View Info
 |
View all LG DML200 manuals
Add to My Manuals
Save this manual to your list of manuals |
Page 36 highlights
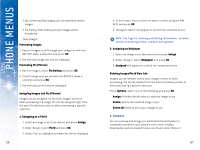
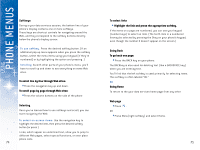
USING PHONE MENUS 3. By connecting Shop Images, you can download various images. 4. Pix Gallery, Video Gallery and your images will be listedbelow "Shop Images." Previewing Images 1. Once in Images, scroll through your image list with the NAV KEY, make a selection and press OK. 2. The selected image will now be displayed. Previewing Pix (Photos) 1. Once in Images, select Pix Gallery and press OK. 2. Scroll through your pix list with the NAV KEY, make a selection and press OK. 3. The selected pix will now be displayed. Assigning Images and Pix (Photos) Images can be assigned via the main Images screen or when previewing the image. Pix can be assigned right from the main Pix Gallery screen or when previewing a specific selection. 1. Assigning as a Pix ID 1. Select an image or pix (see above) and press Assign. 2. Under "Assign," select Pix ID and press OK. 3. Under Find, an alphabetical name list will be displayed. 66 4. At the cursor, enter a name (or select a name using the NAV KEY) and press OK. 5. "Assigned: Name" will appear to confirm the complete action. NOTE: See Page 23, Entering and Editing Information, for more details on entering letters, numbers and symbols. 2. Assigning as Wallpaper 1. Select an image or pix (see above) and press Assign. 2. Under "Assign," select Wallpaper and press OK. 3. Assigned will appear to confirm the completed action. Deleting Images/Pix & View Info Images can be deleted via the main Images screen or when previewing. Pix can be deleted from the main Pix Gallery screen or when previewing a specific selection. Press Options, select one of the following and press OK. Assign: Provides details about a selected image or pix. Delete: Delete the selected image or pix. Delete All: Deletes all of your images or pix. 3. Theme It You can preview and assign pre-loaded/purchased themes to completely transform your phone's entire menu display. Downloaded and pre-loaded themes are found under Theme It. 67
-
 1
1 -
2
-
3
-
4
-
5
-
6
-
7
-
8
-
9
-
10
-
11
-
12
-
13
-
14
-
15
-
16
-
17
-
18
-
19
-
20
-
21
-
22
-
23
-
24
-
25
-
26
-
27
-
28
-
29
-
30
-
 31
31 -
 32
32 -
 33
33 -
 34
34 -
 35
35 -
 36
36 -
 37
37 -
 38
38 -
 39
39 -
 40
40 -
 41
41 -
42
-
43
-
44
-
45
-
46
-
47
-
48
-
49
-
50
-
51
-
52
-
53
-
54
-
55
-
56
-
57
-
58
-
59
-
60
-
61
-
62
-
63
 |
 |