Lexmark Genesis S815 Quick Reference Guide - Page 58
Copying photos, Making a duplex copy automatically, More Options, Number of Copies, Accept, Color
 |
View all Lexmark Genesis S815 manuals
Add to My Manuals
Save this manual to your list of manuals |
Page 58 highlights
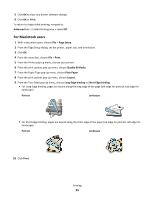
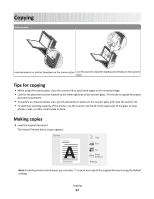
2 Navigate to: Copy > More Options > Number of Copies 3 Enter the number of copies you want to print, and then touch Accept. 4 Touch Color or Black/White to set a color or black-and-white copy. 5 Press . Copying photos 1 Load photo paper. 2 Place a photo facedown on the scanner glass. The Instant Preview home screen appears. 3 Navigate to: SmartSolutions > Photo Reprint 4 Select the photo print size, and then touch Accept. 5 Touch Continue to start printing. Note: For best results, allow the prints to dry at least 24 hours before stacking, displaying, or storing. Making a duplex copy automatically The automatic duplex unit, available only on select printer models, supports letter- and A4-size paper. If you purchased a model without automatic duplex, or if you need to make duplex copies using other paper sizes, then see the instructions for making a duplex copy manually. Note: You cannot make duplex copies on envelopes, card stock, or photo paper. 1 Load the original document. The Instant Preview home screen appears. 2 Navigate to: Copy > More Options > 2-Sided Copies 3 Select a two-sided copying option, and then touch Accept. • 1-Sided to 2-Sided-Make two-sided copies of the one-sided document. • 2-Sided to 2-Sided-Make two-sided copies (like the original document). 4 Press to save the first page of the document to the printer memory. 5 Follow the instructions on the display. Copying 58
-
 1
1 -
2
-
3
-
4
-
5
-
6
-
7
-
8
-
9
-
10
-
11
-
12
-
13
-
14
-
15
-
16
-
17
-
18
-
19
-
20
-
21
-
22
-
23
-
24
-
25
-
26
-
27
-
28
-
29
-
30
-
31
-
32
-
33
-
34
-
35
-
36
-
37
-
38
-
39
-
40
-
41
-
42
-
43
-
44
-
45
-
46
-
47
-
48
-
49
-
50
-
51
-
52
-
 53
53 -
 54
54 -
 55
55 -
 56
56 -
 57
57 -
 58
58 -
 59
59 -
 60
60 -
 61
61 -
 62
62 -
 63
63 -
64
-
65
-
66
-
67
-
68
-
69
-
70
-
71
-
72
-
73
-
74
-
75
-
76
-
77
-
78
-
79
-
80
-
81
-
82
-
83
-
84
-
85
-
86
-
87
-
88
-
89
-
90
-
91
-
92
-
93
-
94
-
95
-
96
-
97
 |
 |