Lexmark Genesis S815 User Manual - Page 136
Jams and misfeeds troubleshooting, Paper jam in the printer
 |
View all Lexmark Genesis S815 manuals
Add to My Manuals
Save this manual to your list of manuals |
Page 136 highlights
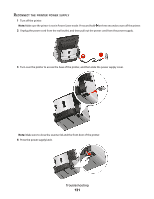
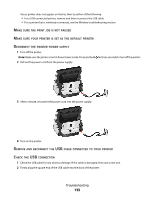
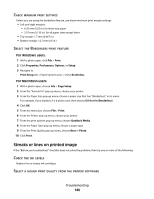
3 Firmly plug the rectangular end of the USB cable into the USB port of the computer. The USB port is marked with . Note: If you continue to have problems, then try another USB port on the computer. You may have connected to a defective port. MAKE SURE THE USB PORT IS ENABLED IN WINDOWS 1 Click , or click Start and then click Run. 2 In the Start Search or Run box, type devmgmt.msc. 3 Press Enter, or click OK. The Device Manager opens. 4 Click the plus sign (+) beside Universal Serial Bus controllers. If USB Host Controller and USB Root Hub are listed, then the USB port is enabled. For more information, see the computer documentation. REMOVE AND REINSTALL THE PRINTER SOFTWARE Jams and misfeeds troubleshooting • "Paper jam in the printer" on page 136 • "Paper jam in the duplex unit" on page 138 • "Paper or specialty media misfeeds" on page 139 Paper jam in the printer Note: The parts inside the printer are sensitive. Avoid unnecessarily touching these parts while clearing jams. 1 Turn off the printer, and then unplug the power cord from the wall outlet. Note: Make sure the printer is not in Power Saver mode. Press and hold for three seconds to turn off the printer. 2 Check the following parts of the printer for any jammed paper: • Paper support Troubleshooting 136
-
 1
1 -
2
-
3
-
4
-
5
-
6
-
7
-
8
-
9
-
10
-
11
-
12
-
13
-
14
-
15
-
16
-
17
-
18
-
19
-
20
-
21
-
22
-
23
-
24
-
25
-
26
-
27
-
28
-
29
-
30
-
31
-
32
-
33
-
34
-
35
-
36
-
37
-
38
-
39
-
40
-
41
-
42
-
43
-
44
-
45
-
46
-
47
-
48
-
49
-
50
-
51
-
52
-
53
-
54
-
55
-
56
-
57
-
58
-
59
-
60
-
61
-
62
-
63
-
64
-
65
-
66
-
67
-
68
-
69
-
70
-
71
-
72
-
73
-
74
-
75
-
76
-
77
-
78
-
79
-
80
-
81
-
82
-
83
-
84
-
85
-
86
-
87
-
88
-
89
-
90
-
91
-
92
-
93
-
94
-
95
-
96
-
97
-
98
-
99
-
100
-
101
-
102
-
103
-
104
-
105
-
106
-
107
-
108
-
109
-
110
-
111
-
112
-
113
-
114
-
115
-
116
-
117
-
118
-
119
-
120
-
121
-
122
-
123
-
124
-
125
-
126
-
127
-
128
-
129
-
130
-
 131
131 -
 132
132 -
 133
133 -
 134
134 -
 135
135 -
 136
136 -
 137
137 -
 138
138 -
 139
139 -
 140
140 -
 141
141 -
142
-
143
-
144
-
145
-
146
-
147
-
148
-
149
-
150
-
151
-
152
-
153
-
154
-
155
-
156
-
157
-
158
-
159
-
160
-
161
-
162
-
163
-
164
-
165
-
166
-
167
-
168
-
169
-
170
-
171
-
172
-
173
-
174
-
175
-
176
-
177
-
178
-
179
-
180
-
181
-
182
-
183
-
184
-
185
-
186
-
187
-
188
-
189
-
190
-
191
-
192
-
193
-
194
-
195
-
196
-
197
 |
 |