Lexmark Genesis S815 User Manual - Page 64
Scanning documents into an editing application
 |
View all Lexmark Genesis S815 manuals
Add to My Manuals
Save this manual to your list of manuals |
Page 64 highlights
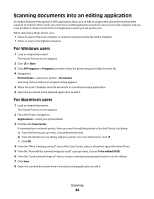
Scanning documents into an editing application An Optical Character Recognition (OCR) application allows you to edit an original text document that has been scanned. In order for this to work, you must have an OCR application stored on a local or network computer and you must be able to choose it from the list of applications when you set up the scan. When selecting settings for the scan: • Select to scan to the local computer or network computer where the OCR is installed. • Select to scan to the highest resolution. For Windows users 1 Load an original document. The Instant Preview screen appears. 2 Click or Start. 3 Click All Programs or Programs, and then select the printer program folder from the list. 4 Navigate to: Printer Home > select your printer > Document Scanning starts and the scan progress dialog appears. 5 When the scan is finished, save the document in a word-processing application. 6 Open the document in the selected application to edit it. For Macintosh users 1 Load an original document. The Instant Preview screen appears. 2 From the Finder, navigate to: Applications > select your printer folder 3 Double-click Scan Center. If scanning from a network printer, then you must first add the printer to the Edit Device List dialog. a From the Device pop-up menu, choose Browse Devices. b From the Edit Device List dialog, add your printer. For more information, click . c Click OK. 4 From the "What is being scanned?" area of the Scan Center, select a document type other than Photo. 5 From the "How will the scanned image be used?" pop-up menu, choose To be edited (OCR). 6 From the "Send scanned image to" menu, choose a word-processing application to use for editing. 7 Click Scan. 8 Open the scanned document from a word-processing application to edit it. Scanning 64
-
 1
1 -
2
-
3
-
4
-
5
-
6
-
7
-
8
-
9
-
10
-
11
-
12
-
13
-
14
-
15
-
16
-
17
-
18
-
19
-
20
-
21
-
22
-
23
-
24
-
25
-
26
-
27
-
28
-
29
-
30
-
31
-
32
-
33
-
34
-
35
-
36
-
37
-
38
-
39
-
40
-
41
-
42
-
43
-
44
-
45
-
46
-
47
-
48
-
49
-
50
-
51
-
52
-
53
-
54
-
55
-
56
-
57
-
58
-
 59
59 -
 60
60 -
 61
61 -
 62
62 -
 63
63 -
 64
64 -
 65
65 -
 66
66 -
 67
67 -
 68
68 -
 69
69 -
70
-
71
-
72
-
73
-
74
-
75
-
76
-
77
-
78
-
79
-
80
-
81
-
82
-
83
-
84
-
85
-
86
-
87
-
88
-
89
-
90
-
91
-
92
-
93
-
94
-
95
-
96
-
97
-
98
-
99
-
100
-
101
-
102
-
103
-
104
-
105
-
106
-
107
-
108
-
109
-
110
-
111
-
112
-
113
-
114
-
115
-
116
-
117
-
118
-
119
-
120
-
121
-
122
-
123
-
124
-
125
-
126
-
127
-
128
-
129
-
130
-
131
-
132
-
133
-
134
-
135
-
136
-
137
-
138
-
139
-
140
-
141
-
142
-
143
-
144
-
145
-
146
-
147
-
148
-
149
-
150
-
151
-
152
-
153
-
154
-
155
-
156
-
157
-
158
-
159
-
160
-
161
-
162
-
163
-
164
-
165
-
166
-
167
-
168
-
169
-
170
-
171
-
172
-
173
-
174
-
175
-
176
-
177
-
178
-
179
-
180
-
181
-
182
-
183
-
184
-
185
-
186
-
187
-
188
-
189
-
190
-
191
-
192
-
193
-
194
-
195
-
196
-
197
 |
 |