Lexmark Genesis S815 User Manual - Page 87
Configuring fax settings using the fax software, Using the Printer Setup Wizard in Windows
 |
View all Lexmark Genesis S815 manuals
Add to My Manuals
Save this manual to your list of manuals |
Page 87 highlights
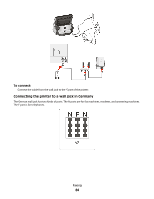
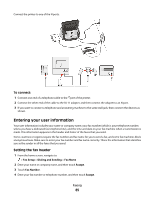
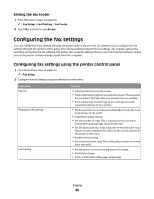
From here Dialing and Sending Fax Blocking You can • Set your fax name and fax number. • Adjust the dialing volume. • Set the dial method, redial time, number of redial attempts, dialing prefix, and dialing volume. Set whether the printer scans the original document before or after dialing the recipient. Set the printer to scan before dialing so that you do not have to scan the document again if the fax fails. The scanned document is saved in the printer memory. The printer can then retrieve it and automatically redial the number. If you set the printer to scan after dialing, then the printer does not automatically redial, even when the phone line is busy. • Set the fax sending speed. • Convert sent faxes into modes that receiving fax machines recognize. Otherwise, such faxes are aborted. • Enable error correction during transmission. Block unwanted incoming faxes. Configuring fax settings using the fax software Before opening the fax software to configure the fax settings, make sure that: • The printer is properly connected to the telephone line. • The printer is turned on and connected to the computer. • The printer is not in Power Saver mode. If the printer is in Power Saver mode, then press to wake up the printer. Using the Printer Setup Wizard in Windows 1 Click or Start. 2 Click All Programs or Programs, and then select the printer program folder from the list. 3 Navigate to: Printer Home > select your printer > Fax tab > Set up the printer to fax 4 Run the Printer Setup Wizard. Make sure you select the correct telephone service and connection. The wizard configures optimal fax settings based on your connection. Note: If you want to configure the advanced fax settings, then click Configure the advanced fax settings in the Fax tab of the Printer Home. This launches the Printer Setup Utility. Using the Printer Settings in Macintosh 1 From the Finder, navigate to: Applications > select your printer folder 2 Double-click Printer Settings. 3 Configure the fax settings using the software. For more information, click Help or to view the help information for the fax software. Faxing 87
-
 1
1 -
2
-
3
-
4
-
5
-
6
-
7
-
8
-
9
-
10
-
11
-
12
-
13
-
14
-
15
-
16
-
17
-
18
-
19
-
20
-
21
-
22
-
23
-
24
-
25
-
26
-
27
-
28
-
29
-
30
-
31
-
32
-
33
-
34
-
35
-
36
-
37
-
38
-
39
-
40
-
41
-
42
-
43
-
44
-
45
-
46
-
47
-
48
-
49
-
50
-
51
-
52
-
53
-
54
-
55
-
56
-
57
-
58
-
59
-
60
-
61
-
62
-
63
-
64
-
65
-
66
-
67
-
68
-
69
-
70
-
71
-
72
-
73
-
74
-
75
-
76
-
77
-
78
-
79
-
80
-
81
-
 82
82 -
 83
83 -
 84
84 -
 85
85 -
 86
86 -
 87
87 -
 88
88 -
 89
89 -
 90
90 -
 91
91 -
 92
92 -
93
-
94
-
95
-
96
-
97
-
98
-
99
-
100
-
101
-
102
-
103
-
104
-
105
-
106
-
107
-
108
-
109
-
110
-
111
-
112
-
113
-
114
-
115
-
116
-
117
-
118
-
119
-
120
-
121
-
122
-
123
-
124
-
125
-
126
-
127
-
128
-
129
-
130
-
131
-
132
-
133
-
134
-
135
-
136
-
137
-
138
-
139
-
140
-
141
-
142
-
143
-
144
-
145
-
146
-
147
-
148
-
149
-
150
-
151
-
152
-
153
-
154
-
155
-
156
-
157
-
158
-
159
-
160
-
161
-
162
-
163
-
164
-
165
-
166
-
167
-
168
-
169
-
170
-
171
-
172
-
173
-
174
-
175
-
176
-
177
-
178
-
179
-
180
-
181
-
182
-
183
-
184
-
185
-
186
-
187
-
188
-
189
-
190
-
191
-
192
-
193
-
194
-
195
-
196
-
197
 |
 |