Lexmark Genesis S815 User Manual - Page 92
Receiving faxes automatically, Faxing FAQ, If I skipped the fax setup initially
 |
View all Lexmark Genesis S815 manuals
Add to My Manuals
Save this manual to your list of manuals |
Page 92 highlights
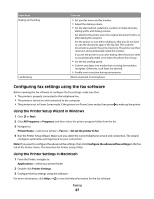
Receiving faxes automatically 1 Make sure that Auto Answer is on: a From the home screen, navigate to: > Fax Setup > Ringing and Answering > Auto Answer b If Auto Answer is not set to On, touch On, and then touch Accept. 2 Set the number of rings before the printer picks up incoming faxes: a Touch Pick Up On. b Set the number of rings, and then touch Accept to save the setting. When the number of rings you set is detected, the printer automatically receives the incoming fax. Warning-Potential Damage: Do not touch the cables or the and ports while receiving a fax. Tips: • If the printer is sharing the line with other analog devices (telephone, answering machine), then set the printer to pick up calls two rings after the answering machine. For example, if the answering machine picks up calls after four rings, then set the printer to pick up after six rings. This way, the answering machine picks up calls first and your voice calls are received. If the call is a fax, then the printer detects the fax signal on the line and takes over the call. If the printer is on a dedicated fax line, then you may set the printer to pick up on any number of rings. • If you have multiple numbers on a single line, or if you subscribe to a distinctive ring service provided by your telephone company, then make sure that you set the correct ring pattern for the printer. Otherwise, the printer will not receive faxes even if you have set it to receive faxes automatically. Receiving faxes manually 1 Make sure that Auto Answer is off: a From the home screen, navigate to: > Fax Setup > Ringing and Answering > Auto Answer b If Auto Answer is not set to Off, touch Off, and then touch Accept. 2 When the telephone rings and you hear fax tones when you pick up the handset, press on the telephone attached to the printer. on the printer or *9* Note: The default code for answering faxes manually is *9*, but for increased security, you can change it to a number that only you know. You can enter up to 7 characters for your code. The valid characters are the digits 0-9 and the characters # and *. Warning-Potential Damage: Do not touch the cables or the and ports while actively receiving a fax. Faxing FAQ If I skipped the fax setup initially, do I need to run the installer again to set up the printer to fax? You do not need to run the installer again. You can set up and configure the printer to fax through the fax software that was installed with the printer software. Faxing 92
-
 1
1 -
2
-
3
-
4
-
5
-
6
-
7
-
8
-
9
-
10
-
11
-
12
-
13
-
14
-
15
-
16
-
17
-
18
-
19
-
20
-
21
-
22
-
23
-
24
-
25
-
26
-
27
-
28
-
29
-
30
-
31
-
32
-
33
-
34
-
35
-
36
-
37
-
38
-
39
-
40
-
41
-
42
-
43
-
44
-
45
-
46
-
47
-
48
-
49
-
50
-
51
-
52
-
53
-
54
-
55
-
56
-
57
-
58
-
59
-
60
-
61
-
62
-
63
-
64
-
65
-
66
-
67
-
68
-
69
-
70
-
71
-
72
-
73
-
74
-
75
-
76
-
77
-
78
-
79
-
80
-
81
-
82
-
83
-
84
-
85
-
86
-
 87
87 -
 88
88 -
 89
89 -
 90
90 -
 91
91 -
 92
92 -
 93
93 -
 94
94 -
 95
95 -
 96
96 -
 97
97 -
98
-
99
-
100
-
101
-
102
-
103
-
104
-
105
-
106
-
107
-
108
-
109
-
110
-
111
-
112
-
113
-
114
-
115
-
116
-
117
-
118
-
119
-
120
-
121
-
122
-
123
-
124
-
125
-
126
-
127
-
128
-
129
-
130
-
131
-
132
-
133
-
134
-
135
-
136
-
137
-
138
-
139
-
140
-
141
-
142
-
143
-
144
-
145
-
146
-
147
-
148
-
149
-
150
-
151
-
152
-
153
-
154
-
155
-
156
-
157
-
158
-
159
-
160
-
161
-
162
-
163
-
164
-
165
-
166
-
167
-
168
-
169
-
170
-
171
-
172
-
173
-
174
-
175
-
176
-
177
-
178
-
179
-
180
-
181
-
182
-
183
-
184
-
185
-
186
-
187
-
188
-
189
-
190
-
191
-
192
-
193
-
194
-
195
-
196
-
197
 |
 |