Lexmark Genesis S815 User Manual - Page 81
Scenario 5: Country- or region-specific setup
 |
View all Lexmark Genesis S815 manuals
Add to My Manuals
Save this manual to your list of manuals |
Page 81 highlights
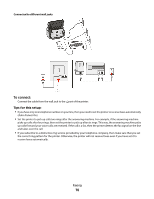
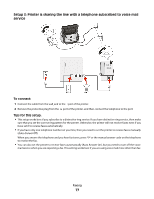
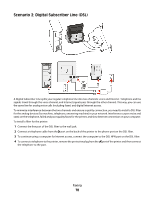
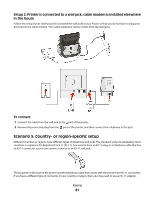
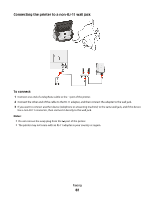
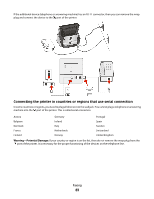
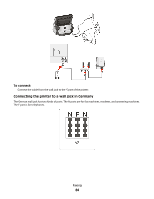
Setup 2: Printer is connected to a wall jack; cable modem is installed elsewhere in the house Follow this setup if your cable provider activated the wall jacks in your house so that you do not have to plug your devices into the cable modem. Your cable telephone service comes from the wall jacks. To connect: 1 Connect the cable from the wall jack to the port of the printer. 2 Remove the protective plug from the port of the printer, and then connect the telephone to the port. Scenario 5: Country- or region-specific setup Different countries or regions have different types of telephone wall jacks. The standard wall jack adopted by most countries or regions is the Registered Jack-11 (RJ-11). You need to have an RJ-11 plug, or a telephone cable that has an RJ-11 connector, so you can connect a device to an RJ-11 wall jack. The fax ports on the back of the printer and the telephone cable that comes with the printer have RJ-11 connectors. If you have a different type of connector in your country or region, then you may need to use an RJ-11 adapter. Faxing 81
-
 1
1 -
2
-
3
-
4
-
5
-
6
-
7
-
8
-
9
-
10
-
11
-
12
-
13
-
14
-
15
-
16
-
17
-
18
-
19
-
20
-
21
-
22
-
23
-
24
-
25
-
26
-
27
-
28
-
29
-
30
-
31
-
32
-
33
-
34
-
35
-
36
-
37
-
38
-
39
-
40
-
41
-
42
-
43
-
44
-
45
-
46
-
47
-
48
-
49
-
50
-
51
-
52
-
53
-
54
-
55
-
56
-
57
-
58
-
59
-
60
-
61
-
62
-
63
-
64
-
65
-
66
-
67
-
68
-
69
-
70
-
71
-
72
-
73
-
74
-
75
-
 76
76 -
 77
77 -
 78
78 -
 79
79 -
 80
80 -
 81
81 -
 82
82 -
 83
83 -
 84
84 -
 85
85 -
 86
86 -
87
-
88
-
89
-
90
-
91
-
92
-
93
-
94
-
95
-
96
-
97
-
98
-
99
-
100
-
101
-
102
-
103
-
104
-
105
-
106
-
107
-
108
-
109
-
110
-
111
-
112
-
113
-
114
-
115
-
116
-
117
-
118
-
119
-
120
-
121
-
122
-
123
-
124
-
125
-
126
-
127
-
128
-
129
-
130
-
131
-
132
-
133
-
134
-
135
-
136
-
137
-
138
-
139
-
140
-
141
-
142
-
143
-
144
-
145
-
146
-
147
-
148
-
149
-
150
-
151
-
152
-
153
-
154
-
155
-
156
-
157
-
158
-
159
-
160
-
161
-
162
-
163
-
164
-
165
-
166
-
167
-
168
-
169
-
170
-
171
-
172
-
173
-
174
-
175
-
176
-
177
-
178
-
179
-
180
-
181
-
182
-
183
-
184
-
185
-
186
-
187
-
188
-
189
-
190
-
191
-
192
-
193
-
194
-
195
-
196
-
197
 |
 |
