Lexmark Genesis S815 User Manual - Page 159
Notes, Software Already Installed, Install a new printer, Change Connection, Start, Enter, ECONNECT
 |
View all Lexmark Genesis S815 manuals
Add to My Manuals
Save this manual to your list of manuals |
Page 159 highlights
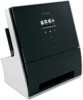
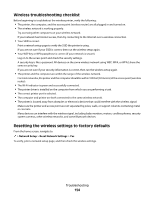
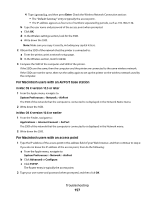
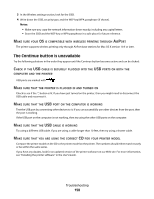
RECONNECT THE POWER SUPPLY 1 Turn off the printer. Note: Make sure the printer is not in Power Saver mode. Press and hold for three seconds to turn off the printer. 2 Pull out the power cord from the power supply. 3 After a minute, reconnect the power cord into the power supply. 4 Turn on the printer. TRY RUNNING THE INSTALLER AGAIN 1 Close the installer. 2 Remove the CD, and then restart the computer. 3 Insert the installation software CD and then run the installer again. Notes: • When you get to the Software Already Installed screen, make sure you select Install a new printer. • If you have already set up your printer, then select Change Connection to skip the hardware setup wizard. CHECK THAT YOUR COMPUTER IS ABLE TO ACKNOWLEDGE USB ACTIVITY ON THE USB PORT Open the Device Manager to check if it has activity whenever a USB device is connected to a USB port: 1 Click , or click Start and then click Run. 2 In the Start Search or Run box, type devmgmt.msc. 3 Press Enter, or click OK. Troubleshooting 159
-
 1
1 -
2
-
3
-
4
-
5
-
6
-
7
-
8
-
9
-
10
-
11
-
12
-
13
-
14
-
15
-
16
-
17
-
18
-
19
-
20
-
21
-
22
-
23
-
24
-
25
-
26
-
27
-
28
-
29
-
30
-
31
-
32
-
33
-
34
-
35
-
36
-
37
-
38
-
39
-
40
-
41
-
42
-
43
-
44
-
45
-
46
-
47
-
48
-
49
-
50
-
51
-
52
-
53
-
54
-
55
-
56
-
57
-
58
-
59
-
60
-
61
-
62
-
63
-
64
-
65
-
66
-
67
-
68
-
69
-
70
-
71
-
72
-
73
-
74
-
75
-
76
-
77
-
78
-
79
-
80
-
81
-
82
-
83
-
84
-
85
-
86
-
87
-
88
-
89
-
90
-
91
-
92
-
93
-
94
-
95
-
96
-
97
-
98
-
99
-
100
-
101
-
102
-
103
-
104
-
105
-
106
-
107
-
108
-
109
-
110
-
111
-
112
-
113
-
114
-
115
-
116
-
117
-
118
-
119
-
120
-
121
-
122
-
123
-
124
-
125
-
126
-
127
-
128
-
129
-
130
-
131
-
132
-
133
-
134
-
135
-
136
-
137
-
138
-
139
-
140
-
141
-
142
-
143
-
144
-
145
-
146
-
147
-
148
-
149
-
150
-
151
-
152
-
153
-
 154
154 -
 155
155 -
 156
156 -
 157
157 -
 158
158 -
 159
159 -
 160
160 -
 161
161 -
 162
162 -
 163
163 -
 164
164 -
165
-
166
-
167
-
168
-
169
-
170
-
171
-
172
-
173
-
174
-
175
-
176
-
177
-
178
-
179
-
180
-
181
-
182
-
183
-
184
-
185
-
186
-
187
-
188
-
189
-
190
-
191
-
192
-
193
-
194
-
195
-
196
-
197
 |
 |