Lexmark Pro5500t User's Guide - Page 47
Managing print jobs, Finding the print queue for your printer
 |
View all Lexmark Pro5500t manuals
Add to My Manuals
Save this manual to your list of manuals |
Page 47 highlights
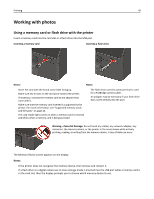
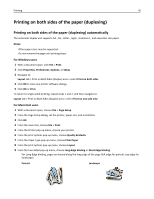
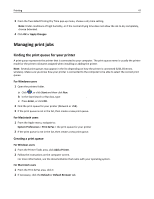
Printing 47 3 From the Two‑Sided Printing Dry Time pop‑up menu, choose a dry time setting. Note: Under conditions of high humidity, or if the normal drying time does not allow the ink to dry completely, choose Extended. 4 Click OK or Apply Changes. Managing print jobs Finding the print queue for your printer A print queue represents the printer that is connected to your computer. The print queue name is usually the printer model or the printer nickname assigned when installing or adding the printer. Note: Several print queues may appear in the list depending on how the printer is connected (USB, Ethernet, wireless). Make sure you know how your printer is connected to the computer to be able to select the correct print queue. For Windows users 1 Open the printers folder. a Click , or click Start and then click Run. b In the Start Search or Run box, type control printers. c Press Enter, or click OK. 2 Find the print queue for your printer (Network or USB). 3 If the print queue is not in the list, then create a new print queue. For Macintosh users 1 From the Apple menu, navigate to: System Preferences > Print & Fax > the print queue for your printer 2 If the print queue is not in the list, then create a new print queue. Creating a print queue For Windows users 1 From the Printer Tasks area, click Add a Printer. 2 Follow the instructions on the computer screen. For more information, see the documentation that came with your operating system. For Macintosh users 1 From the Print & Fax area, click +. 2 If necessary, click the Default or Default Browser tab.
-
 1
1 -
2
-
3
-
4
-
5
-
6
-
7
-
8
-
9
-
10
-
11
-
12
-
13
-
14
-
15
-
16
-
17
-
18
-
19
-
20
-
21
-
22
-
23
-
24
-
25
-
26
-
27
-
28
-
29
-
30
-
31
-
32
-
33
-
34
-
35
-
36
-
37
-
38
-
39
-
40
-
41
-
 42
42 -
 43
43 -
 44
44 -
 45
45 -
 46
46 -
 47
47 -
 48
48 -
 49
49 -
 50
50 -
 51
51 -
 52
52 -
53
-
54
-
55
-
56
-
57
-
58
-
59
-
60
-
61
-
62
-
63
-
64
-
65
-
66
-
67
-
68
-
69
-
70
-
71
-
72
-
73
-
74
-
75
-
76
-
77
-
78
-
79
-
80
-
81
-
82
-
83
-
84
-
85
-
86
-
87
-
88
-
89
-
90
-
91
-
92
-
93
-
94
-
95
-
96
-
97
-
98
-
99
-
100
-
101
-
102
-
103
-
104
-
105
-
106
-
107
-
108
-
109
-
110
-
111
-
112
-
113
-
114
-
115
-
116
-
117
-
118
-
119
-
120
-
121
-
122
-
123
-
124
-
125
-
126
-
127
-
128
-
129
-
130
-
131
-
132
-
133
-
134
-
135
-
136
-
137
-
138
-
139
-
140
-
141
-
142
-
143
-
144
-
145
-
146
-
147
-
148
-
149
-
150
-
151
-
152
-
153
-
154
-
155
-
156
-
157
-
158
-
159
-
160
-
161
-
162
-
163
-
164
-
165
-
166
-
167
-
168
-
169
-
170
-
171
-
172
-
173
-
174
-
175
-
176
-
177
-
178
-
179
-
180
-
181
-
182
-
183
-
184
-
185
-
186
-
187
-
188
-
189
 |
 |