Lexmark X652DE Common Criteria Installation Supplement and Administrator Guide - Page 11
Step 2: Creating accounts
 |
UPC - 734646093835
View all Lexmark X652DE manuals
Add to My Manuals
Save this manual to your list of manuals |
Page 11 highlights
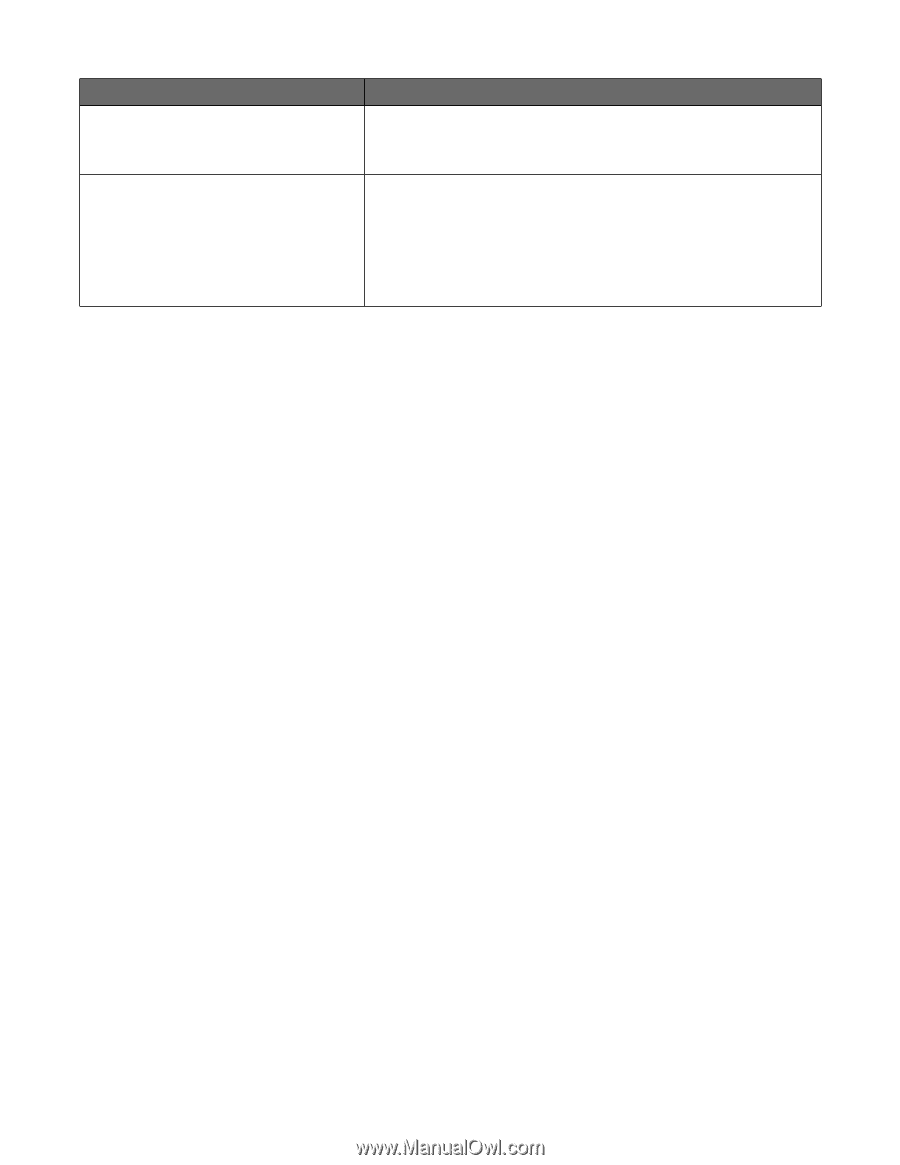
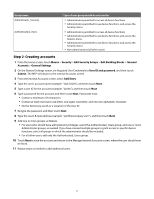
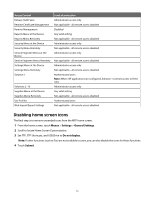
Group name Administrator_Security Authenticated_Users Type of user group would be selected for • Administrators permitted to access all device functions • Administrators permitted to use device functions, and access the Security menu • Administrators permitted to access all device functions • Administrators permitted to use device functions, and access the Reports menu • Administrators permitted to use device functions, and access the Security menu • Non-administrators (all other users) Step 2: Creating accounts 1 From the home screen, touch Menus > Security > Edit Security Setups > Edit Building Blocks > Internal Accounts > General Settings. 2 On the General Settings screen, set Required User Credentials to User ID and password, and then touch Submit. The MFP will return to the Internal Accounts screen. 3 From the Internal Accounts screen, select Add Entry. 4 Type the user's account name (example: "Jack Smith"), and then touch Next. 5 Type a user ID for the account (example: "jsmith"), and then touch Next. 6 Type a password for the account, and then touch Next. Passwords must: • Contain a minimum of 8 characters. • Contain at least one lower case letter, one upper case letter, and one non-alphabetic character. • Not be dictionary words or a variation of the User ID. 7 Re-type the password, and then touch Next. 8 Type the user's E-mail address (example: "[email protected]"), and then touch Next. 9 Add one or more groups, as follows: • For users who should have administrator privileges, select the Authenticated_Users group, and one or more Administrator groups, as needed. If you have created multiple groups to grant access to specific device functions, select all groups in which the administrator should be included. • For all other users, add only the Authenticated_Users group. 10 Touch Next to save the account and return to the Manage Internal Accounts screen, where the user should now be listed. 11 Repeat steps as needed to add additional users. 11
-
 1
1 -
2
-
3
-
4
-
5
-
 6
6 -
 7
7 -
 8
8 -
 9
9 -
 10
10 -
 11
11 -
 12
12 -
 13
13 -
 14
14 -
 15
15 -
 16
16 -
17
-
18
-
19
-
20
-
21
-
22
-
23
-
24
-
25
-
26
-
27
-
28
-
29
-
30
-
31
-
32
-
33
-
34
-
35
-
36
-
37
-
38
-
39
-
40
-
41
-
42
-
43
-
44
-
45
-
46
-
47
-
48
-
49
-
50
-
51
-
52
-
53
-
54
-
55
-
56
-
57
-
58
 |
 |