Lexmark X652DE Common Criteria Installation Supplement and Administrator Guide - Page 15
Administering the device
 |
UPC - 734646093835
View all Lexmark X652DE manuals
Add to My Manuals
Save this manual to your list of manuals |
Page 15 highlights
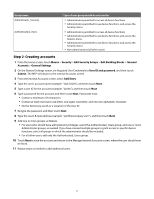
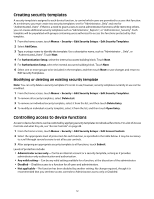
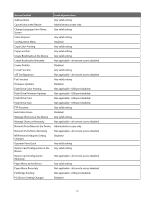
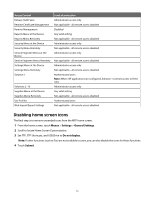
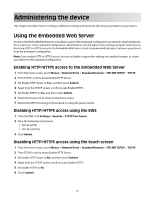
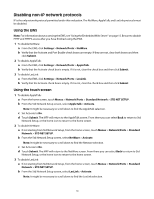
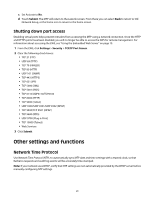
Administering the device This chapter describes how to configure additional settings and functions that may be available on your device. Using the Embedded Web Server Access to the Embedded Web Server is disabled as part of the evaluated configuration on network-attached devices. Once a device is in the evaluated configuration, administrators can still adjust many settings using the touch screen. Restoring HTTP or HTTPS access to the Embedded Web Server is not recommended, because it removes your device from the evaluated configuration. Note: If you enable HTTP or HTTPS access, be sure to disable it again after making any needed changes, to return your device to the evaluated configuration. Enabling HTTP/HTTPS access to the Embedded Web Server 1 From the home screen, touch Menus > Network/Ports > Standard Network > STD NET SETUP > TCP/IP. 2 From TCP/IP, scroll to locate Enable HTTP Server. 3 Set Enable HTTP Server to Yes, and then touch Submit. 4 Again from the TCP/IP screen, scroll to locate Enable HTTPS. 5 Set Enable HTTPS to Yes, and then touch Submit. 6 Touch the home icon to return to the home screen. 7 Reboot the MFP by turning it off and back on using the power switch. Disabling HTTP/HTTPS access using the EWS 1 From the EWS, click Settings > Security > TCP/IP Port Access. 2 Clear the following check boxes: • TCP 80 (HTTP) • TCP 443 (HTTPS) 3 Click Submit. Disabling HTTP/HTTPS access using the touch screen 1 From the home screen, touch Menus > Network/Ports > Standard Network > STD NET SETUP > TCP/IP. 2 From TCP/IP, scroll to locate Enable HTTP Server. 3 Set Enable HTTP Server to No, and then touch Submit. 4 Again from the TCP/IP screen, scroll to locate Enable HTTPS. 5 Set Enable HTTPS to No. 6 Touch Submit. 15
-
 1
1 -
2
-
3
-
4
-
5
-
6
-
7
-
8
-
9
-
 10
10 -
 11
11 -
 12
12 -
 13
13 -
 14
14 -
 15
15 -
 16
16 -
 17
17 -
 18
18 -
 19
19 -
 20
20 -
21
-
22
-
23
-
24
-
25
-
26
-
27
-
28
-
29
-
30
-
31
-
32
-
33
-
34
-
35
-
36
-
37
-
38
-
39
-
40
-
41
-
42
-
43
-
44
-
45
-
46
-
47
-
48
-
49
-
50
-
51
-
52
-
53
-
54
-
55
-
56
-
57
-
58
 |
 |