Lexmark X652DE Common Criteria Installation Supplement and Administrator Guide - Page 32
Configuring Common Access Card access
 |
UPC - 734646093835
View all Lexmark X652DE manuals
Add to My Manuals
Save this manual to your list of manuals |
Page 32 highlights
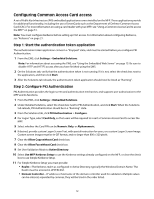
Configuring Common Access Card access A set of Public Key Infrastructure (PKI) embedded applications comes installed on the MFP. These applications provide for additional functionality, including the use of SmartCards such as the Department of Defense Common Access Card (CAC). For more information on using a card reader with your MFP, see "Using a Common Access Card to access the MFP" on page 51. Note: You must configure Kerberos before setting up CAC access. For information about configuring Kerberos, see "Kerberos" on page 21. Step 1: Start the authentication token application The authentication token application comes in a "Stopped" state, and must be started before you configure PKI Authentication. 1 From the EWS, click Settings > Embedded Solutions. Note: For information about accessing the EWS, see "Using the Embedded Web Server" on page 15. Be sure to disable HTTP and HTTPS access after you have finished using the EWS. 2 On the Solutions tab, verify that the authentication token is not running. If it is not, select the check box next to the application, and then click Start. 3 After the Solutions tab reloads, the authentication token application should now be listed as "Running". Step 2: Configure PKI Authentication PKI Authentication provides the login screen and authentication mechanism, and supports user authorization to the MFP and its functions. 1 From the EWS, click Settings > Embedded Solutions. 2 Under Installed Solutions, select the check box next to PKI Authentication, and click Start. When the Solutions tab reloads, PKI Authentication should be in a "Running" state. 3 From the Solutions tab, click PKI Authentication > Configure. 4 For Logon Type, select Card Only, so that users will be required to insert a Common Access Card to access the MFP. 5 Select whether the Card PIN can be Numeric Only, or Alphanumeric. 6 If desired, provide custom Logon Screen Text, with special instruction for users, or a custom Logon Screen Image. Custom screen images must be in GIF format, and no larger than 800 x 320 pixels. 7 Clear the Allow Copy without Card check box. 8 Clear the Allow Fax without Card check box. 9 Set User Validation Mode to Active Directory. 10 Select Use MFP Kerberos Setup to use the Kerberos settings already configured on the MFP, or clear the check box to use Simple Kerberos Setup. 11 For Simple Kerberos Setup you must provide: • Realm-The Kerberos realm as configured in Active Directory; typically the Windows Domain Name. The Realm must be entered in UPPERCASE. • Domain Controller-IP address or hostname of the domain controller used for validation. Multiple values can be entered, separated by commas; they will be tried in the order listed. 32
-
 1
1 -
2
-
3
-
4
-
5
-
6
-
7
-
8
-
9
-
10
-
11
-
12
-
13
-
14
-
15
-
16
-
17
-
18
-
19
-
20
-
21
-
22
-
23
-
24
-
25
-
26
-
 27
27 -
 28
28 -
 29
29 -
 30
30 -
 31
31 -
 32
32 -
 33
33 -
 34
34 -
 35
35 -
 36
36 -
 37
37 -
38
-
39
-
40
-
41
-
42
-
43
-
44
-
45
-
46
-
47
-
48
-
49
-
50
-
51
-
52
-
53
-
54
-
55
-
56
-
57
-
58
 |
 |