Lexmark X652DE Common Criteria Installation Supplement and Administrator Guide - Page 27
User access - hard reset
 |
UPC - 734646093835
View all Lexmark X652DE manuals
Add to My Manuals
Save this manual to your list of manuals |
Page 27 highlights
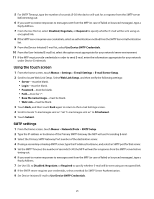
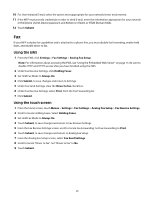
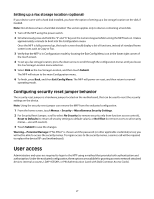
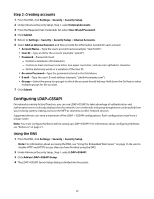
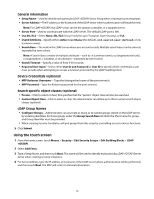
Setting up a fax storage location (optional) If your device came with a hard disk installed, you have the option of setting up a fax storage location on the disk, if needed. Note: Not all devices have a hard disk installed. This section applies only to devices containing a hard disk. 1 Turn off the MFP using the power switch. 2 Simultaneously press and hold the "2" and "6" keys on the numeric keypad while turning the MFP back on. It takes approximately a minute to boot into the Configuration menu. Once the MFP is fully powered up, the touch screen should display a list of functions, instead of standard home screen icons such as Copy or Fax. 3 Verify that the MFP is in Configuration mode by locating the Exit Config Menu icon in the lower right corner of the touch screen. 4 To set up a fax storage location, press the down arrow to scroll through the configuration menus until you locate the Fax Storage Location menu selection. 5 Select Disk as the Fax Storage Location, and then touch Submit. The MFP will return to the main Configuration menu. 6 To finish, press Back, and then Exit Config Menu. The MFP will power-on reset, and then return to normal operating mode. Configuring security reset jumper behavior The security reset jumper is a hardware jumper located on the motherboard, that can be used to reset the security settings on the device. Note: Using the security reset jumper can remove the MFP from the evaluated configuration. 1 From the home screen, touch Menus > Security > Miscellaneous Security Settings. 2 For Security Reset Jumper, scroll to select No Security (to remove security only from function access controls), Reset to Defaults (to return all security settings to default values), or No Effect (to remove access to all security menus-use with caution). 3 Touch Submit to save the changes. Warning-Potential Damage: If "No Effect" is chosen and the password (or other applicable credential) is lost, you will not be able to access the security menus. To regain access to the security menus, a service call will be required to replace the device RIP card (motherboard). User access Administrators and users are required to login to the MFP using a method that provides both authentication and authorization. Under the evaluated configuration, three options are available for granting access to network-attached devices: internal accounts, LDAP+GSSAPI, or PKI Authentication (used with DoD Common Access Cards). 27
-
 1
1 -
2
-
3
-
4
-
5
-
6
-
7
-
8
-
9
-
10
-
11
-
12
-
13
-
14
-
15
-
16
-
17
-
18
-
19
-
20
-
21
-
 22
22 -
 23
23 -
 24
24 -
 25
25 -
 26
26 -
 27
27 -
 28
28 -
 29
29 -
 30
30 -
 31
31 -
 32
32 -
33
-
34
-
35
-
36
-
37
-
38
-
39
-
40
-
41
-
42
-
43
-
44
-
45
-
46
-
47
-
48
-
49
-
50
-
51
-
52
-
53
-
54
-
55
-
56
-
57
-
58
 |
 |