Lexmark X652DE Common Criteria Installation Supplement and Administrator Guide - Page 20
Other settings and functions - service manual
 |
UPC - 734646093835
View all Lexmark X652DE manuals
Add to My Manuals
Save this manual to your list of manuals |
Page 20 highlights
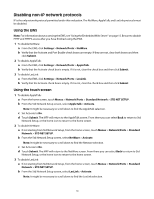
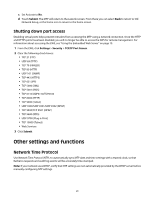
c Set Activate to No. d Touch Submit. The MFP will return to the LexLink screen. From there you can select Back to return to Std Network Setup, or the home icon to return to the home screen. Shutting down port access Disabling virtual ports helps prevent intruders from accessing the MFP using a network connection. Once the HTTP and HTTPS ports have been disabled, you will no longer be able to access the EWS for remote management. For information about accessing the EWS, see "Using the Embedded Web Server" on page 15. 1 From the EWS, click Settings > Security > TCP/IP Port Access. 2 Clear the following check boxes: • TCP 21 (FTP) • UDP 69 (TFTP) • TCP 79 (FINGER) • TCP 80 (HTTP) • UDP 161 (SNMP) • TCP 443 (HTTPS) • TCP 631 (IPP) • TCP 5000 (XML) • TCP 5001 (IPDS) • TCP 6110/UDP6110/TCP6100 • TCP 8000 (HTTP) • TCP 9000 (Telnet) • UDP 9300/UDP 9301/UDP 9302 (NPAP) • TCP 9500/TCP 9501 (NPAP) • TCP 9600 (IPDS) • UDP 9700 (Plug-n-Print) • TCP 10000 (Telnet) • Web Services 3 Click Submit. Other settings and functions Network Time Protocol Use Network Time Protocol (NTP), to automatically sync MFP date and time settings with a trusted clock, so that Kerberos requests and audit log events will be accurately time-stamped. Note: If your network uses DHCP, verify that NTP settings are not automatically provided by the DHCP server before manually configuring NTP settings. 20
-
 1
1 -
2
-
3
-
4
-
5
-
6
-
7
-
8
-
9
-
10
-
11
-
12
-
13
-
14
-
 15
15 -
 16
16 -
 17
17 -
 18
18 -
 19
19 -
 20
20 -
 21
21 -
 22
22 -
 23
23 -
 24
24 -
 25
25 -
26
-
27
-
28
-
29
-
30
-
31
-
32
-
33
-
34
-
35
-
36
-
37
-
38
-
39
-
40
-
41
-
42
-
43
-
44
-
45
-
46
-
47
-
48
-
49
-
50
-
51
-
52
-
53
-
54
-
55
-
56
-
57
-
58
 |
 |