Linksys WMLS11B User Guide - Page 35
Using the LCD Menus of the Wireless-B Media Link for Music - radio list update
 |
UPC - 745883559282
View all Linksys WMLS11B manuals
Add to My Manuals
Save this manual to your list of manuals |
Page 35 highlights
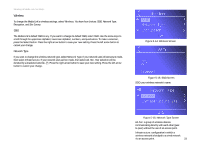
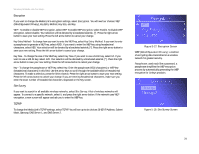
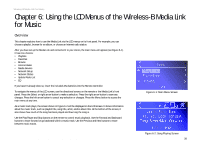
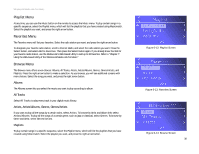
Wireless-B Media Link for Music Chapter 6: Using the LCD Menus of the Wireless-B Media Link for Music Overview This chapter explains how to use the Media Link via the LCD menus on its front panel. For example, you can choose a playlist, browse for an album, or choose an Internet radio station. After you have set up the Media Link and connected it to your stereo, the main menu will appear (see Figure 6-1). It has nine choices: • Playlists • Favorites • Browse • Internet Radio • Media Servers • Network Setup • Network Status • Update Radio List • EQ If you haven't already done so, insert the included AAA batteries into the Remote Controller. To navigate the menus of the LCD screen, use the directional arrows on the remote or the Media Link's front panel. Press the Select or right arrow button to make a selection. Press the right arrow button to save any changes. Press the left arrow button to cancel any selection or changes. Press the Menu button to access the main menu at any time. As a music track plays, the screen shown in Figure 6-2 will be displayed on the LCD screen. It shows information about the music track, such as playlist title, song title, artist, and/or album title. At the bottom of the screen, it also shows how much of the song has been played and how long the song is. Use the Play/Pause and Stop buttons on the remote to control music playback. Use the Forward and Backward buttons to move forward or go backward within a music track. Use the Previous and Next buttons to move between music tracks. Figure 6-1: Main Menu Screen Chapter 6: Using the LCD Menus of the Wireless-B Media Link for Music Overview Figure 6-2: Song Playing Screen 28
-
 1
1 -
2
-
3
-
4
-
5
-
6
-
7
-
8
-
9
-
10
-
11
-
12
-
13
-
14
-
15
-
16
-
17
-
18
-
19
-
20
-
21
-
22
-
23
-
24
-
25
-
26
-
27
-
28
-
29
-
 30
30 -
 31
31 -
 32
32 -
 33
33 -
 34
34 -
 35
35 -
 36
36 -
 37
37 -
 38
38 -
 39
39 -
 40
40 -
41
-
42
-
43
-
44
-
45
-
46
-
47
-
48
-
49
-
50
-
51
-
52
-
53
-
54
-
55
-
56
-
57
-
58
-
59
-
60
-
61
-
62
-
63
-
64
-
65
-
66
-
67
-
68
 |
 |
