Maytag MGDZ400TQ Use and Care Guide - Page 18
I.int Screen. - manual
 |
UPC - 883049064963
View all Maytag MGDZ400TQ manuals
Add to My Manuals
Save this manual to your list of manuals |
Page 18 highlights
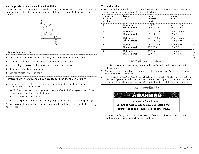
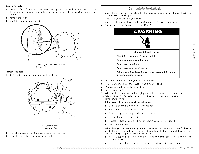
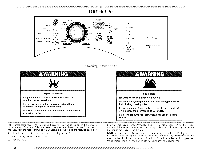
POWER DELICATE DAMP COOL DOWN WDERTY 1 WRINKLE PREVENT 0 CONTROL MOll _OtM_L NORMAl,, WRINKLE CONTROLS LOCKED ;_i CLEAN LINT SCREEN !!_!! 0 DRYNESS LEVEL TOWEL£COTTON/_ START _Juft CANCEL PAUSEo HIGH REGULAR MEDIUM LOW EXTRA LOW AIR FLUFF © O WPRREINVKELNET t,,_I( I.II" I.FI"_/I)I / Explosion Hazard Keep flammable materials and vapors, such as gasoline, away from dryer. Do not dry anything that has ever had anything flammable on it (even after washing). Failure to follow these instructions explosion, or fire. can result in death, Fire Hazard No washer can completely remove oil. Do not dry anything that has ever had any type of oil on it (including cooking oils). Items containing foam, rubber, or plastic must be dried on a clothesline or by using an Air Cycle. Failure to follow these instructions or fire. can result in death Follow these basic steps to start your dryer. Please refer to specific sections of this manual for more detailed information. This information covers several different models. Your dryer may vary from the model shown and may not have all the cycles and features described. 1. Clean lint screen before each load. See "Cleaning the I.int Screen." 2. Place laundry in dryer and shut door. 3. Press POWER. 18 4_ Select a Sensor Dry or Timed Dry Cycle. The preset setti%s for Sensor Dry or Timed Dry Cycles will illuminate. The estimated (Sensor Dry cycle) or actual (Timed Dry) cycle time (in minutes) will show in the display. NOTE: A default time is displayed when an automatic cycle is selected. Durin# the first few minutes of the dryi% process, the cycle time may automatically vary from the default time based on the size and fabric type of the load. toward the end of the dryin8 process, the estimated time display will adjust asain, showin# the final dryi% time.
-
 1
1 -
2
-
3
-
4
-
5
-
6
-
7
-
8
-
9
-
10
-
11
-
12
-
 13
13 -
 14
14 -
 15
15 -
 16
16 -
 17
17 -
 18
18 -
 19
19 -
 20
20 -
 21
21 -
 22
22 -
 23
23 -
24
-
25
-
26
-
27
-
28
-
29
-
30
-
31
-
32
-
33
-
34
-
35
-
36
-
37
-
38
-
39
-
40
-
41
-
42
-
43
-
44
-
45
-
46
-
47
-
48
-
49
-
50
-
51
-
52
-
53
-
54
-
55
-
56
-
57
-
58
-
59
-
60
-
61
-
62
-
63
-
64
-
65
-
66
-
67
-
68
-
69
-
70
-
71
-
72
-
73
-
74
-
75
-
76
-
77
-
78
-
79
-
80
-
81
-
82
-
83
-
84
 |
 |
